Tunisian Crochet Smock Stitch Tutorial
Learn how to crochet the smock stitch! This page includes the full Tunisian crochet smock stitch written instructions, plus photos and video!

Tunisian crochet is a wonderful technique for creating all kinds of fabrics from lace to very thick and or amazingly textured fabrics. This technique combines crochet and knitting to create a fabric that looks woven and or knitted.
A long crochet hook or a crochet hook with a cord is used to pick up loops, first in a forward pass and then work the loops off of the hook in a return pass. This version of crochet can be very meditative and relaxing as well as a wonderful way to have the coveted knitted looking fabric that can be difficult for crocheters to achieve.
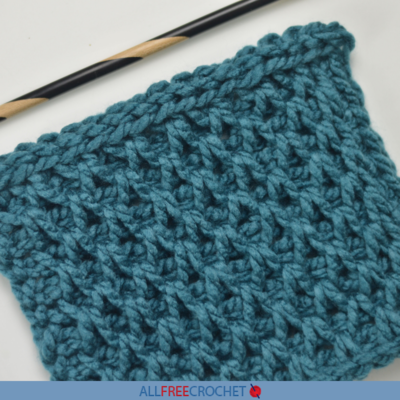
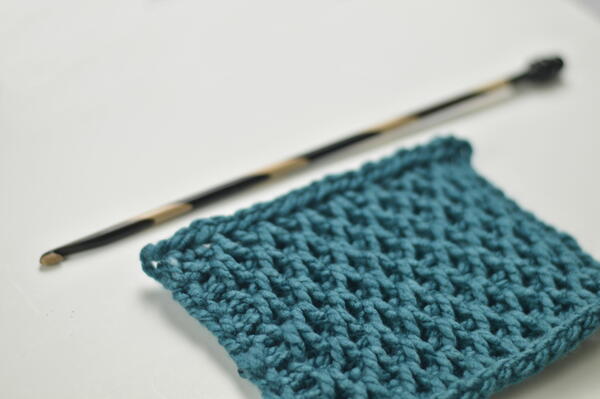
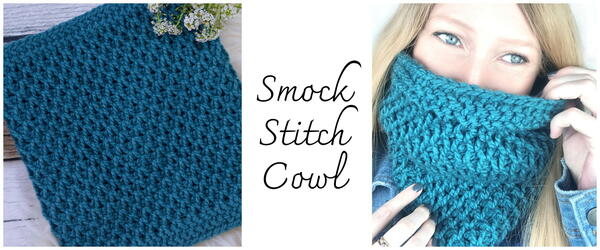
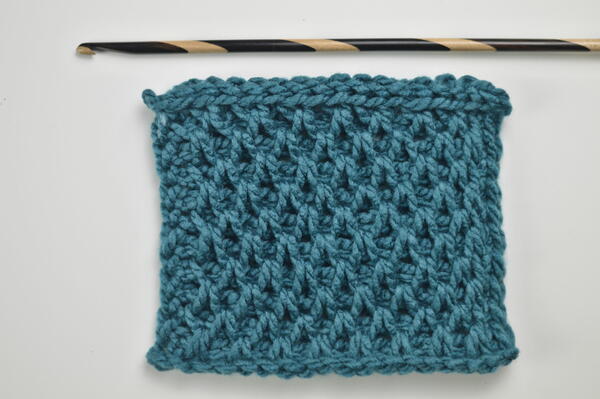
The Tunisian Crochet Smock Stitch aka the Honeycomb Stitch #2 (learn how to crochet the Tunisian honeycomb stitch here) is a wonderful stitch that creates a beautiful, thick texture that is perfect for winter accessories, garments, and blankets. The texture created with this stitch resembles diamonds nestled together in a sea of dazzling beauty. The effect of this stitch can be subtle or dramatic depending on the weight of yarn that is used.
This stitch is an advanced stitch but can be learned quite easily after some practice of the base stitches that are used to create the smock stitch. The two stitches that make up the smock stitch are the Tunisian simple stitch and the Tunisian simple stitch decrease.
Together, with a special yarn under, these stitches create the complicated looking smock stitch. Below is a photo tutorial for the Smock Stitch and if needed, there is a YouTube smock stitch video tutorial linked below, as well.
Resources:
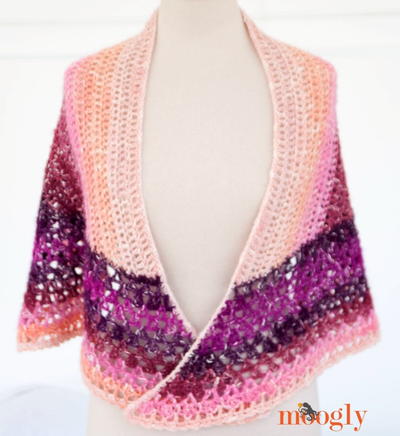
PLUS! Tunisian Smock Stitch Cowl Pattern
You must see the partner pattern for this tutorial: The Tunisian Smock Stitch Cowl. It is a perfect beginner project for those that are looking to put their smock stitch practice into use. This cowl is worked flat and with the Charisma by Loops and Threads yarn or other alternate chunky yarn, it works up quickly and it is super squishy, cozy, and warm!
The texture is beautiful and very dramatic. It’s a perfect accessory for this winter. I love pairing mine with either a flannel shirt or my denim jacket, but it also works and looks very cute with a larger coat too. Since this cowl works up so quickly, it’s a perfect make to gift for the holidays as well!
Smock Stitch Materials Needed:
Size K 6.5 mm Furls 12” Tunisian Crochet Hook
Charisma Loops and Threads Bulky 5 Weight Yarn
Abbreviations:
ch: chain
yu: yarn under
yo: yarn over
tks: Tunisian knit stitch
tss: Tunisian simple stitch
tss2tog: Tunisian simple stitch decrease (see video tutorial here)
st(s): stitch(es)
How to Crochet the Tunisian Crochet Smock Stitch
Follow along with these Tunisian crochet smock stitch written instructions to create your own swatch.
Chain a multiple of 2.
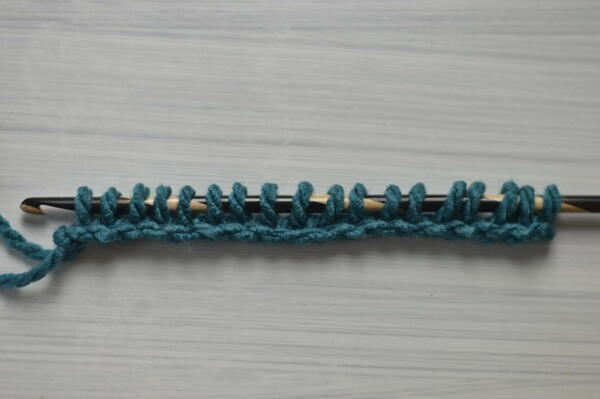
R1: Forward Pass: ch 18, starting in the 2nd ch from the hook, pick up a loop in each ch across. =18
Return Pass: yo and pull through 1 loop on the hook, *yo and pull through 2 loops on the hook. Repeat from the * across until 1 loop remains on the hook.
R2: Forward Pass: tks, *tss2tog, yu and hold the loop made to the side. Repeat from the * across until 1 st remains. tks into the last st. =18
Return Pass: yo and pull through 1 loop on the hook, *yo and pull through 2 loops on the hook. Repeat from the * across until 1 loop remains on the hook.
R3: Forward Pass: tks, tss into the next st, *tss2tog, yu and hold the loop made to the side. Repeat from the * across until 2 sts remain. tss into the next st, tks into the last st. =18
Return Pass: yo and pull through 1 loop on the hook, *yo and pull through 2 loops on the hook. Repeat from the * across until 1 loop remains on the hook.
Repeat R2 and R3 until the desired length and then bind off however you would like.
Smock Stitch Photo Tutorial
Row 1: Forward Pass:
- Chain 18,

- starting in the 2nd chain from the hook, pick up a loop in each chain across. (Make sure that the loops are not tight on the hook.) =18 loops
Return Pass:
- Yarn over (image 1) and pull through 1 loop on the hook (image 2),

- *yarn over (image 1) and pull through 2 loops on the hook. (image 2)

- Repeat Step 4 until 1 loop remains on the hook.

Row 2: Forward Pass:
- tks, (the loop on the hook counts as a tks, here and throughout the stitch pattern)

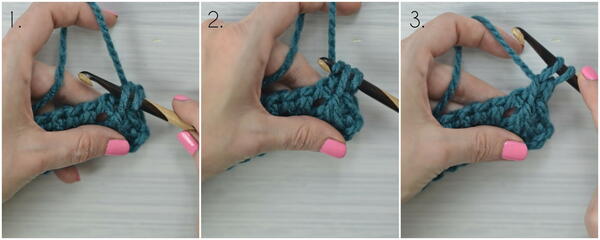
- *tss2tog by inserting the hook behind the front vertical bars of the next 2 stitches (image 1), yarn over (image 2), and draw through the loops on the hook to pull up a loop and remember to pull up on the loop so that it is not too tight on the hook. (image 3)

- Yarn under by bringing the working yarn to the front of the hook (image 1), and hold the loop made to the side. (image 2)
This creates an increase to make up for the decrease that was made in Step 7 so that the stitch count will remain the same.

- Repeat Step 7 and Step 8 until 1 stitch remains.

- Tks into the last stitch by inserting the hook into the last 2 vertical bars at the end of the row (image 2), yarn over and pull up a loop. (image 3) =18 loops


Return Pass:
- Repeat Step 3 and Step 4 until 1 loop remains on the hook.

Row 3: Forward Pass:
- Tks (the loop on the hook),
- tss into the next stitch by inserting the hook behind the front vertical bar of the next stitch (image 1), yarn over (image 2) and pull up a loop. (image 3)
- *Tss2tog by inserting the hook behind the front vertical bars of the next 2 stitches (image 1), yarn over (image 2), and draw through the loops on the hook to pull up a loop. (image 3)

- Yarn under by bringing the working yarn to the front of the hook, and hold the loop made to the side.

- Repeat Step 14 and Step 15 until 2 stitches remain.

- Tss into the next stitch,

- Tks into the last stitch. =18 loops


Return Pass:
- Repeat Step 3 and Step 4 until 1 loop remains on the hook.
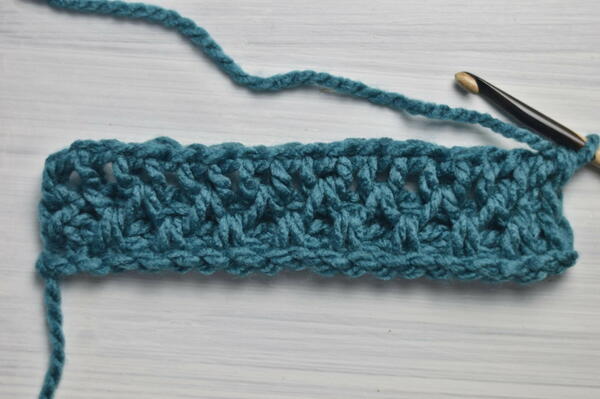
- Repeat Row 2 (Steps 6–11) and Row 3 (Steps 12–19) until the desired length and then bind off.
The end!

About the Author

Alexandra Halsey is a stay at home mommy who loves sharing her crochet designs and teaching others how to crochet, cook, and be creative through her blogs and video tutorials.
Visit her YouTube channel and her blog, With Alex, to learn more. Visit her designer profile on AllFreeCrochet to see everything she has shared with us, too!
Links:
With Alex Website
With Alex Blog
YouTube Channel
Facebook
Instagram
Pinterest