How to Read Crochet Patterns
Learn how to read crochet instructions with this how-to guide!
Learning to crochet practically means learning another language- or at least that's what it may seem like at first. Don't worry! Our guide, How to Read Crochet Patterns, will help you master this new language! Reading crochet patterns is done from left to right, just like you're reading a book, which is a helpful thing to remember at the start.
I am here to help you understand how to read crochet patterns, no matter if you are a beginner crocheter that is just starting out or if you're more advanced and looking for a refresher.
Crochet patterns usually have a few things in common. Most of them start out with a foundation chain where other stitches are worked from later. However, there are a few patterns that start out with a chainless foundation, which creates your stitches and your chain at the same time and completes the first row.
Before You Start...
Check out these video tutorials for both How to Crochet Basics for the Absolute Beginner (right below) and How to Crochet a Chainless Foundation to better understand these beginner techniques.
Crochet Terms and Abbreviations
The key to understanding crochet patterns is knowing how to read the crochet language. These crochet abbreviations are actually the stitches that the pattern uses in shorthand because it could take pages and pages to write out all of the words in full. Most of the time, the pattern you are working with will have an indication of what stitches they are using by including their own chart of abbreviations.
Below, you will find a table of common terms that are used in crochet instructions for US patterns, just in case you find yourself reading a crochet pattern that is without its own specific abbreviation guide.
Reading patterns between the UK and the US is also a completely different story, so make sure you know what abbreviations you're following before you start. If you need help with those translations, go to our Crochet Symbols and Directions Chart.
You will find these abbreviations as well as a diagram explaining how each stitch is used in both types of patterns. Once you understand these abbreviations, you'll be able to know how to read a crochet pattern.
Feel free to pin or print out this Common Crochet Abbreviations Chart to keep it handy and always know how to read a crochet pattern!

How to Read a Crochet Pattern
Let's start with the basics: What is a crochet pattern? It's a guide with a set of instructions, materials, and more that will have everything you need to know in order to make a specific crochet pattern.
Here, we'll go over the common qualities of reading crochet patterns to fully understand them. Even though people and companies write their instructions differently, that doesn't mean you can't break it down to the basics of how to read a crochet pattern. You can at least count on these things to be there for you.
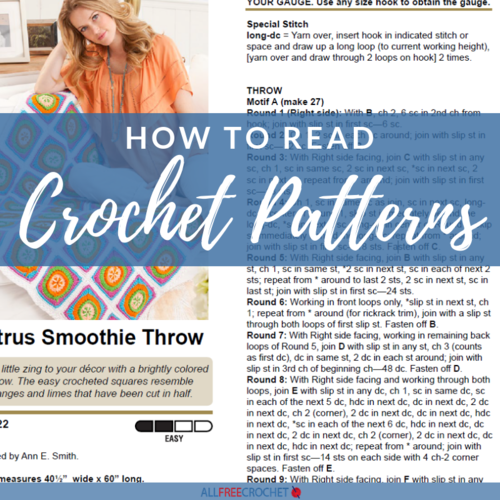
To best explain this, we will use Red Heart's Citrus Smoothie Throw PDF instructions. This has nearly every aspect of a crochet pattern you'll run into.
Click on the image to download a larger version.

Overview: Looking at the pattern above, you'll see a standard pattern for a crochet throw. It shows an image of the finished throw, the name, a description, and the designer of the piece. You'll also see their reference number (LW2722). Then it goes into the pattern itself.
Reference the green numbers and arrows shown on the image above to correspond with the explanations here.
- Suggested Skill Level: This is either written or shown with an image. In this case, it's an easy pattern. The other skill levels are beginner, intermediate, and advanced.
- Finished Size: A pattern should tell you what the finished size will be. Sometimes you'll see a range of sizes or instructions on making your crochet project bigger or smaller.
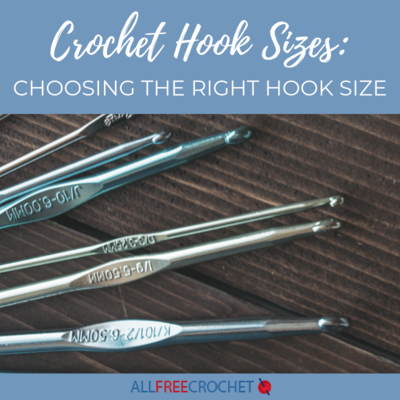
- Materials List: Along with yarn type/weight and hook size needed - this will help you prepare before even getting started. Buy your yarn in the shade you want and make sure you have a crochet hook that goes along with it BEFORE you start. Learn how to choose the right crochet hook size and see a helpful crochet hook size chart, or browse patterns by hook size.
- Gauge Requirements: This will clarify whether gauge is important for the project. If it is, it will tell you what measurements you need to meet with your hook and yarn. To learn more about gauge, read our gauge guide.
- Special Stitches: If there are any unique or less well-known stitches used in the pattern, the pattern will explain what it is and how to work it.
- Pattern Instructions: Shown row-by-row (or round). This should be listed out with a row or round on each line, so it's easy to follow and note where you are in the pattern at all times. This is where you will see abbreviations without explanations as to what they are. You need to know or check the guide while reading the pattern.
- Motifs: If your pattern has motifs, it will explain them. At the start of this particular set of pattern instructions, it said "Motif A (make 27)" and then after you have finished those, "Motif B (make 27)". What is a motif? It is usually a square or repeated stitch pattern that is used to complete the full design. If you look at this throw, there are two different square designs. Those are the motifs.
- Finishing Instructions: This explains how to use what you have already crocheted to create the full piece. In this case, you will finish the throw by combining the two sets of motif designs. Most often, you will also see "Fasten off" and "Weave in ends" as the final steps.
- Abbreviations: As the chart shows above, this guide will usually appear after the pattern in company patterns but sometimes before the pattern in other crochet designer's patterns. Abbreviations are needed because the specific punctuations help to simplify reading the crochet pattern (Learn how to understand punctuation better here).
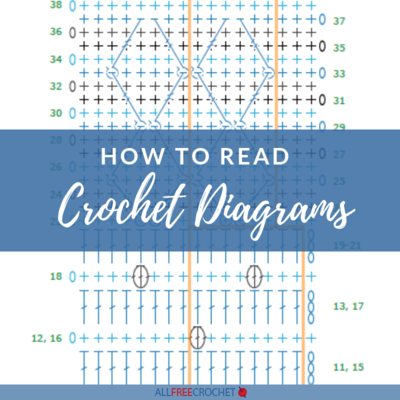
- Diagram: This may be the assembly diagram or the diagram of specific stitches or techniques. If your pattern includes a diagram, it will be mentioned in the pattern ("see assembly diagram" for example). Most of the time it is easy to understand how to read a crochet diagram since it's meant to help simplify the pattern. In this case, the diagram in the pattern image above shows how to assemble the motifs.
Remember: Don't be afraid to ask for help! If a pattern is included on a crochet website or blog, you can usually leave a comment for the designer to help you out if you get stuck. For visual learners, it can also be very helpful to check out crochet videos that can take you through the process step by step along with another person. Thanks to technology, you can access video tutorials on almost any topic without leaving the comfort of your own home.
Video Tutorial on Reading Crochet Patterns
For all of you visual learners out there, here is a video tutorial from our friend Mikey at The Crochet Crowd. He walks you through reading a typical Bernat pattern.
Mikey's Tips for Understanding Written Crochet Patterns
Now that you've watched Mikey's video tutorial, here's a little message from him about understanding written crochet patterns, from the process of general patterns to using diagrams:
"If you're having trouble understanding written crochet patterns then read more into this article. It gives you a few tips on how you can learn to have a better understanding of free crochet patterns.
Many new crochet enthusiasts just taking up the craft complain about the complexity of free crochet patterns and especially reading them. As a crochet tutorial maker, I can’t help but shake my head at many patterns I read. I get bogged down when I see endless pages. I start evaluating if I have time or if I really want to read code to get a pattern. If the pattern looks complicated or the pattern is horrible to read, I just go skipping along to the next pattern to find something simpler.
Maybe it’s a “GUY” thing, but I love diagrams. They tell the story in a clearer form for me. Instead of having someone writing gobbly gook on a pattern, I can clearly see the stitches and decipher the meanings of the shapes.
The Yarn Council of America is trying too hard to standardize Abbreviations and Symbols for Crochet. Sometimes, I find myself googling meanings and abbreviations. I’m just as bad, I never call something “Yarn Over”, I just say “WRAP”.
So how’s the easiest way to learn? Start by writing some simple free crochet patterns of your own work. You will start to see why people write patterns the way they do. You will find yourself using REPEAT a lot but it has to be clear where you are “REPEATING” from. By writing patterns, you start to understand other patterns that may have been rough at first.
My video tutorials allow people to not have to read a pattern, but it’s not the pattern that is always the problem. Sometimes it’s the understanding of why you are having to do a step. You think to yourself the step makes no sense as the author is keeping things brief and you are just doing as instructed without truly realizing until you are a few steps ahead why the “the appearing meaningless” instruction was actually important.
So try writing patterns to gain understanding, better yet, try a few diagrams too! You may find it beneficial in moving up your understanding of a pattern!"
Starting Your Crochet Project
Being a good crocheter doesn't necessarily mean that you've known how to crochet for years and learned all the tips and tricks. In my opinion, a good crocheter is always aware of what they are doing and how they are doing it.
For instance, a big part of the crochet process is counting your stitches as you work. If you don't do this, you are just going to make the crochet project worse for yourself and end up taking more time than expected.
It is also important to know what the gauge is and how to check it, which could mean a few things. You may work up a swatch before you start the actual project so that you have something to compare. You may also use a ruler to check that you have the right amount of stitches within an inch or four, depending on what the pattern specifies originally.
If you have more stitches per inch, change to a larger hook. If you have fewer stitches per inch, change to a smaller hook. Knowing these simple things can increase your crochet ability in no time.
If you think that you are now ready to tackle the crochet world, try your hand at our beginner crochet patterns. You might also be interested in what you can crochet with your specific crochet hook sizes here.
Up Next
How to Read Crochet Diagrams >>
What's your crochet skill level?
Read NextHow To Crochet Feather Stitch
Your Recently Viewed Projects

Thanks for your comment. Don't forget to share!
moyereed 3920387
Jan 29, 2018
I am working on a pattern that says "increase 2 dc evenly spaced". Can someone tell me what that means
AFC Editor Julia
Jan 29, 2018
Hi moyereed - We have a tutorial on how to increase right here: https://www.allfreecrochet.com/Crochet-Videos/Crochet-Increase-Tutorial I hope this helps! Julia, AFC editor
moyereed 3920387
Jan 29, 2018
Hi Julia, I'm still confused. Do I start at a certain point like double crochet half, then start two dc in each stitch to the end?
AFC Editor Julia
Jan 30, 2018
To increase one dc, you would work 2 double crochet stitches into one. Beyond that, it depends on what your pattern calls for - it should say how many and where. If all you're working off of is "evenly spaced," my guess would be in every stitch or every other stitch. Is there a stitch count for the end of the row that can help you out? My best guess would be to ask the pattern author/creator for help as every pattern is different and they can best tell you what they meant. Julia, AFC editor
flowergirl
Dec 04, 2017
The only way you can understand written crotchet patterns is by first understanding what the abbreviations stand for. If the author hasn't indicated that it means that they are basic symbols. Sometimes you go through the symbols only to find out that you don't even know how to work a particular stitch, so practice is best.
DEN
Jun 30, 2017
Help! Pattern reads MULTIPLES 10 17. WHAT ARE THE PLUS STITCHES AND WHEN ARE THEY DONE. WHEN I DO THE MULTIPLES AND THEN ADD THE PLUS I HAVE TOO MANY STITCHES FOR MY PROJECT I THEN HAVE TO TEAR IT OUT AND START AGAIN.
AFC Editor Julia
Jul 05, 2017
Hi Den, I'm sorry, but I don't know what pattern or instructions you are referring to. This is a general informative page on how to read crochet patterns - there isn't a pattern written out here. Thanks! Julia, editor for AllFreeCrochet
DEN
Jun 30, 2017
Informative. However, my question is in the instructions on myafternoon read..... multiples of 10 plus 17.
barbmellott 231361 7
Dec 06, 2018
I believe what that means is, if you are doing your base chain, you need to chain in mulitples of 10, i.e. 10, 20, 30 ect until you get the length you want your piece and then add 17 more chain stitches at the end.
Lynn K
Apr 16, 2017
What an incredibly valuable tutorial! I so often hear, and read about, people complaining that they need a video or written instructions because they are not able to read a crochet pattern so this is going to be really helpful! To me following a diagram is so much easier than reading a written version and I am sure many people will learn a lot from this.
craftedbyfox
Jan 16, 2017
Being a fairly new crocheter this has helped me a great deal, I love the fact you can print the handy table with the abbreviations and what they mean. I can keep it with me so can easily refer back to it when required. The links are useful to help beginners looking for easy patterns to start with.
CeciliaKo
Dec 03, 2016
I'm a beginner in crochet. All I can make is square things that only requires single stitch back and forth. But I'm really happy with that already! I've been collecting patterns and I can't wait to start making them. Now with this post, I'm going to learn a new "language" and start making more gorgeous things!
ladonnam
Jun 21, 2016
Im new at this I need help on a pattern that keeps referring to the tern CREST .... what does this mean?
missysis 6848593
Jun 22, 2014
I am looking to make a baby blanket, but I want to make it smaller than the pattern asks for.can you help me or gide me how to do that. ty
jemhickey 3941139
Feb 22, 2016
The easiest way to make an item smaller than the pattern calls for, is to use a smaller hook. Sometimes you can even get away with using the same sized yarn, but you may want to get a smaller sized yarn if you are wanting to make it much, much smaller. There are other ways, such as cutting down the patter, but that is trickier and may not work out depending on the pattern.
KrisMort
Apr 23, 2016
You've probably already finished that baby blanket but I wanted to give you another idea on how to make a pattern smaller In something as basic as a flat blanket you usually have a regular repeat of stitches that you follow You just need to figure out how many stitches are in the repeat and go from there For example a pattern repeat of stitches means you need to start with a number divisible by If there is a stitch at the beginning and or end of each row you add that stitch or stitches into the mix so you'd chain a number divisible by plus or depending on how many non-pattern stitches you have at the beg or end of the row Often it's just the chains you have to skip to work your first stitch that you have to add to your count Some patterns have this listed so…Read More you could do the same stitch pattern for a blanket as you do for a much narrower scarf or dishrag
WriterJane
Dec 30, 2012
I wish it was like reading music. I'm going to put some thought into that and see if I can come up with something. That would be more of a diagram method.
abonkofsky 8532700
Nov 13, 2011
I agree with agapegal 3384361. The video of pattern reading isn't helpful either. Would it be possible to get a video that shows the written pattern and then someone working the pattern in real time? I'm learning alone with only the web to teach. I've found lots of great advice, tutorials and patterns, but without the knowledge to read and apply the pattern I'm stuck.
agapegal 3384361
Jan 18, 2011
This really didn't help a bit. I understand just as much now as I did before I read it. There's also no way as a novice that I'm going to try to write my own patterns -- not when I have very little experience even with the basics. So I feel that's poor advice as far as I'm concerned. How can I write my own patterns when I'm so clueless???
Report Inappropriate Comment
Are you sure you would like to report this comment? It will be flagged for our moderators to take action.
Thank you for taking the time to improve the content on our site.