Weaving in Your Ends

We all know that when we finish a crochet project we want to show the world the second we put the crochet hook down. Take a second before doing so, to weave in all your ends and make it look perfect. Here are some great tips from Jimmy Beans Wool for just that.
Weaving in your ends is extremely important in the overall quality and hold of your new crochet project over time. Don't let all the effort you just put into this project go to waste because you didn't want to weave in your ends. Plus, weaving in your ends will make it so that your new crochet pattern does not end up unraveling when you go to wash it for the first time.
I don't know about you, but when I tie off that last stitch or sew that last seam, I just want to pull the sweater on and run down the street screaming "YES! I made this!". But wait, before you leave the house in something that looks unfinished, take a few minutes to weave in your ends. Each time you start, end, or join another ball you've got ends to weave. Read on to learn how easy it is to weave in your ends.
How to Weave in Your Ends
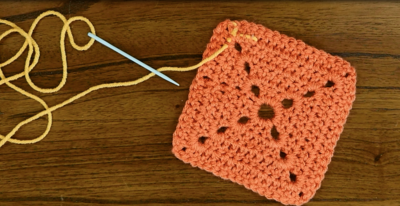
Weave in Your Yarn Ends Instructions
-
Cut the end to about 6" long. This will give you enough yarn to work with so it doesn't want to slip out of the eye of the needle, but you won't have to pull a huge length of yarn through each stitch, either.
-
Thread the eye of your needle.
-
On the inside of your piece (usually the 'wrong' side -- the idea is that you're stitching on the side people can't see!) starting with the stitch closest to the yarn end you're working with, push the needle under three or four stitches going up the rows. The trick here is that you only want to stitch through the top stitches so that it won't show on the public side of your garment. Pull the yarn through so that it is taut, but not tight enough to pucker your piece.
-
Move one stitch to the side and slide your needle under three to four more stitches going down the rows (you should now have made a yarn U-turn), pull taut.
-
Repeat once more, going up the rows so you should have made an 'S' shape with your stitches. The more times you change directions when weaving in your ends, the less likely your ends will be to unravel with wear.
-
Carefully cut the rest of the end off close to your garment. You might have a tiny tail that still sticks out a bit, but over time the fibers will 'felt' into the surrounding stitches.
Your Recently Viewed Projects
Thanks for your comment. Don't forget to share!
margiekins22
Apr 10, 2017
This is such a great video and instructions. Seriously really makes weaving in your ends a breeze!
JaneEK
Jan 23, 2017
These are great instructions for weaving in ends, even without the accompanying video. When I was a new crocheter, Ill admit I didnt pay any attention to the details and would just tie off with a knot and clip it close. Now I take the extra secondsliterallyto work invisible joins and woven ends. It really does make a difference in the professionalism of a project.
craftedbyfox
Jan 22, 2017
A great tutorial for ensuring that your weaved in ends stay in place when washing. If you don't have a wrong side e.g. as you would if you are making a scarf or headband I tend to just make my stitching small and ensure that I weave with the crochet stitches so that it doesn't show up, this tends to be easier with thinner yarn as it blends better. With thicker yarn it just takes practice, now that I have been crocheting for a while I have found it easier to weave in the ends without it showing.
Rhonda Lefty
Jun 20, 2013
I weave a little distance from where the end originates. I go through the bases of the stitches so the yarn is not visible on either side. I try to get to the middle of a cluster of stitches this way, then knot it off after looping around the yarn the base stitch is on. Then I trim the yarn and tuck the knot under the stitch bases nearest to it. It works great.
Daera
Mar 17, 2013
I just made my first pair of newborn baby booties. I don't have a yarn needle, only a crochet hook. What should I do with my yarn ends?
sweetheart832 4760 850
Mar 09, 2012
ok, it is a good method when we have a wrong side but when our project in two right side that mean te people will see two sides , how can i make this??
monkeyme22 0140307
Dec 21, 2012
you could weave it in with tiny stitches that will be harder to see, that is what i have always done. i wish you the best of luck
Report Inappropriate Comment
Are you sure you would like to report this comment? It will be flagged for our moderators to take action.
Thank you for taking the time to improve the content on our site.