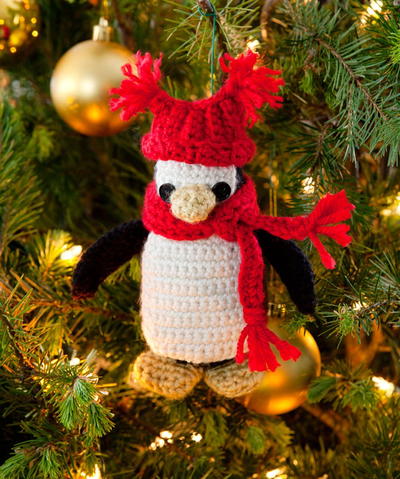
Pipsqueak Penguin Ornament

Your Pipsqueak Penguin Ornament will be bundled up for his time on the tree with a cute scarf and tasseled hat. Put your crochet skills to good use this Christmas by working up fun crochet Christmas ornaments for you to decorate with. Make unique ones for the kids and cousins so that everyone has their own to hang on the tree.
If you worked up the scarf and hat in different colors, they could be for a different kid in the family. However you want to use this fun penguin ornament is sure to make your Christmas tree more fun this year.

Crochet HookF/5 or 3.75 mm hook
Yarn Weight(4) Medium Weight/Worsted Weight and Aran (16-20 stitches to 4 inches)
Crochet Gauge22 sc = 4; 24 rows = 4
Finished SizeMeasurement: 5 tall
Materials List
- RED HEART Soft: 1 ball each 4614 Black A, 4601 Off White B, 9114 Honey C, 5142 Cherry Red D
- Crochet hook: 3.75mm [US F-5]
- Stitch Marker
- Yarn Needle
- (2) Black 1/2" Buttons
- Black Thread
- Sewing Needle
- Stuffing
Notes
Special Abbreviations
Sc2tog = [draw up a loop in next st] twice, yarn over and draw through all 3 loops on hook.
Special Technique
Adjustable loop: Wrap yarn around two fingers to make a ring, hold ring and tail firmly. Insert hook through center of ring, yarn over (with working yarn) and draw up a loop. Work stitches of first round in the ring. After the first round of stitches is worked, pull tail to close the ring.
Additional Notes
- Do not join rows or rounds unless otherwise stated.
- Component pieces are worked separately and sewn together using yarn tails or sewing thread and needle.
Crochet Penguin Ornament Pattern:
Head and Body
Round 1: With A, 6 sc in adjustable loop 6 sts.
Round 2: 2 sc in each st 12 sts.
Round 3: *Sc in next st, 2 sc in next st; repeat from * around 18 sts.
Round 4: *Sc in next 2 sts, 2 sc in next st; repeat from * around 24 sts.
Round 5: *Sc in next 3 sts, 2 sc in next st; repeat from * around 30 sts.
Round 6: *Sc in next 4 sts, 2 sc in next st; repeat from * around 36 sts.
Round 7: *Sc in 5 sts, 2 sc in next st; repeat from * around 42 sts.
Rounds 8-20: Sc in each st.
Round 21: *Sc in next 5 sts, sc2tog; repeat from * around 36 sts.
Round 22: *Sc in next 4 sts, sc2tog; repeat from * around 30 sts.
Rounds 23-32: Sc in each st 30 sts.
Round 33: *Sc in next 3 sts, sc2tog; repeat from * around 24 sts.
Round 34: *Sc in next 2 sts, sc2tog; repeat from * around 18 sts.
Stuff firmly.
Round 35: *Sc in st, sc2tog; repeat from * around 12 sts.
Round 36: *Sc2tog; repeat from * around 6 sts.
Fasten off using long tail. With yarn needle use tail to close hole.
Chest Piece
With B, ch 13
Row 1: Sc in 2nd ch from hook, sc in each ch across, ch 1; turn 12 sts.
Rows 2-12: Sc in each st across, ch 1; turn 12 sts.
Row 13: Skip 1st st, sc in next 9 sts, sc2tog; ch 1; turn 10 sts.
Row 14: Skip 1st st, sc in next 7 sts, sc2tog; ch 1; turn 8 sts.
Row 15: Skip 1st st, sc in next 5 sts, sc2tog, ch 1; turn 6 sts.
Rows 16-18: Sc in each st across, ch 1; turn 6 sts.
Row 19: 2 sc in next st, sc in next 4 sts, 2 sc in next st, ch 1; turn 8 sts.
Rows 20 & 21: Sc in each st across, ch 1; turn 8 sts.
Row 22: Sc in next st, hdc in next 2 sts, sc in next 2 sts, hdc in next 2 sts, sc in last st, ch 1; turn 8 sts.
Row 23: Ch 1, sc around entire piece, in side of rows and across top and bottom rows; join with slip st in first st.
Fasten off.
Flippers (make 2)
With A, ch 10; join with slip st to form ring.
Round 1: 10 sc in ring 10 sts.
Rounds 2-9: Sc in each st 10 sts.
Round 10: (Sc in next st, sc2tog) three times, sc in last st 7 sts.
Round 11: (Sc in next st, sc2tog) twice, sc in last st 5 sts.
Fasten off leaving long 4 tail. Use yarn needle and tail to sew hole closed. Do not stuff.
Beak
With C, ch 8, join with slip st to form ring.
Round 1: 8 sc in ring 8 sts.
Round 2: *Sc in next 2 sts, sc2tog; repeat from *around 6 sts.
Round 3: *Sc2tog; repeat from *around 3 sts.
Fasten off leaving long 4 tail. Use yarn needle and tail to sew hole closed.
Stuff lightly.
Feet (make 2)
With C, ch 7
Round 1: Sc in 2nd ch from hook and in each st across ch, rotate and sc in each st along underside of beginning ch-7 12 sts.
Rounds 2-5: Sc in each st around.
Round 6: *Sc in next st, sc2tog; repeat from * around 8 sts.
Round 7: Sc in each st around.
Round 8: *Sc2tog; repeat from * around 4 sts.
Fasten off leaving an 8 tail for sewing. Do not stuff.
Penguin Ornament Accessories Pattern:
Scarf
With D, ch 77.
Row 1: Hdc in back ridge of 3rd ch from hook, hdc in back ridge of each ch across 75 sts.
Fasten off. Weave in ends.
Cut (8) 4 strands of yarn. Using 4 strands per side, attach at the scarf ends to form fringe. Insert hook in row end, lay 4 strands over hook and pull through the st. Loop ends of yarn through and pull tightly to secure. Trim ends evenly.
Hat
With D, ch 10
Row 1: Sc in front loop only of 2nd ch from hook, sc in front loops only in each ch across, ch 1; turn 9 sts.
Rows 2-17: Sc in front loop only in each st across, ch 1; turn. Fasten off after row 17.
Seam side and crown of hat with yarn needle and matching yarn. Form tassels by cutting (6) 4 strands. Using 3 strands per side insert hook into top corner of hat and lay strands across the hook, pull through and loop ends through. Pull tightly and trim ends evenly. Repeat for other corner.
Finishing:
Pin chest piece onto body and sew securely using matching thread. Attach flippers body using yarn tail. Sew beak onto face as pictured using yarn needle and tail. Sew button eyes on using black thread and sewing needle. Attach feet to the bottom of the penguin as pictured. Weave in ends.
Up Next
Read NextChristmas Tree Ornament
Your Recently Viewed Projects
Thanks for your comment. Don't forget to share!
cattybee
Jul 20, 2020
I love the fact that the pattern is all here on the same page, but couldn't someone have put some paragraph breaks in between the different parts? I had to copy to notepad and separate the different steps so as not to repeat or skip a step. I love penguins, and will have to make up about a dozen of these with all different kinds and colors of accessories!
KLC
Jul 23, 2020
Apologies for the formatting! This was recently automatically transferred to a new template and it copied over incorrectly. We have adjusted the pattern with the correct spacing. Thanks for letting us know. -Krista, Editor at AllFreeCrochet
mulberrygalprinces s
Jul 10, 2018
What a little cutie pie. I would like to make a few of these for my grand kids. They have seen penguins at the zoo in Orlando and they would be thrilled to have their own. But like a previous comment, I will change the hat. That is easy enough. Maybe a Santa hat.
Daughter of Light
Jan 24, 2018
This little Pipsqueak Penguin Ornament is darling! Is this what they call amigurumi? Isn't that the Asian art of knitting or crocheting small stuffed animals? It's amazing that you folks could tell ahead of time that it was going to make up larger that the directions said it would. I really think he's cute but I don't care for the hat part. I wonder if I can come up with something a little different for that part of him. I think I'll use him on my mantle.
JaneEK
Dec 04, 2016
This was my very first attempt at amigurami, and yes, it did work up larger than expected. At first I thought I had made a mistake with the gauge. I think what fooled me was not taking the height of the hat into account. It probably had too many pieces for a first amigurami project but I eventually was successful. He almost makes a tree topper for our small tree.
mulberrygalprinces s
Nov 15, 2016
What a little cutie pie. I think, like the other posters, it is going to be bigger than stated. So in that case I de died to make two and give them to my twin grandsons. I will add some jingle bells inside so they can rattle them. Then shorten the scarves and tack them down to keep them from being chewed upon. Thank you for sharing this one.
Inukshuk84
Oct 27, 2016
What a little sweetie! If you're feeling adventurous, you could make one of these for every student in your child's class for a nice Christmas gift. I remember making Christmas ornaments in grade school and I still have them on my tree every year, even after 20 years! They are made to be treasured!
Cheryl Y
Oct 19, 2016
This Pipsqueak Penguin Ornament is so cute! The pattern is very well written and a easy read. It looks easy enough to make and I'm hoping it's only 5 inches long with the hat. I'll try it as written and see, if it's to large I'll make one using crochet thread. My daughter loves penguins and I'm hoping to give them to her for Christmas. I wish there was a print tab, so I right clicked and saved it to my lap top. Thank you so much for this free easy crochet pattern.
mcaveylisa 8139242
Dec 28, 2015
Cute pattern, but as written using the size hook it makes an ornament much bigger than 5". I ended up using a 3mm hook and the finished object was 8" tall before the hat. Too big to hang on a tree, but it will look cute sitting out on a table.
Report Inappropriate Comment
Are you sure you would like to report this comment? It will be flagged for our moderators to take action.
Thank you for taking the time to improve the content on our site.