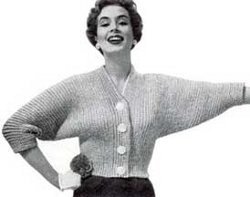
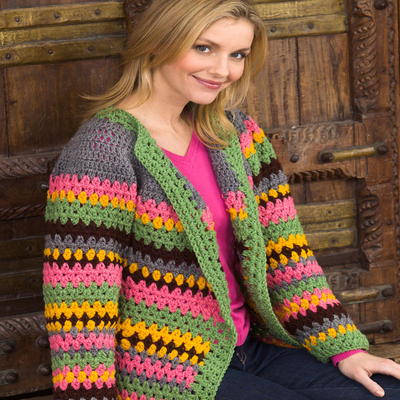
Vintage Striped Jacket

This Vintage Striped Jacket from Red Heart is certainly a one of a kind free crochet jacket. The bright stripes are done in Super Saver yarn in five bold colors. It's a warm jacket for the intermediate crocheter.

Crochet HookI/9 or 5.5 mm hook
Yarn Weight(4) Medium Weight/Worsted Weight and Aran (16-20 stitches to 4 inches)
Directions are for size Small; changes for sizes Medium, Large, X-Large and 2X are in parentheses.
Finished Bust: 36½ (38½, 40½, 46½, 55½)”
Finished Length: 27½ (27½, 27½, 28½, 29)”
Materials:
- RED HEART® “Super Saver®”:
- 2 (3, 3, 3, 3) skeins 400 Grey Heather A,
- 1 (1, 2, 2, 2) skeins 774 Light Raspberry B,
- 1 skein 321 Gold C,
- 2 (3, 3, 3, 3) skeins 624 Tea Leaf D,
- 1 (1, 2, 2, 2) skeins 365 Coffee E.
- Crochet Hook: 5.5mm [US I-9].
- Stitch markers, yarn needle.
Use any size hook to obtain the gauge given.
NOTE: Jacket is worked from Neck edge down to lower edge. Sleeves are worked from armhole down to cuff.
Abbreviations : A, B, C = Color A, B, C; ch = chain; dc = double crochet; hdc = half double crochet; mm = millimeters; sc = single crochet; st(s) = stitch(es); yo = yarn over; [ ] = work directions in brackets the number of times specified; * or ** = repeat whatever follows the * or ** as indicated.
JACKET
Upper Yoke
With A, ch 54 (57, 60, 63, 66).
Row 1: Sc in 2nd ch from hook, sc in next 2 ch, hdc in next 3 ch, dc in each ch to last 6 ch, hdc in next 3 ch, sc in next 3 ch – 53 (56, 59, 62, 65) sts.
Row 2: Ch 3 (counts as dc here and throughout), turn, [2 dc in next st, dc in next 2 sts] 17 (18, 19, 20, 21) times, to last st, dc in last st – 70 (74, 78, 82, 86) sts.
Row 3: Ch 3, turn, [2 dc in next st, dc in next 3 sts] 17 (18, 19, 20, 21) times, dc in last st – 87 (92, 97, 102, 107) sts.
Row 4: Ch 3, turn, [2 dc in next st, dc in next 4 sts] 17 (18, 19, 20, 21) times, dc in last st – 104 (110, 116, 122, 128) sts.
Row 5: Ch 3, [2 dc in next st, dc in next 5 sts] 17 (18, 19, 20, 21) times, dc in last st – 121 (128, 135, 142, 149) sts.
Row 6: Ch 3, [2 dc in next st, dc in next 6 sts] 17 (18, 19, 20, 21) times, dc in last st – 138 (146, 154, 162, 170) sts.
Row 7: Ch 3, [2 dc in next st, dc in next 7 sts] 17 (18, 19, 20, 21) times, dc in last st – 155 (164, 173, 182, 191) sts.
Row 8: Ch 3, [2 dc in next st, dc in next 8 sts] 17 (18, 19, 20, 21) times, dc in last st – 172 (182, 192, 202, 212) sts.
For Sizes X-Large and 2X Only
Row 9: Ch 3, [2 dc in next st, dc in next 9 sts] (20, 21) times, dc in last st – (222, 233) sts.
For Size 2X Only
Row 10: Ch 3, [2 dc in next st, dc in next 10 sts] (21) times, dc in last st – (254) sts.
Begin Pattern Stitch
Row 1: Ch 3, turn, dc in same space, [skip 2 dc, 2 dc in space between last skipped dc and next dc] across to last 3 sts, skip 2 dc, 2 dc in last space before beginning ch.
Row 2: Ch 3, turn, [skip next 2 dc, 2 dc in space between last skipped dc and next dc] across to last 2 dc, dc in top of beginning ch.
Repeating Rows 1-2 for Pattern st, change to work 2 rows with B, work 1 row with C, work 3 rows D, work 2 rows with E.
Divide For Body And Sleeves
Row 1: Keeping in Pattern st and E, work 24 (26, 28, 32, 38) sts for Front, skip next 36 (38, 40, 46, 48) sts for
Sleeve, work across next 52 (54, 56, 66, 82) sts for Back, skip next 36 (38, 40, 46, 48) sts for Sleeve, work to end of row – 100 (106, 112, 130, 158) sts for Body.
Stripe Sequence
Keeping in Pattern st on Body sts, work 2 rows with A, 1 row with C, 1 row with E, 3 rows with B, 3 rows with D, 2 rows with C, 1 row with E, 1 row with C, 1 row with A, 2 rows with B, 1 row with A, 2 rows with D, 1 row with B, 1 row with C, 1 row with B, 2 rows with E, 2 rows with A, and
1 row with C.
Fasten off.
SLEEVES
Row 1: With right side facing, join E in same space as last 2 dc of Front, ch 3, work in Pattern st across skipped 36 (38, 40, 46, 48) sts of Sleeve, end dc in space as first 2 dc of Back – 38 (40, 42, 48, 50) sts.
Stripe Sequence
Keeping in Pattern st on Sleeve sts, work 2 rows with A, 1 row with C, 1 row with E, 3 rows with B, 2 rows with D, 2 rows with E, 1 row with C, 1 row with A, 2 rows with B, 1 row with A, 2 rows with D, 1 row with B, 1 row with C, 1 row with B, 2 rows with E, 2 rows with A, and 1 row with C.
AT SAME TIME, when 6 rows have been worked, end with Row 2 of Pattern st.
Decrease Row: Ch 3, skip first dc, [2 dc in between next 2 dc, skip next 2 dc] across to last space, dc in top of beginning ch – 36 (38, 40, 46, 48) sts; 2 sts decreased.
Repeat Decrease Row every 6 (6, 4, 4, 4) rows 2 (2, 3, 4, 4) more times – 32 (34, 34, 38, 38) sts.
Work until Stripe Sequence is finished.
Fasten off.
FINISHING
Border
Round 1: With right side facing, join D in lower Left
Front corner, ch 3, (dc, ch 1, dc) in same place, working in Pattern st evenly spaced, work around lower edge of
Body to lower Right Front corner, work (2 dc, ch 1, 2 dc) in corner, work along Front edge to Neck edge, work (2 dc, ch 1, 2 dc) in corner, work around Neck edge, work (2 dc, ch 1, 2 dc) in corner, work long Left Front edge, slip st to top of beginning ch to join.
Round 2: Turn, slip st to next ch-1 space, (ch 3, dc, ch 1, 2 dc) in same space, work in Pattern st, working (2 dc, ch 1, 2 dc) in each corner ch-1 space around, slip st in first st to join.
Round 3: Repeat Round 2.
Fasten off.
Sleeve Cuff
Row 1: With right side facing, join D at lower edge of
Sleeve, ch 3, work in Pattern st evenly spaced across row.
Work 2 more rows in Pattern st with D.
Fasten off.
Sew Sleeve seams, matching stripes. Weave in ends.
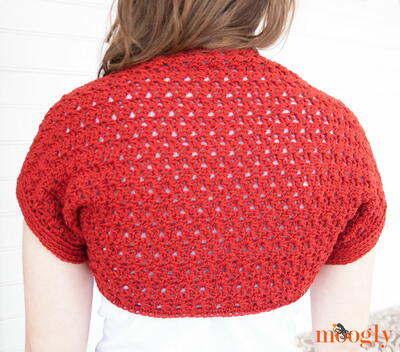
Read NextSimple Scarlet Crochet Shrug Pattern
Your Recently Viewed Projects
Thanks for your comment. Don't forget to share!
princess6860504
Mar 30, 2018
I would totally wear this sweater! It's so hipster chic. With a vintage floor to it. The design tows the line between that 70's granny sweater and something a hip 20-something might wear and I love it! I have to save this to my projects and spend a nice couple of weeks working on this for next year!
taylors 4567316
Mar 05, 2018
I would like to do this pattern in one color. After row 8, I'm not sure where to continue.
AFC Editor Julia
Mar 06, 2018
Hi Taylors, That depends on what size you're making! After row 8, if you're making sizes XL or 2X, follow the headers for those rows (adding on a 9th and maybe a 10th row). For Smaller sizes, you just stop after row 8 and then move on to Begin Pattern Stitch. Julia, AFC editor
Zeemer
Sep 10, 2017
Wow. This Vintage Striped Jacket is so beautiful!! I'm currently doing a few projects and it seems like I wanna temporarily drop all of them to start this one. It is indeed so lovely! The colors are just so appropriate for the fall season and can be worn until winter to make that season alive and bright. This is a work of someone who's got class and good taste.
cynthia wilson 484 3583
Apr 10, 2016
A question about the Vintage Striped Jacket When the pattern says to "work" a part of a row, if no stitch is named, do they intend for you to sc? i.e.., Divide For Body And Sleeves Row 1 Keeping in Pattern st and E, work 24 (26, 28, 32, 38) sts for Front, skip next 36 (38, 40, 46, 48) sts for Sleeve, work across next 52 (54, 56, 66, 82) sts for Back, skip next 36 (38, 40, 46, 48) sts for Sleeve, work to end of row 100 (106, 112, 130, 158) sts for Body." I am considering Facing the Fear and trying my first Intermediate pattern. Don't want to invest in all that yarn if I don't fully understand the pattern. TY
whocanitbenow75 27 06315
May 31, 2016
The part of the pattern that is headed Begin Pattern Stitch is where you learn to make the pattern stitch So when you get to the part that says keeping in pattern stitch you continue on with the pattern stitch that you've learned to make Just start at the beginning of the pattern and read it all all the directions and stitch patterns and abbreviations used sizes and yarns it's all there Then pick up your hook and yarn start at the very beginning and make each stich as you follow the pattern You can do it As long as there isn't a mistake in the pattern you can do it Also if you do a stitch wrong it doesn't really matter Just do every one of them wrong so your finished item looks the same throughout It won't look exactly like it was meant to but no one will know…Read More and it will look great anyway
plabs2013 3831442
Jan 12, 2015
Love this site....easy to navigate. How do you save information from the comment list. I see someone had a problem with a pattern and another person provided an answer for the pattern.
batterie61
Oct 27, 2014
Those having trouble printing. Go to the bar under the pattern title where all the little icons for facebook etc are. All the way to the right is the letter P. Scroll over it and options including print will appear.
sugarwalls45 37654 56
Sep 01, 2012
Do anyone know what this mean? ch3 turn dc in same space, [ skip 2dc, 2dc in space between last skipped dc and next dc] across to last sts, skip 2 dc in space before beginning ch. It to begin Pattern Stitch.
mavericksmom
Sep 10, 2012
sugarwalls, I'm not an expert but, maybe I can explain this if I break it down into bite size pieces. ch3 turn dc in same space= when you do this row you will chain 3 and turn your work around and make a double crochet in the same place that you made the chain 3. [skip 2dc, 2dc in space between last skipped dc and next dc]= you will skip the 2 double crochet stitches from the previous row and in the space before the next double crochet you will make 2 double crochet. you will repeat this pattern across that row. skip 2dc in space before beginning ch.=you will skip the last 2 double crochet stitches of the previous row then make the chain stitches to begin the next row. I hope I was able to explain it well
sugarwalls45 37654 56
Aug 31, 2012
i have worked this pattern over and over. some how the numbers are not adding up. i wonder what im doing wrong?
duttonsharon 28923 08
Feb 28, 2015
HELP! I don't understand this part "Divide For Body And Sleeves Row 1 Keeping in Pattern st and E, work 24 (26, 28, 32, 38) sts for Front, skip next 36 (38, 40, 46, 48) sts for Sleeve, work across next 52 (54, 56, 66, 82) sts for Back, skip next 36 (38, 40, 46, 48) sts for Sleeve, work to end of row 100 (106, 112, 130, 158) sts for Body. " Is one side of the front significantly larger than the other? ie, the one front side is 24 st and the other is 100 to the end of the row? Is the 100 st for the Body? I have so many more st. in total than that. I hope someone at Red Heart steps up and helps solve this problem for me.
davesonlydaughter 4951827
Jan 02, 2017
It is not 100 to the end of the row. It is 100 total for body... 24 for the first front, plus 52 for the back, plus 24 for the second front, after having skipped the stitches where the sleeves will go.
fontrella 7518956
May 11, 2012
I like this pattern...I am going to make this in different colors, I would like the brown family colors with black. Thanks for the pattern.
Report Inappropriate Comment
Are you sure you would like to report this comment? It will be flagged for our moderators to take action.
Thank you for taking the time to improve the content on our site.