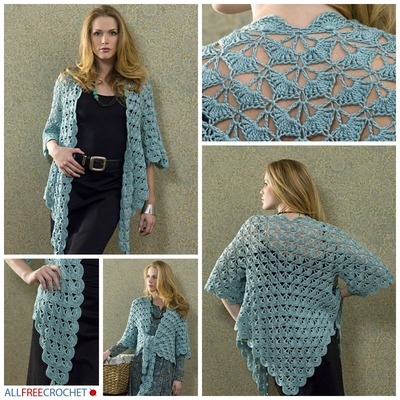
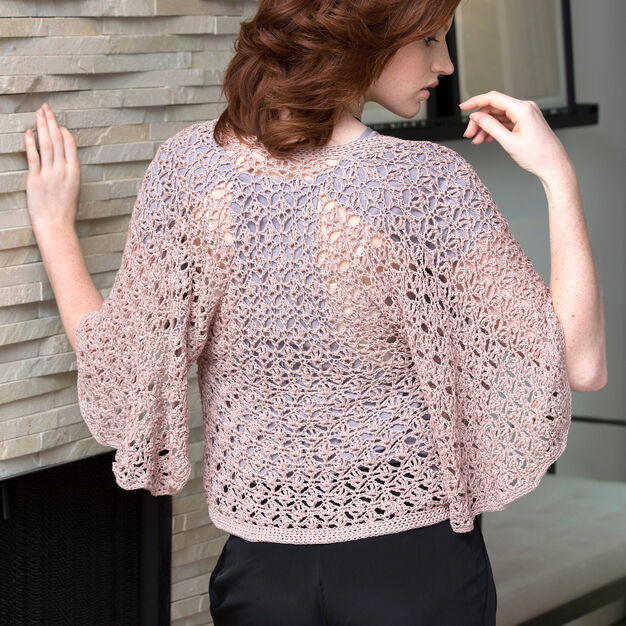
Autumn Butterfly Cardigan

The season of fall makes things like pumpkin lattes and falling leaves incredibly popular. If you want your style to stand out this year, do so with this Autumn Butterfly Cardigan crochet pattern. The flowing nature of the sleeves and cardigan itself make it the perfect fall accessory. Wear it to work so you can avoid the office chills, and then take it to dinner with you to help fend off the autumn breeze. Look stylish, keep from getting chilly, and get ready for fall with this crochet cardigan pattern.
Notes1. Cardigan is worked in three pieces: Back, Right Front, and Left Front.
2. Each piece is worked from the lower edge upwards with stitches added at the sides to form the sleeves.
3. Cardigan is worked with 2 strands of thread held together throughout.

Crochet HookF/5 or 3.75 mm hook
Yarn Weight(0) Lace (33-40 stitches to 4 inches). Includes crochet thread.
Crochet Gauge17 sts = 4” (10 cm); 9 rows = 4” (10 cm) as the piece is crocheted and where each sc, dc, tr, and ch-1 space count as one st. The piece will stretch as you work and final/blocked gauge is closer to: 3 stitch pattern repeats = 4” (10 cm); 8 rows = 5” (12.5 cm) where one stitch pattern repeat consists of one shell and the following sc and ch-1 spaces.
Finished SizeDirections are for size Extra Small. Changes for sizes Small, Medium, Large, 1X, 2X, and 3X are in parentheses To Fit Hip: 34 (36, 42, 44, 47, 52, 55)” (86.5 [91.5, 106.5, 112, 119.5, 132, 139.5] cm) Finished Hip: 35 (37, 43, 45, 48, 53, 56)” (89 [94, 109
Materials List
- Aunt Lydia's Bamboo Crochet Thread: 6 (6, 7, 8, 9, 11, 12) balls in 320 Mushroom
- Susan Bates Crochet Hook (F/5 or 3.75 mm)
- Stitch Markers
- Thread Needle
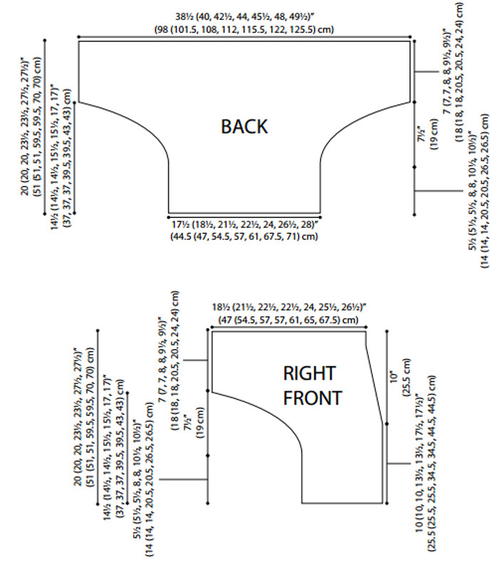
- Diagram
Add a sweet shell edging to the edges of your sweater once you're finished - watch this video tutorial to learn how!
Pattern
Abbreviations
Shell: (Dc, ch 1, tr, ch 1, dc) in indicated stitch or space.
Y-st (Y stitch): Tr in indicated stitch, ch 1, dc in base of tr just made. Note: To insert hook in base of tr, insert the hook into the tr between the stitch the tr was worked into and the first horizontal bar of the tr.
tr-dc-tog (treble-double crochet 2 stitches together): [Yarn over] twice, insert hook in next stitch, yarn over and pull up a loop, [yarn over and draw through 2 loops on hook] twice (2 loops remain on hook), yarn over, insert hook in next stitch, yarn over and pull up a loop, yarn over and draw through 2 loops on hook, yarn over and draw through all 3 loops on hook.
Back
-
With 2 strands of thread held together, ch 83 (89, 101, 107, 113, 125, 131).
-
Row 1 (right side): Dc in 5th ch from hook, ch 1, skip next 2 ch, sc in next ch, *ch 1, skip next 2 ch, shell in next ch, ch 1, skip next 2 ch, sc in next ch; repeat from * to last 3 ch, ch 1, skip next 2 ch, (dc, ch 1, tr) in last ch, turn—12 (13, 15, 16, 17, 19, 20) shells.
-
Row 2: Ch 1, sc in first tr, *ch 1, Y-st in next sc, ch 1, sc in next tr; repeat from * across working last sc in 4th ch of turning ch, turn.
-
Row 3: Ch 1, sc in first sc, *ch 1, skip next ch-1 space, shell in next ch-1 space (at center of Y-st), ch 1, sc in next sc; repeat from * across, turn—13 (14, 16, 17, 18, 20, 21) shells.
-
Row 4: Ch 4 (counts as tr), dc in 4th ch from hook, ch 1, sc in next tr, *ch 1, Y-st in next sc, ch 1, sc in next tr; repeat from * to last sc, ch 1, tr in last sc, dc in base of tr just made, turn.
-
Row 5: Ch 5, dc in first dc, ch 1, sc in next sc, *ch 1, skip next ch-1 space, shell in next ch-1 space, ch 1, sc in next sc; repeat from * to last ch-1 space, ch 1, skip last ch-1 space, (dc, ch 1, tr) in top of turning ch, turn—12 (13, 15, 16, 17, 19, 20) shells.
-
Rows 6–9 (9, 9, 13, 13, 17, 17): Repeat last 4 rows 1 (1, 1, 2, 2, 3, 3) more times.
Shape Sleeves
-
Row 1 (wrong side): Ch 7, sc in 2nd ch from hook and place marker in sc just made (for seaming), sc in next 5 ch, sc in next tr, *ch 1, Y-st in next sc, ch 1, sc in next tr; repeat from * across working last sc in 4th ch of turning ch, turn.
-
Row 2: Ch 7, sc in 2nd ch from hook and place marker in sc just made (for seaming), ch 1, skip next 2 ch, shell in next ch, ch 1, skip next 2 ch, sc in next sc, *ch 1, skip next ch-1 space, shell in next ch-1 space, ch 1, sc in next sc; repeat from * to last 6 sc, ch 1, skip next 2 sc, shell in next sc, ch 1, skip next 2 sc, sc in last sc, turn—15 (16, 18, 19, 20, 22, 23) shells.
-
Row 3: Ch 8, sc in 2nd ch from hook and in next 3 ch, *ch 1, Y-st in next sc, ch 1, sc in next tr; repeat from * to last sc, ch 1, (Y-st, ch 1, tr) in last sc, turn.
-
Row 4: Ch 7, sc in 2nd ch from hook, ch 1, skip next 2 ch, shell in next ch, ch 1, skip next 2 ch, sc in next tr, *ch 1, skip next ch-1 space, shell in next ch-1 space, ch 1, sc in next sc; repeat from * to last 3 sc, ch 1, skip next 2 sc, (shell, ch 1, tr) in last sc, turn—18 (19, 21, 22, 23, 25, 26) shells.
-
Row 5: Ch 11, sc in 2nd ch from hook and in next 6 ch, ch 1, Y-st in next tr, *ch 1, sc in next tr, ch 1, Y-st in next sc; repeat from * to last sc, ch 1, (Y-st, ch 1, tr) in last sc, turn.
-
Row 6: Ch 7, sc in 2nd ch from hook, ch 1, skip next 2 ch, shell in next ch, ch 1, skip next 2 ch, sc in next tr, *ch 1, skip next ch-1 space, shell in next ch-1 space, ch 1, sc in next sc; repeat from * to last 6 sc, ch 1, skip next 2 sc, shell in next sc, ch 1, skip next 2 sc, sc in last sc, turn—21 (22, 24, 25, 26, 28, 29) shells.
-
Row 7: Repeat Row 3.
-
Row 8: Ch 8, shell in 6th ch from hook, ch 1, sc in next tr, *ch 1, skip next ch-1 space, shell in next ch-1 space, ch 1, sc in next sc; repeat from * to last 3 sc, ch 1, skip next 2 sc, (shell, ch 1, tr) in last sc, turn—24 (25, 27, 28, 29, 31, 32) shells.
-
Row 9: Ch 8, sc in 2nd ch from hook and in next 3 ch, ch 1, Y-st in next tr, ch 1, sc in next tr, *ch 1, Y-st in next sc, ch 1, sc in next tr; repeat from * to turning ch, ch 1, (Y-st, ch 1, tr) in 4th ch of turning ch, turn.
-
Row 10: Repeat Row 8—27 (28, 30, 31, 32, 34, 35) shells.
-
Row 11: Ch 5, dc in 5th ch from hook, ch 1, skip first tr, sc in next tr, *ch 1, Y-st in next sc, ch 1, sc in next tr; repeat from * to turning ch, ch 1, tr in 4th ch of turning ch, dc in base of tr just made, turn.
-
Row 12: Ch 4 (counts as dc, ch 1), (tr, ch 1, dc) in first dc (first shell made), ch 1, sc in next sc, *ch 1, skip next ch-1 space, shell in next ch-1 space, ch 1, sc in next sc; repeat from * to turning ch, ch 1, shell in top of turning ch, turn—28 (29, 31, 32, 33, 35, 36) shells.
-
Row 13: Ch 5, dc in 5th ch from hook, ch 1, sc in next tr, *ch 1, Y-st in next sc, ch 1, sc in next tr; repeat from * to turning ch, ch 1, tr in 3rd ch of turning ch, dc in base of tr just made, turn.
-
Row 14: Ch 5, dc in first dc, ch 1, sc in next sc, *ch 1, skip next ch-1 space, shell in next ch-1 space, ch 1, sc in next sc; repeat from * to last ch-1 space, ch 1, skip last ch-1 space, (dc, ch 1, tr) in top of turning ch, turn—27 (28, 30, 31, 32, 34, 35) shells.
-
Row 15: Ch 1, sc in first tr, *ch 1, Y-st in next sc, ch 1, sc in next tr; repeat from * across working last sc in 4th ch of turning ch, turn.
-
Row 16: Ch 1, sc in first sc, *ch 1, skip next ch-1 space, shell in next ch-1 space, ch 1, sc in next sc; repeat from * across, turn—28 (29, 31, 32, 33, 35, 36) shells.
-
Row 17: Ch 5, dc in 5th ch from hook, *ch 1, sc in next tr, ch 1, Y-st in next sc; repeat from * to last sc, tr in last sc, dc in base of tr just made, turn.
-
Rows 18–23: Repeat Rows 12–17.
-
Sizes L (1X, 2X, 3X) Only
Rows 24–25 (25, 27, 27): Repeat Rows 12–13 (13, 15, 15).
All Sizes: Fasten off
Right Front
-
With 2 strands of thread held together, ch 47 (47, 53, 53, 59, 65, 71).
-
Row 1 (right side): Sc in 2nd ch from hook, *ch 1, skip next 2 ch, shell in next ch, ch 1, skip next 2 ch, sc in next ch; repeat from * to last 3 ch, ch 1, skip next 2 ch, (dc, ch 1, tr) in last ch, turn—7 (7, 8, 8, 9, 10, 11) shells.
-
Row 2: Ch 1, sc in first tr, *ch 1, Y-st in next sc, ch 1, sc in next tr; repeat from * to last sc, ch 1, dc in last sc, turn.
-
Row 3: Ch 4, sc in next sc, *ch 1, skip next ch-1 space, shell in next ch-1 space, ch 1, sc in next sc; repeat from * across, turn.
-
Row 4: Ch 4 (counts as tr), dc in 4th ch from hook, ch 1, sc in next tr, *ch 1, Y-st in next sc, ch 1, sc in next tr; repeat from * to last sc, ch 1, Y-st in last sc, dc in 3rd ch of turning ch, turn.
-
Row 5: Ch 1, shell in first ch-1 space, ch 1, sc in next sc, *ch 1, skip next ch-1 space, shell in next ch-1 space, ch 1, sc in next sc; repeat from * to last ch-1 space, ch 1, skip last ch-1 space, (dc, ch 1, tr) in top of turning ch, turn.
-
Row 6: Ch 1, sc in first tr, *ch 1, Y-st in next sc, ch 1, sc in next tr; repeat from * across, turn; leave remaining sts unworked, turn.
-
Row 7: Ch 1, sc in first sc, *ch 1, skip next ch-1 space, shell in next ch-1 space, ch 1, sc in next sc; repeat from * across, turn.
-
Row 8: Ch 4, dc in 4th ch from hook, ch 1, sc in next tr, *ch 1, Y-st in next sc, ch 1, sc in next tr; repeat from * to last sc, ch 1, tr in last sc, dc in base of tr just made, turn.
-
Row 9: Ch 5, dc in first dc, ch 1, sc in next sc, *ch 1, skip next ch-1 space, shell in next ch-1 space, ch 1, sc in next sc; repeat from * to turning ch, ch 1, (dc, ch 1, tr) in top of turning ch, turn.
-
Sizes L (1X, 2X, 3X) Only
Rows 10–13 (13, 17, 17): Repeat last 4 rows 1 (1, 2, 2) more times.
Note: When repeating Row 6, there will be no stitches to leave unworked at the end of the row. Work all the way across working last sc in 4th ch of turning ch.
Shape Sleeve
-
Row 1 (wrong side): Ch 7, sc in 2nd ch from hook and place marker in sc just made (for seaming), sc in next 5 ch, sc in next tr, *ch 1, Y-st in next sc, ch 1, sc in next tr; repeat from * across working last sc in 4th ch of turning ch, turn.
-
Row 2: Ch 1, skip first ch-1 space, shell in next ch-1 space, ch 1, sc in next sc, *ch 1, skip next ch-1 space, shell in next ch-1 space, ch 1, sc in next sc; repeat from * to last 6 sc, ch 1, skip next 2 sc, shell in next sc, ch 1, skip next 2 sc, sc in last sc, turn—8 (8, 9, 10, 11, 12, 13) shells.
-
Row 3: Ch 8, sc in 2nd ch from hook and in next 3 ch, *ch 1, Y-st in next sc, ch 1, sc in next tr; repeat from * across working last sc in last tr, turn; leave remaining sts unworked.
-
Row 4: Ch 1, sc in first sc, *ch 1, skip next ch-1 space, shell in next ch-1 space, ch 1, sc in next sc; repeat from * to last 3 sc, ch 1, skip next 2 sc, (shell, ch 1, tr) in last sc, turn—9 (9, 10, 11, 12, 13, 14) shells.
-
Row 5: Ch 11, sc in 2nd ch from hook and in next 6 ch, ch 1, sc in next tr, *ch 1, Y-st in next sc, ch 1, sc in next tr; repeat from * to last sc, ch 1, tr in last sc, dc in base of tr just made, turn.
-
Row 6: Ch 5, dc in first dc, ch 1, sc in next sc, *ch 1, skip next ch-1 space, shell in next ch-1 space, ch 1, sc in next sc; repeat from * to last 6 sc, ch 1, skip next 2 sc, shell in next sc, ch 1, skip next 2 sc, sc in last sc, turn—10 (10, 11, 12, 13, 14, 15) shells.
-
Row 7: Ch 8, sc in 2nd ch from hook and in next 3 ch, *ch 1, Y-st in next sc, ch 1, sc in next tr; repeat from * across working last sc in 4th ch of turning ch, turn.
-
Row 8: *Ch 1, skip next ch-1 space, shell in next ch-1 space, ch 1, sc in next sc; repeat from * to last 3 sc, ch 1, skip next 2 sc, (shell, ch 1, tr) in last sc, turn—12 (12, 13, 14, 15, 16, 17) shells.
-
Rows 9 and 10: Repeat Rows 3 and 4—13 (13, 14, 15, 16, 17, 18) shells.
-
Row 11: Ch 5, dc in 5th ch from hook, ch 1, skip first tr, sc in next tr, *ch 1, Y-st in next sc, ch 1, sc in next tr; repeat from * to last sc, ch 1, tr in last sc, dc in base of tr just made, turn.
-
Row 12: Ch 5, dc in first dc, ch 1, sc in next sc, *ch 1, skip next ch-1 space, shell in next ch-1 space, ch 1, sc in next sc; repeat from * to turning ch, ch 1, shell in top of turning ch, turn.
-
Row 13: Ch 5, dc in 5th ch from hook, ch 1, sc in next tr, ch 1, Y-st in next sc, *ch 1, sc in next tr, ch 1, Y-st in next sc; repeat from * to turning ch, ch 1, sc in 4th ch of turning ch, turn.
-
Row 14: Ch 1, sc in first sc, *ch 1, skip next ch-1 space, shell in next ch-1 space, ch 1, sc in next sc; repeat from * to last ch-1 space, ch 1, skip last ch-1 space, (dc, ch 1, tr) in top of turning ch, turn.
-
Row 15: Ch 1, sc in first tr, *ch 1, Y-st in next sc, ch 1, sc in next tr; repeat from * to last sc, tr in last sc, turn.
-
Row 16: Ch 1, skip first tr, sc in next sc, *ch 1, skip next ch-1 space, shell in next ch-1 space, ch 1, sc in next sc; repeat from * across, turn.
-
Row 17: Ch 5, dc in 5th ch from hook, *ch 1, sc in next tr, ch 1, Y-st in next sc; repeat from * to last sc, tr in last sc, dc in base of tr just made, turn.
-
Rows 18–23: Repeat Rows 12–17.
-
Sizes L (1X, 2X, 3X) Only
Rows 24–25 (25, 27, 27): Repeat Rows 12–13 (13, 15, 15).
All Sizes: Fasten off.
Left Front
-
With 2 strands of thread held together, ch 47 (47, 53, 53, 59, 65, 71).
-
Row 1 (right side): Dc in 5th ch from hook, ch 1, skip next 2 ch, sc in next ch, *ch 1, skip next 2 ch, shell in next ch, ch 1, skip next 2 ch, sc in next ch; repeat from * to last 3 ch, ch 1, skip next 2 ch, (dc, ch 1, tr) in last ch, turn—7 (7, 8, 8, 9, 10, 11) shells.
-
Row 2: Ch 4, sc in first tr, *ch 1, Y-st in next sc, ch 1, sc in next tr; repeat from * across working last sc in 4th ch of turning ch, turn.
-
Row 3: Ch 1, sc in first sc, *ch 1, skip next ch-1 space, shell in next ch-1 space, ch 1, sc in next sc; repeat from * to turning ch, ch 1, dc in 2nd ch of turning ch, turn—8 (8, 9, 9, 10, 11, 12) shells.
-
Row 4: *Ch 1, Y-st in next sc, ch 1, sc in next tr; repeat from * to last sc, ch 1, tr in last sc, dc in base of tr just made, turn.
-
Row 5: Ch 5, dc in first dc, ch 1, sc in next sc, *ch 1, skip next ch-1 space, shell in next ch-1 space, ch 1, sc in next sc; repeat from * to last Y-st, ch 1, dc in ch-1 space of last Y-st, ch 1, tr-dc-tog over same ch-1 space and next tr, turn—7 (7, 8, 8, 9, 10, 11) shells.
-
Row 6: Ch 1, sc in first st, *ch 1, Y-st in next sc, ch 1, sc in next tr; repeat from * across working last sc in 4th ch of turning ch, turn.
-
Row 7: Ch 1, sc in first sc, *ch 1, skip next ch-1 space, shell in next ch-1 space, ch 1, sc in next sc; repeat from * across, turn—8 (8, 9, 9, 10, 11, 12) shells.
-
Row 8: Ch 4, sc in next tr, *ch 1, Y-st in next sc, ch 1, sc in next tr; repeat from * to last sc, ch 1, tr in last sc, dc in base of tr just made, turn.
-
Row 9: Ch 5, dc in first dc, ch 1, sc in next sc, *ch 1, skip next ch-1 space, shell in next ch-1 space, ch 1, sc in next sc; repeat from * to turning ch, ch 1, dc in top of turning ch, turn—7 (7, 8, 8, 9, 10, 11) shells.
-
Sizes L (1X, 2X, 3X) Only
Rows 10–13 (13, 17, 17): Repeat last 4 rows 1 (1, 2, 2) more times.
Shape Sleeve
-
Row 1: *Ch 1, Y-st in next sc, ch 1, sc in next tr; repeat from * across working last sc in 4th ch of turning ch, turn.
-
Row 2: Ch 7, sc in 2nd ch from hook, place marker in sc just made for seaming, ch 1, skip next 2 ch, shell in next ch, skip next 2 ch, sc in next sc, *ch 1, skip next ch-1 space, shell in next ch-1 space, ch 1, sc in next sc; repeat from * to last Y-st, ch 1, (dc, ch 1, tr) in ch-1 space of last Y-st, turn—8 (8, 9, 9, 10, 11, 12) shells.
-
Row 3: Ch 1, sc in first tr, *ch 1, Y-st in next sc, ch 1, sc in next tr; repeat from * to last sc, ch 1, (Y-st, ch 1, tr) in last sc, turn.
-
Row 4: Ch 7, sc in 2nd ch from hook, ch 1, skip next 2 ch, shell in next ch, ch 1, skip next 2 ch, sc in next tr, *ch 1, skip next ch-1 space, shell in next ch-1 space, ch 1, sc in next sc; repeat from * across, turn—10 (10, 11, 11, 12, 13, 14) shells.
-
Row 5: Ch 4, sc in next tr, *ch 1, Y-st in next sc, ch 1, sc in next tr; repeat from * to last sc, ch 1, (Y-st, ch 1, tr) in last sc, turn.
-
Row 6: Ch 7, sc in 2nd ch from hook, ch 1, skip next 2 ch, shell in next ch, ch 1, skip next 2 ch, sc in next tr, *ch 1, skip next ch-1 space, shell in next ch-1 space, ch 1, sc in next sc; repeat from * to turning ch, ch 1, dc in 3rd ch of turning ch, turn—11 (11, 12, 12, 13, 14, 15) shells.
-
Row 7: *Ch 1, Y-st in next sc, ch 1, sc in next tr; repeat from * to last sc, ch 1, (Y-st, ch 1, tr) in last sc, turn.
-
Row 8: Ch 8, shell in 6th ch from hook, ch 1, skip next 2 ch, sc in next tr, *ch 1, skip next ch-1 space, shell in next ch-1 space, ch 1, sc in next sc; repeat from * to last Y-st, ch 1, dc in ch-1 space of last Y-st, ch 1, tr-dc-tog over same ch-1 space and last tr, turn—12 (12, 13, 13, 14, 15, 16) shells.
-
Row 9: Ch 1, sc in first st, *ch 1, Y-st in next sc, ch 1, sc in next tr; repeat from * to turning ch, ch 1, skip next ch, (Y-st, ch 1, tr) in 4th ch of turning ch, turn.
-
Row 10: Ch 8, shell in 6th ch from hook, ch 1, skip next 2 ch, sc in next tr, *ch 1, skip next ch-1 space, shell in next ch-1 space, ch 1, sc in next sc; repeat from * across, turn—14 (14, 15, 15, 16, 17, 18) shells.
-
Row 11: Ch 4, sc in next tr, *ch 1, Y-st in next sc, ch 1, sc in next tr; repeat from * to turning ch, ch 1, tr in 4th ch of turning ch, dc in base of tr just made, turn.
-
Row 12: Ch 4, shell in first dc, ch 1, sc in next sc, *ch 1, skip next ch-1 space, shell in next ch-1 space, ch 1, sc in next sc; repeat from * to turning ch, ch 1, dc in 3rd ch of turning ch, turn.
-
Row 13: *Ch 1, Y-st in next sc, ch 1, sc in next tr; repeat from * to turning ch, ch 1, tr in 3rd ch of turning ch, dc in base of tr just made, turn.
-
Row 14: Ch 5, dc in first dc, ch 1, sc in next sc, *ch 1, skip next ch-1 space, shell in next ch-1 space, ch 1, sc in next sc; repeat from * to last Y-st, ch 1, (dc, ch 1, tr) in ch-1 space of last Y-st, turn—13 (13, 14, 14, 15, 16, 17) shells.
-
Row 15: Ch 1, sc in first tr, ch 1, Y-st in next sc, *ch 1, sc in next tr, ch 1, Y-st in next sc; repeat from * to turning ch, ch 1, sc in 4th ch of turning ch, turn.
-
Row 16: Ch 1, sc in first sc, *ch 1, skip next ch-1 space, shell in next ch-1 space, ch 1, sc in next sc; repeat from * across, turn—14 (14, 15, 15, 16, 17, 18) shells.
-
Row 17: Ch 4, sc in next tr, *ch 1, Y-st in next sc, ch 1, sc in next tr; repeat from * to last sc, ch 1, tr in last sc, dc in base of tr just made, turn.
-
Rows 18–23: Repeat Rows 12–17.
-
Sizes L (1X, 2X, 3X) Only
Rows 24–25 (25, 27, 27): Repeat Rows 12–13 (13, 15, 15).
All Sizes: Fasten off.
Finishing
For best results, wet block pieces to measurements shown on schematic. With right sides together, align underarm markers and use mattress stitch to sew
underarm seams and side seams. Remove markers.
-
Front Edging
Work edging with 2 strands of thread held together.
Row 1 (right side): With right side facing, join thread in lower front corner to work up a front edge, work sc evenly spaced up the front edge, across back neck, and down other front edge, turn, do not continue across lower edge.
Rows 2–4: Ch 1, sc in each st across, turn.
Row 5: Skip first sc, slip st in each sc across.
Fasten off. -
Lower Edging and Tie
Work edging and ties with 2 strands of thread held together.
Row 1 (right side): Ch 36 for first tie, with right side facing, slip st to lower front corner to work across the lower edge, sc evenly spaced across lower edge, ch 37 for 2nd tie, turn.
Row 2: Sc in 2nd ch from hook and in each ch across tie ch, sc in each sc across to other tie ch, sc in each ch across, turn.
Rows 3 and 4: Ch 1, sc in each st across, turn.
Row 5: Skip first sc, slip st in each sc across. Fasten off.
Weave in ends. Wet block edging if desired.
Diagram
-
Click the image to make the picture bigger
Up Next:
50+ Easy Crochet Cardigan Patterns
Read NextSimple Scarlet Crochet Shrug Pattern
Your Recently Viewed Projects

Thanks for your comment. Don't forget to share!
elocin1104 2800379
Aug 15, 2018
I love this butterfly cardigan. I do not know that I would make it for myself, but it definitely is a beautiful piece to make someone for a gift. Do you know anyone who would wear this? I would have to try it out, because sometimes I like to wear things like this and sometimes I dont. I think working with thread is difficult at times, but it is worth it in the end.
Member 5126416
Feb 26, 2018
Hey All Free why is the stitch abbreviations at the bottom of the pattern, on Red Heart patterns there stitch abbreviations are under the materials. This is the way that all patterns are. Please include stitch abbreviations at the top so that any inexperience crocheter doesn't have to go all the way past the pattern to see them. It will help everyone that wants to make the pattern.
AFC Editor Julia
Feb 27, 2018
Hi there! Thanks for the suggestion - we've had many different editors on this site adding patterns, and our best practices have changed in all the years we've been active so not all patterns will be represented the exact same way throughout. We do make an effort to update as needed, but we have thousands of patterns so it's not always easy to spot an issue. Thanks again! Julia, AFC editor
Zeemer
Feb 26, 2018
Very simple cardigan this Autumn Butterfly Cardigan pattern. It enhances the formal look of the gray top worn by the model. However, this type of cardigan chooses its wearers.
Morehouse17
Sep 30, 2017
If you use the pattern as designed and crochet with the thread, it may take you longer to complete if you were using yarn. However, when done you will have a magnificent piece to add to your wardrobe that will get a lot of wear. Thank you for the free pattern.
Hippie Chick
Aug 16, 2017
This pattern has very detailed instructions. Working with crochet thread is a very complicated form to work with. It takes a lot of practice to get your stitches even throughout the project so that the finished project looks neat and smooth. I think that this pattern should have more pictures of the progress and to show how it looks in the making.
Tricia108
Apr 29, 2017
I was reading the comments and I don't care what it is called. It is a pretty lightweight cardigan that will go nicely over an outfit. Working in a office with temperature variations I could use this in summer with the air conditioning and in winter where you just need a bit more warmth. Thank you for printing it.
melissasea22
Apr 13, 2017
I do not understand why AllFreeCrochet has to RENAME patterns to suit their needs to grab our attention! Bad bad idea on their part! This is originally published on redheart.com under the name Flutter Cardigan. Plus it is on Ravelry as well so if you have questions head on over there to get other users' opinions that have made this.
AFC Editor Julia
Apr 14, 2017
Hi Melissa, We have company and blogger permission to rename the projects we share on our site to either help generate a buzz or to get attention to these fantastic patterns and to aid in our promotion efforts. You can always find the original pattern by searching the company site or by right clicking an image and doing a reverse image search. :) Thanks! Julia, editor for AllFreeCrochet
Lynn K
Apr 06, 2017
Oh wow, so gorgeous! Who among us does not LOVE a lovely, comfy beach mat. The colors are fabulous for summer and just looking at this mat makes me wish that summer was coming here in Soutb Africa, instead of winter, lol! Well, I guess there is always next summer to look forward to and here is really good reason to put up with the winter months so that we can get to summer as soon as possible, lol!
Hippie Chick
Mar 29, 2017
This pattern looks intimidating to me. I see it is ranked for an advanced crocheter. I have been crocheting for many, many years and not really sure if I have made it to the ranks of being advanced yet or not. LOL. This is a very cute cardigan. I have not made anything yet with crochet thread so I am curious to find out how well I will do on this project. I do like a challenge.
Delphine Bryant
Mar 29, 2017
I just adore working with thread. The details pop out in any patten when using thread. The project does take a little longer to complete but it is well worth it. I have yet to attempt to make an article of clothing and I think this Autumn Butterfly Cardigan may be a little out of my league. It is beautiful though.
Linda
Feb 16, 2017
Darling butterfly cardigan! This project I will share with my group of friends who meet at place to try new projects.
snigdhaghan 351893 1
Jul 12, 2016
Hello, I completed all the pieces of this pattern. I also sew the underarms and sides as mentioned in the pattern. I still cannot figure out how to wear this cardigan. I still have to work on the edging and tie. I am so confused and frustrated. I small size as per the pattern, but it looks like it must be a large size. Or as I cannot figure out if my sewing the under arms and sides are correct. Please help.
AFC Editor Julia
Jul 13, 2016
Hi Snigdhaghan, I'm sorry you're having trouble with this pattern! This cardigan is worn loosely and more openly than most other cardigans, as shown in the photo, but if you'd like to pose your question to our Facebook community (facebook.com/allfreecrochet), I'm certain someone could give you some guidance or suggestions! I hope this helps. Julia, editor for AllFreeCrochet
Report Inappropriate Comment
Are you sure you would like to report this comment? It will be flagged for our moderators to take action.
Thank you for taking the time to improve the content on our site.