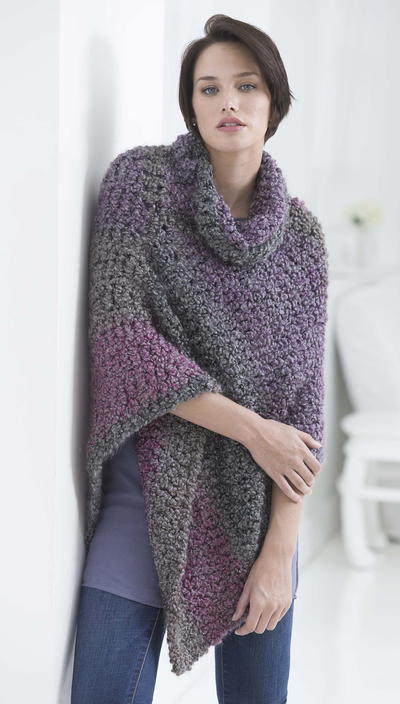
Shaded Midnight Cardigan
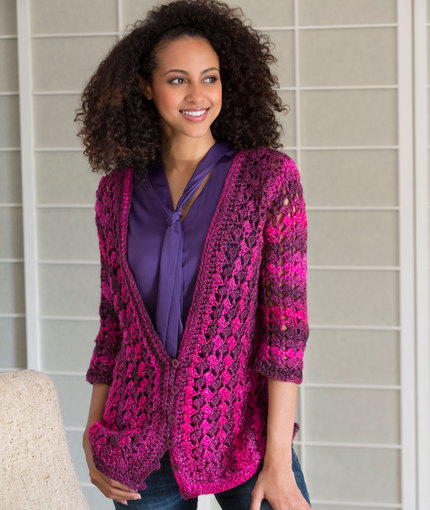
I absolutely love the hues in this Shaded Midnight Cardigan. Leave it to purple and pink to make a superbly radiant crochet cardigan stand out. This is definitely the perfect fall wearable for you and will be just what you need to fit into the dress code at work. Even in the summer when the office is cold, this crochet cardigan sweater will keep you chilled from the outside heat but warm in the indoor air. Since it's a little bit oversized, you can easily wear this fun crochet sweater pattern over a dress shirt or tshirt.

Crochet HookJ/10 or 6 mm hook
Yarn Weight(4) Medium Weight/Worsted Weight and Aran (16-20 stitches to 4 inches)
Crochet Gauge3 Cl in body pattern = 4 (10 cm); 4 rows in body pattern = 3 (7.5 cm).
Finished SizeDirections are for size Small. Changes for Medium, Large, Extra Large and 2X-Large are in parentheses. Finished Bust: 34 (37, 40, 44, 48) (87.5 [95, 103, 112, 122] cm). Finished Length: 24 (24, 26, 27, 28) (59 [63, 66.5, 69, 73] cm).
Materials List
- RED HEART Boutique Midnight: 5 (6, 7, 8, 9) balls of 1938 Radiant.
- Susan Bates Crochet Hooks: 6mm [US J-10]
- Yarn Needle
- 5 (6, 6, 7, 7) 5/8 (1.5 cm) buttons
- Sewing needle and matching thread
Special Stitches:
Mattress stitch: Join Place front and back pieces side by side with right sides facing up. Thread matching yarn (about twice the length of the seam) on yarn needle; do not knot. Beginning at the hem edge of the right-hand piece, insert needle back to front; leave a tail for weaving in later. Insert needle from back to front in left-hand piece, draw yarn through both sides; leaving yarn loose; go to the opposite piece and pick up the stitch (under the bottom and out the top of the stich). Work in corresponding rows, mirroring stitches, continue working back and forth. Every three or four stitches tighten yarn in seam. Be sure the yarn is tight enough to disappear, but not enough to shorten or pucker the seam.
Pattern
BACK:
- Starting at side edge, ch 67 (71, 75, 79, 83).
- Row 1: Dc in 4th ch from hook and in each across, turn—65 (69, 73, 77, 81) dc.
- Row 2: Ch 4, Cl in first st, *skip next st, sc in each of next 2 dc, (sc, ch 4, Cl) in next st; repeat from * across to last 4 sts, skip next st, sc in each of last 3 dc, turn—16 (17, 18, 19, 20) Cl.
- Row 3: Ch 4, Cl in first st, (sc, ch 4, Cl) in each ch-4 space across, slip st in first ch of same ch-4 space, turn—17 (18, 19, 20, 21) Cl.
- Row 4: Slip st in first Cl, (sc, ch 4, Cl) in each ch-4 space across, slip st in first ch of same ch-4 space, turn.
- Rows 5-21 (25, 25, 28, 31): Repeat Row 4.
- Row 22 (26, 26, 29, 32): Slip st in first Cl, slip st in next ch-4 space, ch 3 (counts as dc here and throughout), 2 dc in same 4 space, [dc in next sc, 3 dc in next ch-4 space] 3 (3, 3, 4, 4] times, dc in next sc, 2 dc in next ch-4 space, *[dc in next sc, 3 dc in next ch-4 space] 3 (4, 4, 4, 4] times, dc in next sc, 2 dc in next ch-4 space; repeat from * once, [dc in next sc, 3 dc in next ch-4 space] 4 (3, 4, 4, 5] times, dc in last sc—65 (69, 73, 77, 81) dc.
- Do not fasten off.
Shape Shoulders/Neck: Rotate to work across row-end sts on top edge of Back.
Right Shoulder
- Row 1 (right side): Ch 3, 2 dc around the post of first dc, (Cl, ch 1) in each of the next 3 (3, 4, 5, 6) row-end sts, Cl in next row-end st, turn—3 dc; 4 (4, 5, 6, 7) Cl.
- Row 2: Ch 3, skip next Cl, (sc, ch 2) in each of next 3 (3, 4, 5, 6) ch-1 spaces, skip next Cl, sc in each of last 3 dc, turn—4 (4, 5, 6, 7) ch-spaces.
- Row 3: Ch 3, dc in each of next 2 sc, (Cl, ch 1) in each of next 3 (3, 4, 5, 6) ch-2 spaces, Cl in last ch-3 space, ch 3, slip st in same ch-3 space—4 (4, 5, 6, 7) Cl.
Neck Edging
- Row 1: Ch 1, sc in next row-end st on neck edge, (ch 1, sc) in each next 11 (15, 13, 14, 15) row-end sts, ch 1—13 (17, 15, 16, 17) ch-1 spaces.
- Note: 5 (5, 6, 7, 8) rows remain for Left Shoulder.
Left Shoulder
- Row 1: (Cl, ch 1) in each of the next 3 (3, 4, 5, 6) row-end sts, Cl in next row-end st, 3 dc around the post of last dc, turn—3 dc; 4 (4, 5, 6, 7) Cl.
- Row 2: Ch 1, sc in each of first 3 dc, (ch 2, sc) in each of next 3 (3, 4, 5, 6) ch-1 spaces, ch 2, sc in last Cl, turn—4 (4, 5, 6, 7) ch-2 spaces.
- Row 3: Ch 3, (Cl, ch 1) in each of the next 3 (3, 4, 5, 6) ch-2 spaces, Cl in next ch-2 space, dc in each of last 3 sc. Fasten off. Weave in ends.
FRONT (make 2)
- Starting at side edge, ch 67 (71, 75, 79, 83).
- Work same as Back through Row 4 (4, 5, 6, 7).
Shape Armhole
- Row 5 (5, 6, 7, 8): Slip st in first Cl, slip st in next ch-4 space, ch 3, 2 dc in same ch-4 space, dc in next sc, [3 dc in next ch-4 space, dc in next sc], 4 (4, 5, 5, 6) times, (sc, ch 4, Cl) in each ch-4 space across, slip st in first ch of same ch-4 space, turn—12 (13, 13, 14, 14) Cl.
- Row 6 (6, 7, 8, 9): Slip st in first Cl, (sc, ch 4, Cl) in each of next 12 (13, 13, 14, 15) ch-4 spaces, slip st in first ch of same ch-4 space, turn, leaving remaining sts unworked—12 (13, 13, 14, 14) Cl.
- Rows 7-11 (7-11, 8-13, 9-14, 10-15): Slip st in first Cl, (sc, ch 4, Cl) in each ch-4 space across, slip st in first ch of same ch-4 space, turn.
- Row 12 (12, 14, 15, 16): Slip st in first Cl, slip st in next ch-4 space, ch 3, 2 dc in same ch-4 space, dc in next sc, *[3 dc in next ch-4 space, dc in next sc] 3 (4, 4, 4, 4) times, 2 dc in next ch-4 space, dc in next sc; repeat from * once, [3 dc in next ch-4 space, dc in next sc] 3 (2, 2, 3, 3) times—46 (50, 50, 54, 54) dc.
- Sew Fronts to Back across shoulders. Sew last row of each Front to corresponding side edge of Back, matching sts.
Left Sleeve
- Round 1: With right side facing, join yarn with a slip st in first st of underarm on left armhole opening, ch 2 (counts as hdc here and throughout), working in row-end sts, work 11 (11, 15, 15, 13) hdc evenly spaced across to Left Front armhole edge, hdc in each of next 19 (19, 23, 23, 27) dc to shoulder seam, 2 dc in each of next 2 row-end sts of Back Shoulder, hdc in each of next 19 (19, 23, 23, 27) dc of Back, join with a slip st in top of beginning ch-2—54 (54, 66, 66, 72) sts.
- Round 2: Ch 1, (sc, ch 4, Cl) in first st, *skip next 2 hdc, sc in next st, ch 2, skip next 2 sts**, (sc, ch 4, Cl) in next st; repeat from * around, ending last repeat at **, join with a slip st in first sc—9 (9, 11, 11, 12) Cl; 9 (9, 11, 11, 12) ch-2 spaces.
- Round 3: (Sc, ch 4, Cl) in first ch-4 space, *ch 2, skip next ch-2 space**, (sc, ch 4, Cl) in next ch-4 space; repeat from * around, ending last repeat at **, join with a slip st in first sc—9 (9, 11, 11, 12) Cl; 9 (9, 11, 11, 12) ch-2 spaces.
- Round 4 (decrease round): *(Sc, ch 4, Cl) in next ch-4 space, skip next ch-2 space; repeat from * around; join with a slip st in first sc—9 (9, 11, 11, 12) Cl.
- Rounds 5-17 (18, 19, 20, 21): *(Sc, ch 4, Cl) in each ch-4 space around; join with a slip st in first sc—9 (9, 11, 11, 12) Cl.
- Round 18 (19, 20, 21, 22): Slip st in next ch-4 space, ch 2, 3 hdc in same ch 4 space, 4 hdc in each ch-4 space around; join with a slip st in top of beginning ch-2—36 (36, 44, 44, 48) hdc.
- Round 19 (20, 21, 22, 23): Ch 2, hdc in each hdc around; join with a slip st in top of beginning ch-2. Fasten off. Weave in ends.
Right Sleeve
- Round 1: With right side facing, join yarn with a slip st in first st of underarm on right armhole opening, ch 2 (counts as hdc here and throughout), working in row-end sts, work 11 (11, 15, 15, 13) hdc evenly spaced across to Back armhole edge, hdc in each of next 19 (19, 23, 23, 27) dc, 2 dc in each of next 2 rowend sts of Back Shoulder, hdc in each of next 19 (19, 23, 23, 27) dc of Right Front, join with a slip st in top of beginning ch-2—54 (54, 66, 66, 72) sts.
- Complete same as Left Sleeve.
FINISHING
Bottom Edging
- Row 1: With right side facing, join yarn in bottom right-hand corner of Left Front, ch 2, working in row-end sts, hdc evenly across to bottom edge to bottom right-hand corner of Right Front, turn.
- Row 2 (wrong side): Ch 2, hdc in each hdc across, ending at Left Front. Do not fasten off.
Sweater Edging
- Row 1 (wrong side): Rotate to work across Left Front edge, ch 2, hdc evenly across Left Front edge, across Back neck edge, and down Right Front edge to bottom right-hand corner, turn.
- Row 2: Ch 1, sc in first hdc, (sc, ch 3, slip st) in next st (buttonhole made), *sc in each of next 4 hdc, (sc, ch 3, slip st) in next st; repeat from * 3 (4, 4, 5, 5) times, sc in each remaining hdc across—5 (6, 6, 7, 7) buttonholes. Fasten off. Weave in ends.
- Sew buttons to Left Front edge, opposite buttonholes.
- Block sweater to measurements.
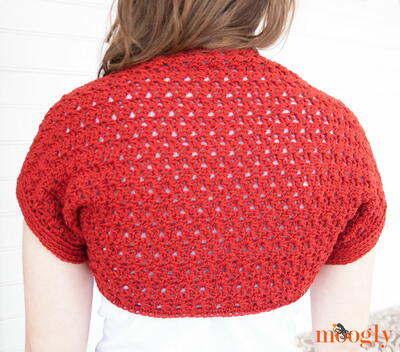
Read NextSimple Scarlet Crochet Shrug Pattern
Your Recently Viewed Projects
Thanks for your comment. Don't forget to share!
Morehouse17
Mar 28, 2018
I love to find patterns that have the option to complete it in more than one size. It is not often that when I do make a project that I get a request from someone in a different size to make them one to. I try be nice and for the most part because I love to crochet, I will do it.
Daughter of Light
Feb 28, 2018
I have to admit I didn't think I cared for this design at first but the more I looked at the details the more my opinion changed. I do tend to like 3/4 length sleeves because it keeps them from getting caught in something or wet. I like the ombre color effect although I'm not sure I'd go with this color. Maybe a blue or green shade instead for me. I also wasn't sure about the lower buttons but it would allow me to showcase a tie shirt underneath like this model is doing. This one I'm debating on and I might go ahead and add the buttons so I'd have the option of wearing it both ways!
princess6860504
Aug 23, 2017
I like the design of this color blocked/shaded cardigan, with the open front all the way down to the waist until there are buttons. It gives it a casual look while still being able to keep it buttoned up, unlike the traditional cardi. Here you can show off a pretty blouse or tunic much easier.
witchmedea 7668936
Jul 30, 2017
Can someone please explain just how you are supposed to do the neck and shoulders? I have the right shoulder stitched but the neck edging numbers just do not work out. I am very frustrated right now and feel like screaming!
pearlcat 4291403
May 31, 2017
I am confused - I get that Cl means cluster stitch but how many stitches in the cluster in this pattern 3 or 4 or 5 or ??? and am i right in assuming they are double crochet clusters?
pearlcat 4291403
Jun 11, 2017
Ok for anyone else who is wondering ... i eventually found this pattern on the red heart site and the following section seems to have been missed from the above version of the pattern Special Abbreviations Cluster (Cl) Yarn over, insert hook in designated st or space, yarn over, draw yarn through st, yarn over, draw yarn through 2 loops on hook 3 times in same st or space, yarn over, draw yarn through 4 loops on hook.
miso5000 3144370
Oct 18, 2017
Thanks. I have found that when you try to use free patterns, you get what you pay for. Better to pay $5.00 for something that has been thoroughly tested and proof read.
Bev
Jan 21, 2018
I feel the same way. All the work that you put into your projects and then to come to directions that are non existant or wrong, how horrible is that? I would never start a complex project without a good, dependable pattern.
Lynn K
May 11, 2017
I am about half way through this project and can already see how gorgeous it is going to be. Red Heart yarns do not seem to be available here in South Africa but my awesome local yarn store recommended a great substitute which, I am thrilled to say, is working beautifully. The pattern is clearly explained and very easy to get into so grab that yarn and hook and get going, lol!
JillMarie
May 06, 2017
What is "Cl in first st"? Ive never seen this before.
AFC Editor Julia
May 08, 2017
Hi jillsproat, That stands for "cluster in first stitch" - in your first stitch, work a cluster stitch. If you don't know how to work a cluster stitch, there are plenty of tutorials available that can help you, just utilize our site search to see! Hope that helps, Julia, editor for AllFreeCrochet
Hippie Chick
Apr 06, 2017
Its beginning to get warmer here now so I am not as motivated to make sweaters and things for cooler weather. This is a lovely sweater and love the colors the designer used on hers for Red Heart. I will definitely put this in my to make later queue for making later though as it looks very versatile.
Bev
Jan 21, 2018
These are good projects to make and put away for Christmas gifts that way you aren't crunched for time like I was last Christmas trying to get everyone scarfs and fingerless mitts made. (lots of late night crocheting) learn from me!
nettles12555 90574 72
Feb 17, 2017
I am having trouble with the neck edging - numbers are just not working out. All in all very poorly proofed.
AFC Editor Julia
Feb 21, 2017
Hi nettles, I've gone ahead and proofed this against the version on Red Heart's webpage and corrected any inconsistencies. It should all match up with their version now. If you have any further questions on this, feel free to contact Red Heart customer service directly for any further clarification. :) Thanks! Julia, editor for AllFreeCrochet
witchmedea 7668936
Jul 30, 2017
The numbers are not working out for me either. Does neck edging stitch mean you skip the clusters? If so you cannot do eleven and have five rows left at the end.
Linda
Feb 06, 2017
I especially like the fit of this cardigan. I plan to make one just to see how it turns out. Hopefully it will compare to this.
Cheryl Y
Jan 11, 2017
I love the look of this Shaded Midnight Cardigan. I would make a few changes when I make mine. First I would make the sleeves longer and I think that I would make it so it buttons all the way closed. Other then that, I love this Cardigan pattern. After reading the written pattern, I think this pattern will work out great. Now I need to find the beautiful yarn and get started on this. Thank you so much for sharing this free crochet pattern.
myraludlam1 339608 8
Aug 31, 2016
which way is it crocheted,sideways or straight from bottom to top.are there any final size measurements or drawings?
chika7702 6277973
Mar 01, 2016
I'm confused when it says "skip next st,skip next st, sc in each of next 2 dc, (sc, ch 4, Cl) in next st repeat from across to last 4 sts, skip next st, sc in each of last 3 dc, turn16 (17, 18, 19, 20) Cl." Do you single crochet, chain 4 and cluster after you skip one and sc in each of next 2 dc? or is that just for bigger sizes (I am making a small
bjbbaselink 313961 1
Jul 24, 2015
There are stripes in the image but only one color is described in the pattern. The "Radiant" Midnight yarn is subtly varied, but not enough to produce stripes. Is there a version of the pattern detailing when to change colors available?
sterlingideas 8584 859
Jul 28, 2015
Hi, This is actually done with just the one color of yarn. It has very long colorways that subtly blend into each other. If you look closely at the picture and follow the rows, at the. Bottom of the sweater you can"trace" the yarn and see the changes. Hope this helps. Debra
Report Inappropriate Comment
Are you sure you would like to report this comment? It will be flagged for our moderators to take action.
Thank you for taking the time to improve the content on our site.