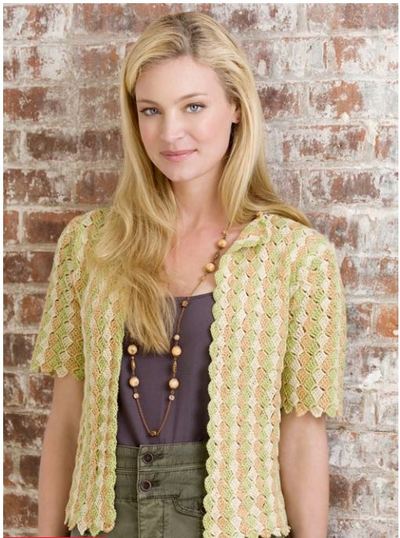
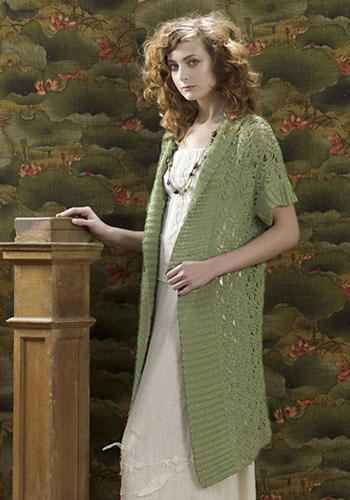
Reading Room Crochet Sweater

Get your glasses on and work up the Reading Room Crochet Sweater. This cardigan may seem a little bookish, but we promise that it's both stylish and comfortable. Whether you're headed to the library, work, or sitting at home, this sweater will keep you warm and looking lovely. You can go neutral or colorful with this pattern or make one of each. It's an easy crochet pattern to work up, you just need a little time, some yarn and a hook.

Crochet HookI/9 or 5.5 mm hook
Yarn Weight(4) Medium Weight/Worsted Weight and Aran (16-20 stitches to 4 inches)
Crochet Gauge16 sts = 4; 14 rows = 4 in Pattern st. CHECK YOUR GAUGE. Use any size hook to obtain the gauge.
Finished SizeFinished Chest: 39 (43, 47, 51)” Finished Length: 18 (18½, 19½, 20)”
Materials List
- RED HEART® Eco-Ways™: 6 (7, 8, 9) balls 3360 - Mushroom
- Crochet Hook: 5.5mm [US I-9]
- Yarn needle
Cardigan Pattern
Back
-
Ch 76 (84, 92, 100).
-
Foundation Row: Beginning in 2nd ch from hook, *sc2tog, ch 1; repeat from * to last ch, sc in last ch, turn—75 (83, 91, 99) sts.v
-
Work in Pattern st until piece measures 10 (10, 10½, 10½)” from beginning.
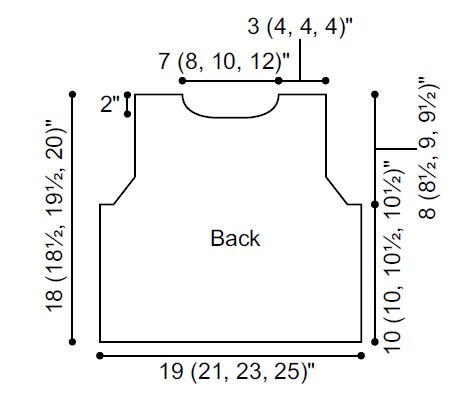
Shape Armholes
-
Row 1: Slip st in first 4 sts, [sc2tog, ch 1] across to last 5 sts, sc in next st, turn, leave remaining 4 sts unworked—67 (75, 83, 91) sts.
-
Row 2: Ch 1, sc2tog, [sc2tog, ch 1] across to last 3 sts, sc2tog, sc in last st, turn—65 (73, 81, 89) sts.
-
Row 3: Ch 1, skip first st, [sc2tog, ch 1] across to last 4 sts, sc2tog, ch 1, skip next st, sc in last st, turn—63 (71, 79, 87) sts.
-
Row 4: Work in Pattern st.
-
Repeat Rows 2–4 twice—55 (63, 71, 79) sts.
-
Work in Pattern st until piece measures 16 (16½, 17½, 18)” from beginning, end with a Wrong Side row.
Shape Neck and First Shoulder
-
Row 1 (Right Side): Ch 1, [sc2tog, ch 1] 9 (10, 10, 10) times, sc in next st, turn—19 (21, 21, 21) sts for first shoulder. Leave remaining sts unworked for second shoulder.
-
Row 2: Ch 1, sc2tog, [sc2tog, ch 1] across to last st, sc in last st, turn—18 (20, 20, 20) sts.
-
Row 3: Ch 1, [sc2tog, ch 1] across to last 4 sts, sc2tog, ch 1, skip next st, sc in last st, turn—17 (19, 19, 19) sts.
-
Repeat Rows 2 and 3 twice—13 (15, 15, 15) sts. Fasten off.
Shape Neck and Second Shoulder
-
With Right Side facing, skip next 17 (21, 29, 37) unworked sts following first shoulder. Join yarn with slip st in next st.
-
Row 1: Ch 1, beginning in same st as join, [sc2tog, ch 1] across to last st, sc in last st, turn—19 (21, 21, 21) sts.
-
Row 2: Ch 1, [sc2tog, ch 1] across to last 3 sts, sc2tog, sc in last st, turn—18 (20, 20, 20) sts.
-
Row 3: Ch 1, skip first st, [sc2tog, ch 1] across, sc in last st, turn—17 (19, 19, 19) sts. Repeat Rows 2 and 3 twice—13 (15, 15, 15) sts. Fasten off.
Front (Make 2)
-
Ch 20 (24, 28, 32).
-
Row 1: Beginning in 2nd ch from hook, *sc2tog, ch 1; repeat from * to last ch, sc in last ch, turn—19 (23, 27, 31) sts. Note: End of Row 1 is at side edge. End of Row 2 is at front edge.
-
Row 2: Ch 1, [sc2tog, ch 1] across to last 5 sts, (sc, ch 1) in next 4 sts, sc in last st, turn—23 (27, 31, 35) sts.
-
Row 3: Ch 1, [sc, ch 1] in next 2 sts, [sc2tog, ch 1] across to last st, sc in last st, turn—25 (29, 33, 37) sts.
-
Row 4: Ch 1, [sc2tog, ch 1] across to last st, [sc, ch 1, sc] in last st, turn—27 (31, 35, 39) sts.
-
Row 5: Repeat Row 3 – 29 (33, 37, 41) sts.
-
Row 6: Work in Pattern st.
-
Row 7: Ch 1, sc in first st, ch 1, sc2tog in same st and next ch-space, ch 1, [sc2tog, ch 1] across, sc in last st, turn—31 (35, 39, 43) sts.
-
Row 8: Ch 1, [sc2tog, ch 1] across, [sc, ch 1, sc] in last st, turn—33 (37, 41, 45) sts.
-
Row 9: Repeat Row 7—35 (39, 43, 47) sts.
-
Row 10: Work in Pattern st.
-
Row 11: Repeat Row 7—37 (41, 45, 49) sts.
-
Rows 12 and 13: Work in Pattern st.
-
Row 14: Repeat Row 4—39 (43, 47, 51) sts.
-
Rows 15 and 16: Repeat Rows 13 and 14—41 (45, 49, 53) sts.
-
Work in Pattern st until piece measures 10 (10, 10½, 10½)” from beginning, end at side edge.
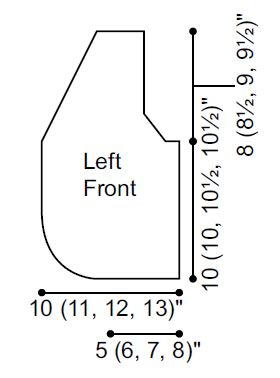
Shape Armhole and Front Edge
-
Row 1: Slip st in first 4 sts (for armhole), [sc2tog, ch 1] across to last 3 sts, sc2tog, sc in last st, turn—36 (40, 44, 48) sts.
-
Row 2: Ch 1, sc in first st, [sc2tog, ch 1] across to last 3 sts, sc2tog, sc in last st, turn—35 (39, 43, 47) sts.
-
Row 3: Ch 1, skip first st, [sc2tog, ch 1] across to last 4 sts, sc2tog, ch 1, skip next st, sc in last st, turn—33 (37, 41, 45) sts.
-
Row 4: Work in Pattern St.
-
Row 5: Ch 1, sc2tog, [sc2tog, ch 1] across to last 3 sts, sc2tog, sc in last st, turn—31 (35, 39, 43) sts.
-
Row 6: Ch 1, sc in first st, [sc2tog, ch 1] across to last 4 sts, sc2tog, ch 1, skip next st, sc in last st, turn—30 (34, 38, 42) sts.
-
Row 7: Ch 1, [sc2tog, ch 1] across to last 4 sts, sc2tog, ch 1, skip next st, sc in last st, turn—29 (33, 37, 41) sts.
-
Row 8: Ch 1, [sc2tog, ch 1] across to last 3 sts, sc2tog, sc in last st, turn—28 (32, 36, 40) sts.
-
Row 9: Ch 1, sk first st, [sc2tog, ch 1] across to last 3 sts, sc2tog, sc in last st, turn—26 (30, 34, 38) sts.
-
Row 10: Ch 1, sc in first st, [sc2tog, ch 1] across to last st, sc in last st, turn.
-
Row 11: Repeat Row 7—25 (29, 33, 37) sts.
-
Shape Front Edge Only; Row 12: Ch 1, sc2tog, [sc2tog, ch 1] across to last st, sc in last st, turn—24 (28, 32, 36) sts.
-
Row 13: Repeat Row 7—23 (27, 31, 35) sts.
-
Repeat last 2 rows until 13 (15, 15, 15) sts remain.
-
Work even in pattern until piece measures 18 (18½, 19½, 20)” from beginning. Fasten off.
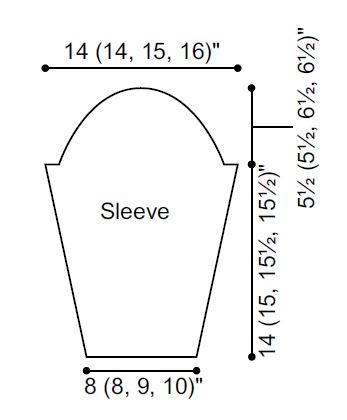
Sleeves
-
Ch 32 (34, 36, 40).
-
Row 1: Beginning in 2nd ch from hook, *sc2tog, ch 1; repeat from * to last ch, sc in last ch, turn—31 (33, 35, 39) sts.
-
Rows 2–6: Work in Pattern st.
-
Rows 7–8: Ch 1, sc in first st, ch 1, sc2tog in same st and next ch-sp, ch 1, [sc2tog, ch 1] across to last st, sc in last st, turn—35 (37, 39, 43) sts.
-
Row 9: Work in Pattern st.
-
Repeat Rows 2–9 for 5 more times—55 (57, 59, 63) sts.
-
Work in Pattern st until piece measures 14 (15, 15½, 15½)” from beginning.
Shape Cap
-
Row 1: Slip st in first 4 sts, [sc2tog, ch 1] across to last 5 sts, sc in next st, turn, leave remaining 4 sts unworked—47 (49, 51, 55) sts.
-
Row 2: Ch 1, sc in first st, skip next ch-sp, [sc2tog, ch 1] across to last 3 sts, sc2tog, sc in last st, turn—45 (47, 49, 53) sts.
-
Row 3: Ch 1, skip first st, [sc2tog, ch 1] across to last 2 sts, sc2tog, turn—43 (45, 47, 51) sts.
-
Row 4: Work in Pattern st.
-
Repeat Rows 2–4 until piece measures 19½ (20½, 21½, 22)” from beginning. Fasten off.
Finishing
Sew shoulder seams. Sew in Sleeves. Sew side and Sleeve seams.
-
Edging: Ch 11.
-
Row 1: Sc in 2nd ch from hook, *insert hook in same st as last completed st, yo and draw up a loop, insert hook in next st and draw up a loop, draw last loop through 2 loops on hook; repeat from * across, slip st in same st as last completed st, turn – 10 sts.
-
Row 2: Ch 1, *insert hook in same st as last completed st, yo and draw up a loop, insert hook in next st and draw up a loop, draw last loop through 2 loops on hook; repeat from * across, slip st in same st as last completed st, turn.
Repeat Row 2 until piece measures 77 (83, 89, 95)” from beginning, or until piece fits around front opening, neck edge and lower edge. Fasten off. -
Starting at lower side seam, sew ribbing around front opening, neck edge and lower edge, easing to fit around curves. Sew ends of ribbing together.
-
Ruffle: With Right Side facing, join yarn in edging at side seam.
-
Round 1 (Right Side): Working along ends of rows, ch 3, 2 dc in same space as join, *skip 1 row, 5 dc in next row (shell made), skip 1 row, sc in next row; repeat from * around, end 2 dc in same space as beginning; join with slip st in top of beginning ch, turn.
-
Round 2: *Ch 5, slip st in center dc of next shell; repeat from * around, turn.
-
Round 3: *(Sc, 2 dc) in next ch-sp, 3 dc in sc of Round 1, (2 dc, sc) in same ch-sp; repeat from * around; join with slip st in first sc. Fasten off.
-
Weave in ends.
Abbreviations
- sc2tog
- [draw up a loop in next st] twice, yarn over and draw through all 3 loops on hook.
- Pattern Stitch
- Row 1: Ch 1, [sc2tog, ch 1] across to last st, sc in last st, turn. Repeat this row for Pattern st.
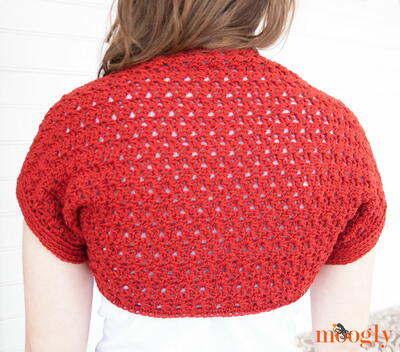
Read NextSimple Scarlet Crochet Shrug Pattern
Your Recently Viewed Projects
Thanks for your comment. Don't forget to share!
Delphine Bryant
Jul 28, 2018
So what are you guys trying to imply, only a librarian would appreciate a beautiful crochet sweater such as this? lol I think that this sweater would look great on anyone that would like to wear it. I think that the beige is a little bland so I would punch it up a bit with a brighter color.
Morehouse17
Jun 30, 2018
If this does not "shout" librarian, I do not know what sweater would. Back in grade school, I can recall our librarian always with a sweater on. I felt like it was like her "uniform". She taught me a great love of books and I am often knee deep in books from fantasy to crochet. Funny how a picture of a sweater can conjure up memories like that.
Hippie Chick
Jan 26, 2018
This is a very prim and proper classic traditional sweater tutorial with a hint of modern flair with the edging used here. Since this pattern is furnished by or from Red Heart yarn, I am assuming that the picture is just a stock photo. The tutorial is great, but we need more pics Red Heart.
FireFightersMoM
Jun 28, 2017
I thought this was a very cute pattern. I always look at the comments before I save the pattern. There seemed to be problems in the pattern. So I went to the RedHeart page and there was a correction made. Here is the correct pattern http//www.redheart.com/files/patterns/pdf/WR1774. == pdf
redress1 4115422
Apr 21, 2017
I am hesitant to try this with all the other comments, but it does look nice. My first question is what does sc2tog mean--single crochet 2 together? Does that mean 2 single crochets done in one stitch?
AFC Editor Julia
Apr 21, 2017
Hi redress, sc2tog means you combine two stitches with one single crochet stitch. It's a type of decrease. You start single crocheting in one stitch and then once you have 2 loops on your hook, instead of yarning over and pulling through them both, you insert your hook into the next stitch and pull up a loop (essentially starting another single crochet). Then, you'll have 3 loops on your hook. Yarn over and pull through all three. And that's single crocheting 2 stitches together. :) Hope that helps! Julia, editor for AllFreeCrochet
FireFightersMoM
Jun 28, 2017
Here is the corrected pattern ) http//www.redheart.com/files/patterns/pdf/WR1774.p == df
Hippie Chick
Apr 04, 2017
This sweater is way too pretty to limit it to a reading room. It looks very stylish and comfortable. The only upgrade it needs as far as looks is a more cheerful color or even multi color. This pattern is rated Easy, but after reading the comments from the others, I will not be attempting this project as everyone says it is harder than that and it does not come out correct.
Linda
Feb 16, 2017
Terrific curved front design! I shall crochet this sweater in one piece to elimate seams for a perfect finished swearer.
Catdabrat
Jan 07, 2018
I would like to do that, too. I have been looking for a cardigan pattern that I like, and this seems to be it, finally. But I don't know how to adapt this pattern to be made in one piece? Any suggestions? Thanks!
sbitabathaboudreau 6291312
Dec 05, 2016
I managed to get it made without too much trouble however the size of the front pannels is way off. After a closer lok at the picture i can see even it shows them puffing out. Its too bad because otherwise it would have been really pretty .
dcdavis4 8608421
Sep 30, 2016
This is not easy. I have made other sweaters before. The pattern stitch is easy very pretty. After tearing out the front for the sixth time, I'm going to try a different pattern. I do think I'm goingbto use this stitch for a baby blanket I have to make.
rifenburgc 4799776
Nov 07, 2015
I am not a beginner, but this garment is NOT "easy" as stated. I would say it was more intermediate, especially if you have never made a fitted garment. Maybe you should re-think the label "easy". Thanks
vchinery 6546987
Feb 26, 2016
I agree with you. I ripped out stitches several times trying to get things right. I got it assembled but it just didn't fit well together. I used 4 weight yarn but it seemed too heavy. I think I'm going to try again with 100% acrylic 3 weight that I found on sale. I'm determined to get this right..
lunaraevn
Oct 31, 2015
I am making this garment now. I am struggling with the instructions for the "front". I have included a photo of my attempt. This is the shape I get every time I do rows 1-16 the rows of pattern stitch until I get the instructed 10 1/2 ". I am not able to recognize how my piece reflects what the desired piece should be. In photo, the piece is laying just as it is worked from hook. What is the notch in bottom right? After my piece measures the 10 1/2 inches, the instruction has me beginning the armhole area, but I can't even identify where that is on my project as it does not fit the picture no matter which way I turn my project. Has anyone else tried making this from the current instructions provided?
kksdragons 0651702
Jan 03, 2016
I haven't made this yet, tho' I downloaded the pattern. Your pic seems to cut off the edges but if I am guessing right, flip the piece vertically (so what's on top in the pic is at the bottom). I believe the arm hole is on the right side where the notch is. Hope that helps! This is NOT what I'd call an "easy" pattern by any means!
Report Inappropriate Comment
Are you sure you would like to report this comment? It will be flagged for our moderators to take action.
Thank you for taking the time to improve the content on our site.