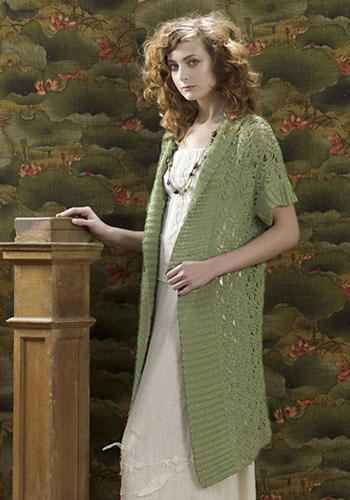
Renaissance Tunic

Step back in time with this Renaissance Tunic! Full of fun details, this is a great pattern if you are looking for a satisfying challenge. Wear your talent on your sleeve in this quirky sweater. This free crochet pattern includes five different sizing options. The bright colors make this the perfect item to wear during the spring and summer months. It's an advanced crochet pattern to complete.

Crochet HookG/6 or 4 mm hook
Yarn Weight(4) Medium Weight/Worsted Weight and Aran (16-20 stitches to 4 inches)
SIZES
Small (Medium, Large, X-Large, XX-Large)
FINISHED MEASUREMENTS
Chest 35 (39, 43, 47, 54)"/ 89 (99, 109, 119.5, 137) cm
Length 29 (30, 30, 31 1/2, 31 1/2)"/ 73.5 (76, 76, 80, 80) cm
MATERIALS
-
Caron International's Simply Soft (100% acrylic; 6 oz/170 g, 315 yds/288 m skein):
#9711 Dark Country Blue (A), 4 (4, 5, 6, 7) skeins
#9709 Light Country Blue (B), 1 (2, 3, 4, 5) skeins
#9727 Black (C), 1 (1, 2, 2, 3) skeins
#9717 Orchid (D), 1 (1, 1, 1, 1) skein
#9723 Raspberry (E), 1 (1, 1, 1, 1) skein - One each size US G-7 (4.5 mm), US H-8 (5 mm), and US I/9 (5.5 mm) crochet hooks, or sizes needed to obtain gauge.
- Stitch markers
- Yarn needle
- 1 yd/1 m dark red velvet or black leather lacing
- 1 matching flat button for side closure—1"/25mm diameter
- 2 large snaps
- Sewing needle and matching thread
- Assembly Chart
GAUGE
In single crochet, using H-8 (5 mm) hook, 13 sts and 17 rows = 4"/10 cm
Accent Border, using G-7 (4.5 mm) hook, Border is approximately 1 1/4"/3 cm wide.
In Sleeve pattern, using size US I-9 (5.5 mm) hook, 3 5-dc shells and 3 sc, and 9 rows = 5"/12.5 cm; 2 7-dc shells and 1 sc = 4"/10 cm
STITCHES USED
Chain (ch)
Double crochet (dc)
Half double crochet (hdc)
Single crochet (sc)
Slip stitch (slip st)
SPECIAL TERMS
2-hdc cluster (2-hdc Cl): Yarn over, insert hook in indicated st and draw up a loop (3 loops on hook), yarn over, insert hook in same st and draw up a loop (5 loops on hook), yarn over and draw through all loops on hook.
3-hdc cluster (3-hdc Cl): Yarn over, insert hook in indicated st and draw up a loop (3 loops on hook), [yarn over, insert hook in same st and draw up a loop] twice (7 loops on hook), yarn over and draw through all loops on hook.
Split sc (split-sc): Insert hook in indicated st, *yarn over and draw up a loop, insert hook in next st, yarn over and draw through all loops on hook*. To work next split sc, insert hook in same st as previous split sc and repeat from * to *.
sc2tog: Single crochet 2 together – Insert hook in next stitch, yarn over and pull up a loop, (two loops on hook), insert hook in next stitch, yarn over and pull up a loop, yarn over and draw through all three loops on hook.
NOTES
1) The Bodice is worked first in single crochet, from the empire waist up. The 1 3/4"/4.5 cm wide accent border is worked next. The flared shell stitch Peplum is then worked from the waist down.
2) The Sleeves are worked separately, from top of Sleeve down to cuff, then seamed to armholes and along their lengths.
3) The Tunic has left side opening, beginning beneath left arm and extending downward into the top third of the Peplum.
4) The Bodice ease can be adjusted with front lacing and is meant to be close-fitting.
5) To change color in joining slip st, insert hook in st to join, yarn over with new color and draw through all loops on hook to complete slip st and join.
FRONT (make 2)
With A and H-8 (5 mm) hook, ch 18 (22, 22, 25, 30).
Row 1: Sc in second ch from hook and in each remaining ch across, turn—17 (21, 21, 24, 29) sc.
Row 2: Ch 1, sc in each st across, turn.
Row 3: Ch 1, sc in each st across to last st, 2 sc in last st, turn—18 (22, 22, 25, 30) sc.
Note: Beginning of Row 3 is armhole edge; end of Row 3 is front edge.
Row 4: Ch 1, sc in each st across, turn.
Row 5: Ch 1, slip st in first 0 (3, 3, 5, 5) sts, sc in each st across to last st, 2 sc in last st, turn—19 (20, 20, 21, 26) sc.
Shape Armhole
Row 6: Ch 1, sc in each st across to last 4 sts, sc2tog twice, turn—17 (18, 18, 19, 24) sc.
Row 7: Ch 1, sc2tog twice, sc in each st across to last (0, 0, 0, 1, 1) st, 2 sc in last 0 (0, 0, 1, 1) st, turn—15 (16, 16, 18, 23) sc
Rows 8 and 9: Ch 1, sc in each st across, turn.
Row 10: Ch 1, sc in each st across to last 4 (2, 2, 4, 6) sts, sc2tog 2 (1, 1, 2, 3) times, turn—13 (15, 15, 16, 20) sc.
Row 11: Ch 1, sc in each st across, turn.
Row 12: Ch 1, sc2tog 1 (0, 0, 0, 0) times, sc in each st across to last 2 (4, 4, 2, 4) sts, sc2tog 1 (2, 2, 1, 2) times, turn—11 (13, 13, 15, 18) sc.
Row 13: Ch 1, sc in each st across, turn.
Row 14: Ch 1, sc in each st across to last 2 (2, 2, 2, 4) sts, sc2tog 1 (1, 1, 1, 2) times, turn—10 (12, 12, 14, 16) sc.
Rows 15–17: Ch 1, sc in each st across, turn.
Row 18: Ch 1, sc2tog, sc in each st across to last 2 (2, 2, 2, 4) sts, sc2tog 1 (1, 1, 1, 2) times, turn—8 (10, 10, 12, 13) sc.
Rows 19 and 20: Ch 1, sc in each st across, turn.
Row 21: Ch 1, sc2tog 0 (1, 0, 1, 2) times, sc in each st across to last 2 sts, sc2tog, turn—7 (8, 9, 10, 10) sc.
Rows 22 and 23: Ch 1, sc in each st across, turn.
Row 24: Ch 1, sc in each st across to last 2 sts, sc2tog, turn—6 (7, 8, 9, 9) sc.
Rows 25–27: Repeat Rows 22–24—5 (6, 7, 8, 8) sc.
Rows 28–32: Ch 1, sc in each st across, turn.
Size Small only:
Rows 33–46: Repeat Rows 27–32 twice; then repeat Rows 27 and 28 once—3 sc.
Sizes Medium (Large) only:
Rows 33–51: Repeat Rows 27–32 three times; then repeat Row 28 once—3 (4) sc.
Size X-Large only:
Rows 33–40: Repeat Rows 27–32 once; then repeat Row 28 twice—7 sc.
Rows 41–56: Repeat Rows 33–40 twice—5 sc.
Size XX-Large only:
Rows 33 and 34: Ch 1, sc in each sc across, turn.
Rows 35–52: Repeat Rows 27–34 twice; then repeat Row 28 twice—6 sc.
Rows 53–58: Repeat Rows 27–32—5 sc.
All sizes:
Fasten off.
Edge Right Front
With RS facing and H-8 (5 mm) hook, join A in first sc of Row 1; working along opposite side of foundation ch, *sc in next 4 sts, skip next st; repeat from * to curve of lower Front (sc in any remaining sts); sc in end of each row along curve; working up Front edge, **sc in end of next 4 rows, skip next row; repeat from ** to corner of shoulder (sc in any remaining sc); 2 sc in corner, sc in each st across to next corner; 2 sc in corner, ***sc in end of next 4 rows, skip next row; repeat from *** to end of Row 6; leave ends of Rows 1–5 unworked. Fasten off, leaving a long tail for seaming to Back.
Edge Left Front
With RS facing and H-8 (5 mm) hook, join A with sc in end of Row 6. Work same as right Front edging, working in opposite direction around edges.
BACK
With A and H-8 (5 mm) hook, ch 59 (63, 71, 77, 89).
Row 1: Sc in second ch from hook and in each remaining ch across, turn—58 (62, 70, 76, 88) sc.
Rows 2–4: Ch 1, sc in each st across, turn.
Shape Armholes
Row 5: Ch 1, sc2tog 0 (0, 4, 6, 5) times, sc in each st across to last 0 (0, 8, 12, 10) sts, sc2tog 0 (0, 4, 6, 5) times, turn—58 (62, 62, 64, 78) sc.
Row 6: Ch 1, sc2tog 4 (4, 1, 2, 0) times, sc in each st across to last 8 (8, 2, 4, 0) sts, sc2tog 4 (4, 1, 2, 0) times, turn—50 (54, 60, 60, 78) sc.
Row 7: Ch 1, sc2tog 1 (2, 2, 0, 3) times, sc in each st across to last 2 (4, 4, 0, 6) sts, sc2tog 1 (2, 2, 0, 3) times, turn—48 (50, 56, 60, 72) sc.
Row 8: Ch 1, sc in each st across, turn.
Row 9: Ch 1, sc2tog 2 (2, 2, 2, 3) times, sc in each st across to last 4 (4, 4, 4, 6) sts, sc2tog 2 (2, 2, 2, 3) times, turn—44 (46, 52, 56, 66) sc.
Row 10: Ch 1, sc in each st across, turn.
Rows 11–14: Repeat Rows 9 and 10; then repeat Row 10 twice—40 (42, 48, 52, 60) sc.
Row 15: Ch 1, sc2tog 1 (1, 1, 1, 3) times, sc in each st across to last 2 (2, 2, 2, 6) sts, sc2tog 1 (1, 1, 1, 3) times, turn—38 (40, 46, 50, 54) sc.
Rows 16–18: Ch 1, sc in each st across, turn.
Row 19: Ch 1, sc2tog 1 (2, 1, 2, 2) times, sc in each st across to last 2 (4, 2, 4, 4) sts, sc2tog 1 (2, 1, 2, 2) times, turn—36 (36, 44, 46, 50) sc.
Rows 20–36 (40, 42, 28, 28): Ch 1, sc in each st across, turn.
Sizes X-Large (XX-Large) only:
Row 29: Ch 1, sc2tog 1 (2) times, sc in each st across to last 2 (4) sts, sc2tog 1 (2) times, turn—44 (46) sc.
Rows 30–46 (48): Ch 1, sc in each st across, turn.
All sizes:
Row 37 (41, 43, 47, 49): Ch 1, sc in first 8 (8, 9, 10, 12) sts; leave remaining sts unworked, turn.
Row 38 (42, 44, 48, 50): Ch 1, sc in each st across, turn.
Row 39 (43, 45, 49, 51): Ch 1, sc in each st across to last 4 sts, sc2tog twice, turn—6 (6, 7, 8, 10) sc.
Row 40 (44, 46, 50, 52): Ch 1, sc in each st across, turn.
Rows 41 (45, 47, 51, 53)–42 (46, 48, 52, 56): Repeat Rows 39 (43, 45, 49, 51) and 40 (44, 46, 50, 52) 1 (1, 1, 1, 2) times—4 (4, 5, 6, 6) sc.
Row 43 (47, 49, 53, 57): Ch 1, sc in each st across to last 2 sts, sc2tog, turn—3 (3, 4, 5, 5) sc.
Rows 44 (48, 50, 54, 58)–46 (51, 51, 56, 58): Ch 1, sc in each st across, turn.
Fasten off, leaving a long tail for seaming shoulder.
Second Shoulder
With H-8 (5 mm) hook, join A with slip st in 8th (8th, 9th, 10th, 12th) sc from the end of Row 36 (40, 42, 46, 48).
Row 37 (41, 43, 47, 49): Ch 1, sc in same sc as join, sc in each sc to end, turn—8 (8, 9, 10, 12) sc.
Row 38 (42, 44, 48, 50): Ch 1, sc in each st across, turn.
Row 39 (43, 45, 49, 51): Ch 1, sc2tog twice, sc in each st across, turn—6 (6, 7, 8, 10) sc.
Row 40 (44, 46, 50, 52): Ch 1, sc in each st across, turn.
Rows 41 (45, 47, 51, 53)–42 (46, 48, 52, 56): Repeat Rows 39 (43, 45, 49, 51) and 40 (44, 46, 50, 52) 1 (1, 1, 1, 2) times—4 (4, 5, 6, 6) sc.
Row 43 (47, 49, 53, 57): Ch 1, sc2tog, sc in each st across, turn—3 (3, 4, 5, 5) sc.
Rows 44 (48, 50, 54, 58)–46 (51, 51, 56, 58): Ch 1, sc in each st across.
Fasten off, leaving a long tail for seaming shoulder.
Edge Back
With RS facing and H-8 (5 mm) hook, join A in lower right edge; edge as for Fronts.
Sew shoulder and right side seams. Leave left side unseamed.
ACCENT BORDER
Right Armhole
With WS facing and G-7 (4.5 mm) hook, join B with slip st in first st of armhole.
Round 1 (WS): Ch 2, work 3-hdc Cl in same st and in each st around, skipping 8 sts evenly space; join with slip st in first st; change to C in joining slip st, do not turn. Ensure that you have an even number of sts.
Round 2 (WS): With C, ch 1, sc in first st, *work split-sc over same and next st; repeat from * around, end with sc in last st; join with slip st in first st; change to D in joining slip st, do not turn.
Round 3 (WS): With D, ch 1, *3-hdc Cl in next st, slip st in next st; repeat from * around; join with slip st in first st; change to E in joining slip st, do not turn.
Round 4 (WS): With E, *slip st in next 3-hdc Cl, 2-hdc Cl in next slip st; repeat from * around; join with slip st in first st; change to C in joining slip st, turn.
Round 5 (RS): With C, ch 1, (sc, slip st) in each slip st around; join with slip st in first st; change to B in joining slip st, do not turn.
Round 6 (RS): With B, work a slip st around the post of each st around; join with slip st in first st; change to C in joining slip st, turn.
Round 7 (WS): With C, repeat Round 2; change to B in joining slip st, do not turn.
Round 8 (WS): With B, ch 2, work 3-hdc Cl in each st around, skipping 8 sts evenly space; join with slip st in first st. Fasten off.
Round 9 (WS): With A, slip st together the first Cl of Round 8 with one loop of nearest st in Round 5, *ch 2, skip next Cl in Round 8 and next st in Round 5, slip st together next Cl of Round 8 and one loop of next st in Round 5; repeat from * around. Fasten off, leaving a long tail for seaming. Repeat around left armhole, holding left sides together as needed to complete first round.
Neck/Body Opening
Note: Neck/Body border is worked in a manner similar to Armhole border, but the Border is worked in rows not joined rounds.
With WS facing and G-7 (4.5 mm) hook, join B in lower (unseamed) corner of left Front, to work up front opening, around neck, and back down other side of front opening.
Row 1: Ch 2, 3-hdc Cl in first st and in each st around, increasing one cluster in each shoulder seam; end at lower left corner of Back. Fasten off.
Row 2 (WS): Join C in first st of Row 1, work as for Round 2 of Armhole Border, working 6 increases (ch 1 after completing a split-sc) evenly spaced along 14 (18, 18, 18, 22) sts of curve of each Front. Fasten off.
Row 3 (WS): Join D in first st of Row 2, work as for Round 3 of Armhole Border. Fasten off.
Row 4 (WS): Join E, work as for Round 4 of Armhole Border; change to C in last st. Fasten off D.
Row 5 (RS): Work as for Round 5 of Armhole Border, working 3 increases (ch 1 after completing a slip st) evenly spaced along each curve of Fronts; do not fasten off.
Row 6 (RS): Join B in first st of Row 5, work as for Round 6 of Armhole Border, working 3 decreases (skip a slip st) evenly spaced along Back neck; change to C in last st; do not fasten off.
Row 7 (WS): With C, repeat Row 2 omitting increases; change to B in last st. Fasten off C.
Row 8 (WS): With B, ch 2, repeat Row 1, increasing 2 clusters spaced 12 sts apart along curve of each Front, omit extra clusters at shoulders. Fasten off.
SLEEVE (make 2)
Beginning at Sleeve Cap, with A and I-9 (5.5 mm) hook, ch 20 (26, 32, 38, 44).
Row 1: Sc in second ch from hook, *skip next 2 ch, 5 dc in next ch (shell made), skip next 2 ch, sc in next ch; repeat from * across, turn—3 (4, 5, 6, 7) shells.
Row 2: Ch 5 (counts as dc, ch 2 here and throughout), sc in third dc of first shell, ch 2, dc in next sc, *ch 2, sc in third dc of next shell, ch 2, dc in next sc; repeat from * across, turn.
Row 3: Ch 3 (counts as dc here and throughout), 4 dc in first st, *sc in next sc, 5 dc in next dc; repeat from * across, turn—4 (5, 6, 7, 8) shells.
Row 4: Ch 1, sc in first dc, ch 2, sc in third dc of same shell, *ch 2, dc in next sc, ch 2, sc in third dc of next shell; repeat from * across to last 2 dc, ch 2, sc in last dc (top of turning ch), turn.
Row 5: Ch 3, 4 dc in first st, *sc in next sc, 5 dc in next dc; repeat from * across, working last 5 dc in last sc, turn—5 (6, 7, 8, 9) shells.
Rows 6–12 (12, 12, 12, 14): Repeat Rows 4 and 5 3 (3, 3, 3, 4) times; then repeat Row 4 once more, leaving last 2 dc (dc and turning ch) unworked, turn—8 (9, 10, 11, 13) shells.
Row 13 (13, 13, 13, 15): Ch 1, sc in first sc, *5 dc in next dc, sc in next sc; repeat from * across to last sc; leave last sc unworked, turn.
Row 14 (14, 14, 14, 16): Ch 5, sc in third dc of first shell, ch 2, dc in next sc, *ch 2, sc in third dc of next shell, ch 2, dc in next sc; repeat from * across, turn.
Row 15 (15, 15, 15, 17): Ch 3, 2 dc in first dc, *sc in next sc, 5 dc in next dc; repeat from * across to last sc, sc in last sc, 3 dc in last dc (third ch of turning ch), turn.
Row 16 (16, 16, 16, 18): Ch 1, sc in first dc, *ch 2, dc in next sc, ch 2, sc in third dc of next shell; repeat from * across, turn.
Row 17 (17, 17, 17, 19): Ch 1, sc in first sc, *5 dc in next dc, sc in next sc; repeat from * across, turn.
Row 18 (18, 18, 18, 20): Ch 5, sc in third dc of first shell, ch 2, dc in next sc, *ch 2, sc in third dc of next shell, ch 2, dc in next sc; repeat from * across, turn.
Row 19 (19, 19, 19, 21): Ch 3, 3 dc in first dc, *sc in next sc, 7 dc in next dc; repeat from * across to last sc, sc in last sc, 4 dc in last dc (third ch of turning ch), turn.
Row 20 (20, 20, 20, 22): Ch 1, sc in first dc, *ch 3, dc in next sc, ch 3, sc in center dc of next shell; repeat from * across to last sc, ch 3, dc in last sc, ch 3, sc in last dc (top of turning ch), turn.
Row 21 (21, 21, 21, 23): Ch 1, sc in first sc, *7 dc in next dc, sc in next sc; repeat from * across, turn.
Row 22 (22, 22, 22, 24): Ch 6 (counts as dc, ch 3 here and throughout), sc in center dc of first shell, ch 3, dc in next sc, *ch 3, sc in center dc of next shell, ch 3, dc in next sc; repeat from * across, turn.
Row 23 (23, 23, 23, 25)–25 (25, 25, 25, 27): Repeat Rows 19 (19, 19, 19, 21)–21 (21, 21, 21, 23).
Sizes Small (Medium, Large, X-Large) only:
Row 26: Ch 6, sc in center dc of first shell, ch 2, (dc, ch 2, dc) in next sc (V-st made), *ch 3, sc in center dc of next shell, ch 3, dc in next sc; repeat from * across, turn.
Row 27: Ch 3, 3 dc in first dc, sc in next sc, *7 dc in next dc, sc in next sc; repeat from * across to V-st, 5 dc in next dc, sc in next ch-2 space, 5 dc in next dc, sc in last sc, 4 dc in last dc (third ch of turning ch), turn—9 (10, 11, 12) shells.
All sizes:
Rows 28–32: Repeat Rows 24–27; then repeat Row 24 once more—10 (11, 12, 13, 13) shells.
Fasten off.
Rows 33–41: Repeat Rows 21–24 twice; then repeat Row 21 once more, fastening off at the end of each row and beginning each row with a new color in this order: C, A, E, A, D, A, C, A, B.
Fasten off. Seam each Sleeve from cuff to Row 11 (12, 13, 14, 15); seam remaining rows to Row 9 of armhole opening.
BODICE INSERT
With A and I-9 (5.5 mm) hook, ch 20 (20, 26, 26, 26).
Row 1 (RS): Sc in second ch from hook, *skip next 2 ch, 5 dc in next ch (shell made), skip next 2 ch, sc in next ch; repeat from * across, turn—3 (3, 4, 4, 4) shells.
Rows 2–9: Repeat Rows 14–17 of Sleeve twice.
Sizes X-Large (XX-Large):
Repeat Rows 14 and 15 of Sleeve.
Fasten off. Position first row of Bodice Insert midway between curves of lower Fronts. Sew Bodice Insert into this opening between left and right Fronts along Round 5 of Accent Border, behind cluster stitch edge.
PEPLUM
Note: Peplum is worked along lower edge of Bodice.
With WS facing and I-9 (5.5 mm) hook, join A with slip st in first st of Row 5 of Accent Border at lower side edge of left Front.
Row 1 (WS): Ch 4, hdc in same st as joining, *ch 2, skip next st, hdc in front loop of next st; repeat from * across to edge of Bodice Insert, **hdc in next ch-2 space, ch 2; repeat from ** across Bodice Insert; hdc in front loop of first st of right Front, ***ch 2, skip next st, hdc in front loop of next st; repeat from *** across right Front and Back to end, turn.
Row 2: Ch 1, sc in first hdc, *(dc, ch, dc, ch, dc) in next hdc (shell made), sc in next hdc; repeat from * across, end with sc in last hdc (work into same st as last dc, if necessary), turn.
Row 3: Ch 5, sc in center dc of first shell, ch 2, dc in next sc, *ch 2, sc in center dc of next shell, ch 2, dc in next sc; repeat from * across to last sc; leave last sc unworked, turn.
Rows 4–7: Repeat Rows 15–18 of Sleeve.
Rows 8–11: Repeat Rows 3–7.
Rows 12–21: Repeat Rows 19–22 of Sleeve twice; then repeat Rows 19 and 20 of Sleeve once more.
Rows 22–30: Repeat Rows 33–41 of Sleeve.
Seam Rows 13–30. With RS facing, join A to Row 12 of Front side opening of Peplum, sc evenly along edge to Accent Border, slip st along edge of Accent Border, sc in edge of Row 1 of Bodice, ch 6 (for button loop), skip 2 rows along Bodice, sc in end of remaining rows to armhole border. Pivot to work along other edge; sc evenly spaced along Bodice edge, Border, and Peplum; *turn, skip first sc, working in front loops only, sc in each sc across; repeat from * once more. Fasten off.
FINISHING
Briefly steam block entire garment. Sew button to unseamed sc edge of Back opposite button loop. Sew one snap to close unseamed edge of left Front Accent Border over unseamed edge of Back Accent Border. Sew second snap midway down side opening of Peplum.
Weave velvet or leather lacing through every fifth cluster st along curving front opening.
Visit Caron's company profile for more crochet patterns!
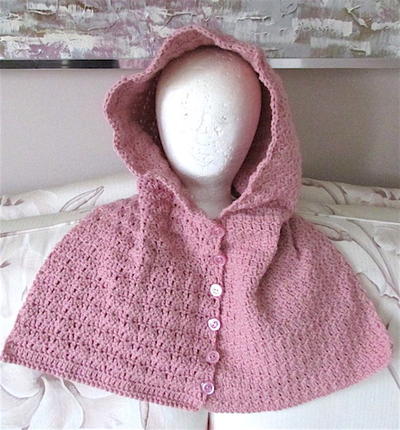
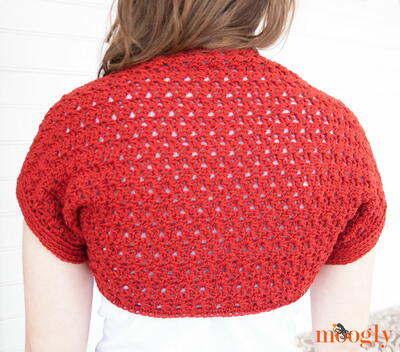
Read NextSimple Scarlet Crochet Shrug Pattern
Your Recently Viewed Projects
Thanks for your comment. Don't forget to share!
Delphine Bryant
Aug 02, 2018
This is definitely an advanced pattern. I am so happy to see that the directions allow for five different sizes to. I just love the way the tunic has a flair at the tail. That design element to me makes the article a little more modest. For anyone that is that bold, this could be a mini-mini dress.
Morehouse17
Jul 28, 2018
There are a lot of design elements to this tunic. I can get the feel of the renaissance flair especially with the tie at the front. I think I would appreciate this in a lighter shade over the blue. That dark color makes me think it is more appropriate for the fall and winter months instead of the spring and summer months.
Zeemer
Aug 28, 2017
There's something about tunics. My heart started to beat faster when I saw the word "tunic". This Renaissance Tunic may not be the tunic style I want but again I like the length of the tunic projects a dressy look. It's perfect with a tight-fitting pants or leggings maybe even vinyl leggings...wow. You can make this tunic in a color that will make you look stunning, maybe in black, midnight blue or any earth colors. Can't wait to make this project.
guineapig girl
Mar 22, 2016
I loved this pattern. It took me a while to figure it out and I had to customize a few steps, but the end result was very satisfying. Mine turned out like a short dress, which was fine by me! This was a good challenging project. Beware not for beginners!
tlhar22
Nov 06, 2015
anyone have trouble with the pattern the edges the armholes? thats where i am stuck. sent message to designer but nothing back
cutiepi1023 486192 8
May 14, 2015
Would someone here who has made this garment please share exactly how you steam blocked it at the end... I thought that you were never supposed to steam block acrylics. Afraid to try without some more details first! Thanks!
xena91388
Dec 20, 2013
It's really great but some parts of this get very confusing very fast, such as for the Front part it says: "Rows 3346: Repeat Rows 2732 twice; then repeat Rows 27 and 28 once3 sc." Which is asking you to repeat multiple rows from a step that has you repeat multiple rows: "Rows 22 and 23: Ch 1, sc in each st across, turn. Row 24: Ch 1, sc in each st across to last 2 sts, sc2tog, turn6 (7, 8, 9, 9) sc. Rows 2527: Repeat Rows 22245 (6, 7, 8, 8) sc. Rows 2832: Ch 1, sc in each st across, turn." I had to sit down with a piece of paper and sketch out those 14 rows just to wrap my mind around it.
ciu2310 5407193
May 11, 2013
The project is not that difficult in fact was fun. I had to go back and rewrite the instructions for myself to make it easier to follow. Unfortunately the instructions were like trying to follow computer program subroutines.
Lanoula
Aug 05, 2013
Is there any chance you could send you rewritten instructions to me? I'am struggling a bit here! Thanks
Report Inappropriate Comment
Are you sure you would like to report this comment? It will be flagged for our moderators to take action.
Thank you for taking the time to improve the content on our site.