Solomon's Knot Crochet: About and Tutorial
Learn the Solomon's knot crochet stitch with this guide and tutorial.

A Little Background...
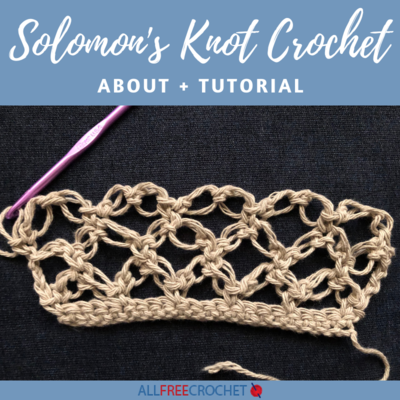
Sometimes called the Lover's Knot, the Solomon's Knot is a stitch that looks difficult but only requires you to know two stitches, a chain stitch, and single crochet.
The key with this stitch is to be consistent with your loop size. This will make more sense as you look over the pattern below. This is one pattern that is easier to follow by looking at pictures and reading the directions together as opposed to just reading the directions.
When following a crochet pattern, the stitch is abbreviated Sk (Solomon's Knot) or Lk (Lover's knot). Every two Solomon's Knot stitches are referred to as a pair or a set.
When working the pattern, you will usually work two of them together to form half of the diamond shape with a single crochet in the center, which resembles a knot. When you finish your first row it won't look like much, but, as you continue with additional rows the pattern will soon take shape.

Solomon's Knot Crochet Tutorial
There are two ways you can work the stitch… By starting with the knots themselves or with the stitch worked into a row of single crochets. The latter is much simpler to learn.
Starting with a row of single crochets:
- Begin by working a foundation row of four stitches + one. Below is a row of 21 single crochets.

- Next, at the end of the row Chain 1 and turn and then single crochet into the very first stitch.

- Pull your loop about 1/2” tall (if you are following a pattern, the directions will tell you how big your loop should be) and yarn over and draw through the loop on your hook. When you are looking at your yarn you should see a single strand of yarn in the back and two strands of yarn in the front.

- Insert your yarn under the back bar and make a single crochet.

- Repeat steps 2–4 to make another Solomon’s Knot. Two Solomon’s Knots = one set.

- Skip three stitches on the foundation row and single crochet into the next one.

- Make two more Solomon’s Knots.
Repeat steps 6 & 7 to the end of the row. Ending with a single crochet into the last stitch.

To start a new row…
- Chain 4 and make one Solomon’s knot and then turn your work.

- Single Crochet into the single crochet of the first set of Solomon’s Knots.

- Make two Solomon’s Knots and then single crochet into the single crochet between the next set of Solomon’s Knots.

- Continue step 3 to the end of the row. At the end of the row, you will be left with half of a Solomon’s Knot. Make one Solomon’s Knot and then treble crochet into the last single crochet of the row.

To work the third row…
- Chain 1 and turn. Single crochet into the first single crochet and then work two Solomon’s Knots.

- Next, single crochet into the center of the next full set of Solomon knots from the previous row.
- Continue step 2 until you reach the end of the row, single crochet into the top of the chain 4 from the previous row.
To make additional rows start with the Chain 4 from the second row and alternating between that row and the instructions for the third row.

Making a Chain of Solomon's Knots
- Begin by making a chain 2 and then single crochet into the first chain.
- Draw the loop on your hook to a taller height. If you are following a pattern it will tell you how big the loop should be.

- Yarn over and draw through the loop on your hook. Once again, when you are looking at your yarn you should see a single strand of yarn in the back and two strands of yarn in the front.

- Insert your yarn under the back bar and make a single crochet.

Repeat steps 2–4 until your desired length.

What Projects is the Solomon's Knot Crochet Stitch Best For?
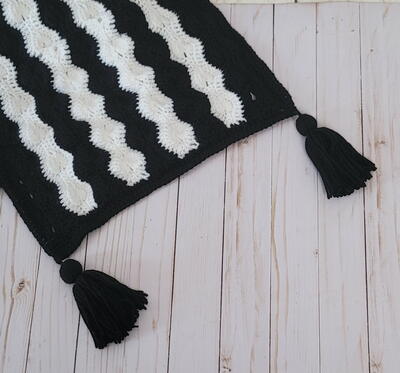
As you can see, the stitch creates an openwork pattern that is ideal for making warmer weather items like scarves, sweaters/pullovers, and shawls. It’s not a go-to for blankets or anything you want to use in colder weather.
Up Next
How Much Yarn Do I Need? >>>
What do you want to make using this stitch?