This project was submitted by one of our readers, just like you.
How To Crochet Easy Ribbing (for Beanies, Cuffs Or Cardigans)

How To Crochet Easy Ribbing for Beanies Cuffs Or Cardigans
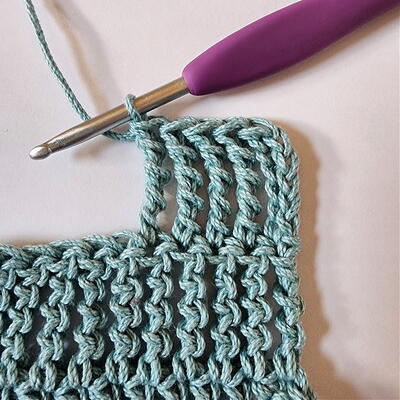
"How To Crochet Easy Ribbing Are you planning to crochet a beanie and want to make sure it sits properly & comfortably on your head? Some easy crochet ribbing will do just that. You can also add crochet ribbing to cuffs of cardigans or sweaters for a neat finish to the arms and waist. Or you could even crochet an entire garment with ribbed stitches if you want it to be tight & stretchy. There are a many ways you could create this stretchiness, but they're all called "ribbed stitches". Crochet ribbing comes in many forms and can be created using a variety of basic stitches. You could use slip stitches (sl st), single crochet stitches (sc), or taller stitches like half double crochet stitches (hdc) or double crochet stitches (dc). The smaller the stitch, the tighter the fabric will be. There's also a couple of different methods you could use with any of the above stitches to create ribbing: - The back loop only (BLO) method; or - The ribbed post method For this tutorial, I will show you how to crochet easy ribbing that has a good amount of stretch, ideal for crochet hats, beanies, cardigan sleeves & hems, or roll-necks of sweaters. This is my go-to ribbing type that I feel fits nicely on most of the garments I crochet. I generally tend to go down a hook size (or two) when crocheting ribbing for a garment to give it a more professional finish (I mean use a smaller sized hook for the ribbing than for the rest of the garment). The tighter, denser look of the ribbing will round up the garment nicely. I should also point out here that the type & weight of yarn you use will have an effect on how stretchy your ribbing will be. Cotton or cotton blend yarns will have more stitch definition and less stretch than acrylics, for example. Heavier or bulkier yarns will also create more stretch. For this tutorial, I used some classic DK yarn (from Paintbox Yarns). At the end of this tutorial, you'll find a list of frequently asked questions. If you have any questions that I haven't answered there, please drop me a comment below."

Crochet Hook4.5 mm hook
Yarn Weight(3) Light/DK (21-24 stitches to 4 inches)
Crochet Gauge17 stitches and 16 rows in sc = 4" (10 cm) using a size 7 (4.5 mm) hook.
Note: This gauge is simply to show you what my gauge was for this sample. You will need to follow the gauge written on the pattern you are following for correct sizing.
Finished SizeFor this tutorial, I am crocheting ribbed cuffs for a project I'm designing for my 6-year-old daughter. These are fairly long cuffs (reaching from her wrist to her elbow) measuring: 15 cm length (21 stitches) 15 cm width (25 rows) I used a size 7 (4.5 mm
Materials List
-
Any type of yarn. Perhaps using some acrylic yarn would be easier if you're a beginner. I used DK yarn (from Paintbox Yarns) for this tutorial. Just make sure the yarn you choose is not hairy or fuzzy.
-
Crochet hook that fits your yarn. Generally I use between a size G/4mm to H/5mm hook.
-
A tapestry needle
- A pair of scissors

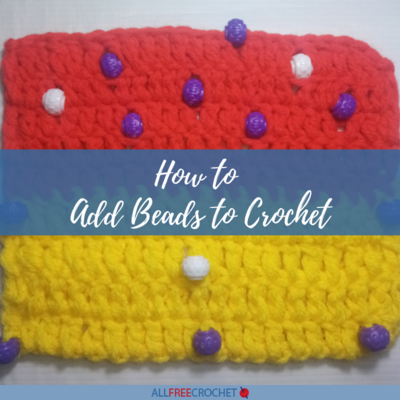
Read NextHow to Add Beads to Crochet (2 Ways)