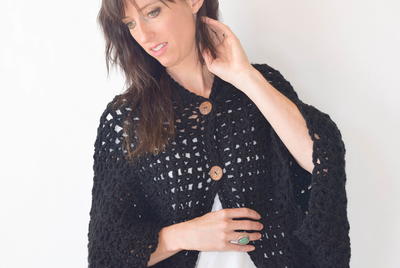
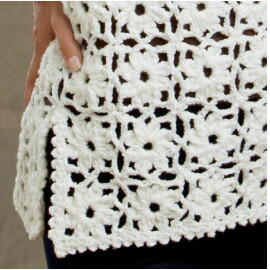
Dainty Daisy Pullover

This Dainty Daisy Pullover may seem like a winter sweater, but it has a lot more uses than that. In the summer, this lacy crochet sweater pattern would be perfect at night when there is a light breeze but it's not chilly enough for a full coat. It would also make a great cover over swimsuits, tanks, and turtlenecks. The possibilities are endless with this crochet top pattern from Premier Yarns that you definitely shouldn't miss.

Crochet HookH/8 or 5 mm hook
Yarn Weight(4) Medium Weight/Worsted Weight and Aran (16-20 stitches to 4 inches)
Crochet Gauge1 motif = 2 1/2 (2 3/4, 3)" square using size H (I, J) hook.
Finished SizeS (M, L) Bust: 35 (38, 42)"
Materials List
- Premier Yarns Deborah Norville Collection Everyday Soft Worsted Solids: Snow White (9 [10, 11] balls)
- Crochet Hook Size H/8, 5 mm (I/9, 5.5mm; J/10, 6mm)
- Stitch Marker
- Yarn Needle
- Assembly Diagram
Instructions
SPECIAL TERMS:
Puff: [Work tr into space, leaving last loop of each st on hook] 3 times, yo and pull through all 4 loops on hook.
PATTERN STITCH
-
Flower Motif: Ch 6, join with a sl st to form a ring.
-
Rnd 1: Ch 4, [tr in ring, leaving last lp of each st on hook] twice, yo and pull through all 3 loops on hook (beg Puff made); [ch 5, Puff in ring] 7 times, ch 5, join with sl st in top of beg Puff – 8 Puff sts. Fasten off.
Instructions for the last row of the motif based on the 4 circumstances when motifs would be joined:
-
The first row of motif you’ll only be joining in the middle ch-sps.
First Row of Motifs:
Ch 4, [tr in ring, leaving last lp of each st on hook] twice, yo and pull through all 3 loops on hook (beg Puff made); ch 5, Puff in ring, ch 2, sl st in side ch-5 sp of motif next to current motif, ch 2, Puff in ring, [ch 5, Puff in ring] 5 times, ch 5, join with sl st in top of beg Puff – 8 Puff sts. Fasten off.
After the first row is made you’ll be joining at the corners and in the middle of the side. At the beginning and end of a row of motifs there won’t be a motif diagonal from the corner motif to join the corner to (for the first corner on the first motif & last corner of the last motif), so for those you’ll join to the corner on the motif just below instead. -
Joining 1 Side
Ch 4, [tr in ring, leaving last lp of each st on hook] twice, yo and pull through all 3 loops on hook (beg Puff made); ch 5, dc in corner ch-5 sp of motif next to current motif, ch 2, Puff in ring, ch 2, sl st in side ch-5 sp of motif next to current motif, ch 2, Puff in ring, ch 2, dc in corner ch-5 sp of motif diagonal from current motif, ch 2, Puff in ring, [ch 5, Puff in ring] 4 times, ch 5, join with sl st in top of beg Puff – 8 Puff sts. Fasten off. -
Joining 2 Sides
Ch 4, [tr in ring, leaving last lp of each st on hook] twice, yo and pull through all 3 loops on hook (beg Puff made); ch 5, Puff in ring, ch 2, sl st in side ch-5 sp of motif next to current motif, ch 2, Puff in ring, ch 2, dc in corner ch-5 sp of motif diagonal from current motif, ch 2, Puff in ring, ch 2, sl st in side ch-5 sp of motif next to current motif, ch 2, Puff in ring, ch 2, dc in corner ch-5 sp of motif diagonal from current motif, ch 2, Puff in ring, [ch 5, Puff in ring] 2 times, ch 5, join with sl st in top of beg Puff – 8 Puff sts. Fasten off. -
Joining 2 Sides – last motif of row
Ch 4, [tr in ring, leaving last lp of each st on hook] twice, yo and pull through all 3 loops on hook (beg Puff made); ch 5, Puff in ring, ch 2, sl st in side ch-5 sp of motif next to current motif, ch 2, Puff in ring, ch 2, dc in corner ch-5 sp of motif diagonal from current motif, ch 2, Puff in ring, ch 2, sl st in side ch-5 sp of motif next to current motif, ch 2, Puff in ring, ch 2, dc in corner ch-5 sp of motif next to current motif, ch 2, Puff in ring, [ch 5, Puff in ring] 2 times, ch 5, join with sl st in top of beg Puff – 8 Puff sts. Fasten off.
SWEATER BACK
-
Body: Make a total of 42 motifs for the main body section; join in a rectangle 7 motifs wide and 6 motifs high as follows. This will be the section from the hem to the underarms.
Join corners of each motif to corresponding corners of new motif by working ch 5 as (ch 2, dc in center ch of ch-5 loop of previous motif, ch 2), continue in patt.
Join center loop on each side of motif to corresponding center loop of new motif by working ch 5 as (ch 2, sl st in center ch of ch-5 loop of previous motif, ch 2), continue in patt. -
Bodice: Work an additional row of 7 motifs along top edge of body section. Leaving center 3 motifs open for neck, work and join 2 motifs on each side of neck opening.
-
Sleeves: For each sleeve, work a total of 10 motifs. Join in a rectangle 5 motifs long and 2 motifs high, and join to sides of bodice along armholes.
FRONT
Work same as Back.
GUSSETS
For underarm gussets, work a total of 2 motifs.
FINISHING
Sew Front and Back together along sides, leaving bottom 2 motifs open on each side for vents and stopping 1 motif short of bottom of sleeves. Take 1 gusset motif and sew side edge along top motif of body (at underarm) on Back and top edge along first motif of sleeve. Fold motif in half diagonally and rep with remaining two sides on Front. Rep at other underarm with second gusset motif. Sew top and bottom seams of sleeves.
-
Picot Border—Rnd 1: Wth RS facing, join yarn on edge of hem with a sl st, ch 1, work 1 rnd of sc evenly around bottom edge and sides of vents; join with sl st in first sc.
-
Rnd 2: * Ch 3, sl st in same sc, sc in next sc; rep from * around, join with a sl st in first sc; fasten off.
-
Rep Picot Border on sleeve cuffs and around neck opening. Weave in ends.
Read NextArlo Granny Square Cardigan
Your Recently Viewed Projects
Thanks for your comment. Don't forget to share!
bagrella 7039618
Jul 17, 2016
I am fairly new to crocheting and I am extremely disappointed with this pattern direction. Guess I won't waste my time.
Elizabeth W
Mar 12, 2016
Very disappointing to try this pattern. Has anyone actually finished this sweater, following the instructions as they are written?! I would expect a pattern from a yarn company to be more easy to understand. The Assembly Diagram only shows the dimensions of the sweater....it does not show the motifs laid out or how to assemble them. The directions nor any comments every actually clarify whether to make the individual motifs first and then join or to make the motifs and join as you go. And each paragraph ends with "fasten off" which implies that you stop and start again....but where?! Again very disappointing. And customer service is not helplful...they are there to assist with orders...and there is no info for pattern help on their website that I can find. I give it a 2 star only because the "daisy" is cute...
Elizabeth W
Mar 13, 2016
I have now found a daisy scarf pattern on the premier site...the same daisy motif. It plainly states to make 48 flower motifs and then join., but the instructions in my opinion are not any more clear than on this paattern.
cynthia wilson 484 3583
Mar 08, 2016
How could anyone categorize this as "easy"?? This is NOT easy!!!
cynthia wilson 484 3583
Mar 08, 2016
Oh brother! I bought four cones of yarn yesterday, came home excited to start this, and flopped hopelessly. I just do not understand these instructions. What am I going to do with all this white yarn????? Bummer! Is there, by any chance, a tutorial video for this sweater on Youtube??? (please say yes....-( )
JennyBee1
Apr 16, 2015
Hi everyone Here are instructions for the last row of the motif based on the circumstances when motifs would be joined The first row of motif youll only be joining in the middle ch-sps First Row of Motifs Ch tr in ring leaving last lp of each st on hook twice yo and pull through all loops on hook beg Puff made ch Puff in ring ch sl st in side ch- sp of motif next to current motif ch Puff in ring ch Puff in ring times ch join with sl st in top of beg Puff Puff sts Fasten off After the first row is made youll be joining at the corners and in the middle of the side At the beginning and end of a row of motifs there wont be a motif diagonal from the corner motif to join the corner to for the first corner on…Read More the first motif last corner of the last motif so for those youll join to the corner on the motif just below instead Joining Side Ch tr in ring leaving last lp of each st on hook twice yo and pull through all loops on hook beg Puff made ch dc in corner ch- sp of motif next to current motif ch Puff in ring ch sl st in side ch- sp of motif next to current motif ch Puff in ring ch dc in corner ch- sp of motif diagonal from current motif ch Puff in ring ch Puff in ring times ch join with sl st in top of beg Puff Puff sts Fasten off Joining Sides Ch tr in ring leaving last lp of each st on hook twice yo and pull through all loops on hook beg Puff made ch Puff in ring ch sl st in side ch- sp of motif next to current motif ch Puff in ring ch dc in corner ch- sp of motif diagonal from current motif ch Puff in ring ch sl st in side ch- sp of motif next to current motif ch Puff in ring ch dc in corner ch- sp of motif diagonal from current motif ch Puff in ring ch Puff in ring times ch join with sl st in top of beg Puff Puff sts Fasten off Joining Sides last motif of row Ch tr in ring leaving last lp of each st on hook twice yo and pull through all loops on hook beg Puff made ch Puff in ring ch sl st in side ch- sp of motif next to current motif ch Puff in ring ch dc in corner ch- sp of motif diagonal from current motif ch Puff in ring ch sl st in side ch- sp of motif next to current motif ch Puff in ring ch dc in corner ch- sp of motif next to current motif ch Puff in ring ch Puff in ring times ch join with sl st in top of beg Puff Puff sts Fasten off Hope this helps --editors of AllFreeCrochet com
An Cailin Ban
Feb 04, 2015
I agree that the instructions are confusing. Because this motif has only one row, the linking must happen while you are working that row. The motif instruction, as printed, applies only to the first motif/square. Each subsequent motif must be joined on one side (if it is in the first line or at the beginning of any other line) or two sides (if it is elsewhere in second or later lines). I'm trying to upload a picture of the first three motifs joined together, but haven't succeeded so far! It helped that I had already made the Irish Lace Shawl which has 11 inch pattern squares and clearer instructions on joining the final pattern row of each square to its neighbours. Hope this helps.
jonsieivey 8672289
Aug 01, 2014
Are you supposed to create the first 42 motifs and then join them or are you joining them as you make them? In other words is the "working ch 5 as (ch 2, dc in center ch of ch-5 loop of previous motif, ch 2), continue in patt" talking about the chain 5 to make the motif or is this a totally separate additional chain 5 that you make solely for the purpose of joining the motifs?
jonsieivey 8672289
Aug 04, 2014
After looking at the pattern closer and starting work on this project, I decided that you join the motifs as they are being made. Make one motif and then as you are making each additional one join it to existing ones between the puffs. Instead of a chain five you chain two, join to another piece, and then chain two more. I hope this helps others. The pattern is a little confusing because at first glance it looks like you are supposed to make 42 individual motifs first and then join them. I don't think that is the intent.
parkerg 8878843
Jul 21, 2014
I am trying to join the motifs but I do not understand the directions on how to join them. Can anyone help me with this.
Jesse NC
Jul 22, 2014
Hello, Viewing the Assembly Diagram may help you see how the motifs are joined. Make sure you've read about the puff stitch. These are the instructions for joining: Join corners of each motif to corresponding corners of new motif by working ch 5 as (ch 2, dc in center ch of ch-5 loop of previous motif, ch 2), continue in patt. Join center loop on each side of motif to corresponding center loop of new motif by working ch 5 as (ch 2, sl st in center ch of ch-5 loop of previous motif, ch 2), continue in patt. This is a Premier Yarns pattern, so their customer service may be able to help you at phone number 1-888-458-3588. I hope we were able to help you! If not, perhaps a fellow commenter can help. Jesse, editor of AllFreeCrochet.com.
pweidmann 1301538
Jul 15, 2014
I wrote a comment yesterday, but I see it's not posted. The instructions for joining the motifs are not clear and do not describe where to begin joining in a clear way. A diagram would be very helpful. The instructions say to join the "corners" of the motifs, but the motifs are round and have no corners. I've made 42 of these motifs with no way to join them in way I can understand. Help would be greatly appreciated. I rated this based on my experience so far.
Jesse NC
Jul 22, 2014
Hello, Viewing the Assembly Diagram may help you see how the motifs are joined. Make sure you've read about the puff stitch. These are the instructions for joining: Join corners of each motif to corresponding corners of new motif by working ch 5 as (ch 2, dc in center ch of ch-5 loop of previous motif, ch 2), continue in patt. Join center loop on each side of motif to corresponding center loop of new motif by working ch 5 as (ch 2, sl st in center ch of ch-5 loop of previous motif, ch 2), continue in patt. This is a Premier Yarns pattern, so their customer service may be able to help you at phone number 1-888-458-3588. I hope we were able to help you! If not, perhaps a fellow commenter can help. Jesse, editor of AllFreeCrochet.com.
jonsieivey 8672289
Aug 04, 2014
The motifs do look round but once joined to others become more square looking. There are 8 puffs per motif so 2 puffs per side of the square. If you look at it that way the "corners" become more evident.
bb 0420635
Mar 06, 2015
I am a relatively experienced crocheter but I am very disappointed that these instructions are terribly confusing. I checked out the assembly diagram before starting and the fact that there is an
Report Inappropriate Comment
Are you sure you would like to report this comment? It will be flagged for our moderators to take action.
Thank you for taking the time to improve the content on our site.