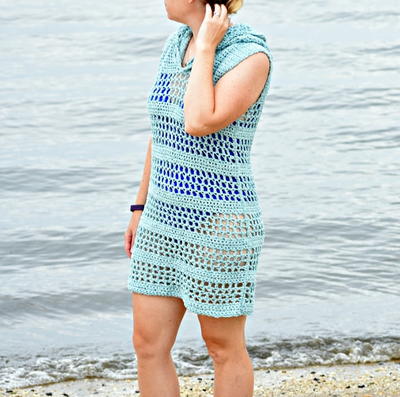
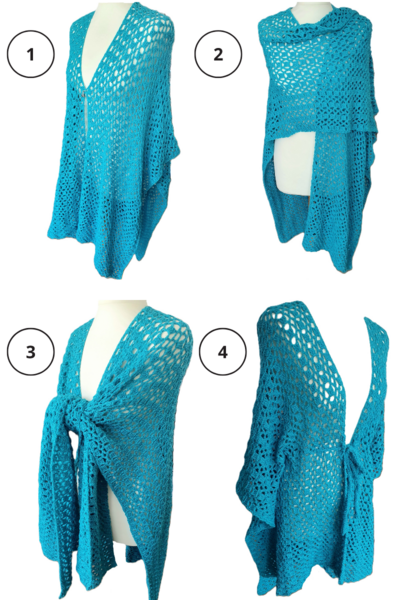
Sandy Shore Crochet Cover Up
Try out this gorgeous summer crochet pattern that's perfect for beginners and advanced crocheters alike!

This beginner-friendly crochet pattern, for a Sandy Shore Crochet Cover Up, is the perfect project to get you ready for summer. Whether you're planning to wear this cute and comfy cover up at the pool or beach, you will look beyond fashionable. With an optional hood, this customizable piece is a great addition to your swimwear. It is even possible to make this cover up longer for comfort or modesty with a few simple steps.
This crochet pattern uses lightweight yarn to make something breathable and airy that you’ll want to wear all summer long!

Crochet HookK/10.5 or 6.5 mm hook
Yarn Weight(5) Bulky/Chunky (12-15 stitches for 4 inches)
Crochet Gauge12 sc across x 14 rows = 4″
Finished Size17.5in (XS/S) or 19.5in (M/L) or 22in (XL/2X) by 29in
Materials List
- Lion Brand Ribbonaire yarn. XS/S – 3 skeins, M/L – 3 1/2 skeins, XL/2XL – 4 skeins. Keep in mind that this yardage includes the hood.
- 6.5mm Crochet Hook
- Scissors
- Fabric Measuring Tape
- Tapestry Needle
Pattern Instructions
Notes:
- This pattern is worked in three pieces: The front panel, back panel and hood. The hood is completely optional.
- Pattern is worked in an 8 row repeat. There are 4 rows of sc followed by 4 rows of dc mesh stitch.
- If you would like to make the cover up longer, simply add another 8 row repeat before you start the shoulder shaping.
- Whenever it says to sew/seam two pieces together, always flip them inside out and whip/mattress stitch them together to get a cleaner seam.
- The Ch.4 to begin the dc mesh row counts as a dc plus ch.1
- Chain (ch)
- Stitch (st)
- Single Crochet (sc)
- Double Crochet (dc)
- Decrease (dec)
- Skip (sk)
- Slip Stitch (sl st)
Front Panel:
-
Ch. (48,54,64)
-
Row 1 – Sc in 2nd ch from the hook and in each ch across. (47,53,63)
-
Rows 2 thru 4 – Ch.1 turn, sc in every st across. (47,53,63)
-
Row 5 – Ch.4 turn, sk first sc, dc in the next. *ch.1, sk next st, dc in the next* Repeat *across the row. (47,53,63)
-
Row 6 – Ch.4 turn, dc in the first dc. *ch.1, dc in the next dc* Repeat *across the row, ending with a dc in the 3rd ch of the ch.4 of previous row.
-
Rows 7 & 8 – Repeat Row 6
-
Rows 9 thru 48 – Repeat Rows 1 thru 8 respectively by crocheting 4 rows of sc followed by 4 rows of dc mesh.
NOTE: For Row 9, make your first row of sc by making a sc in every dc and ch.1 space. End this row with a sc in the 3rd and 4th ch of the ch.4 of the previous row.
NOTE: If you want to add length to you cover up, crochet another 8 row repeat before going onto the shaping of the shoulders.
Shaping of Left Shoulder:
-
Row 49 – Ch.1 turn, sl st in the first (4,4,7) stitches. Then, sc in the next (18,21,23) stitches.
-
Row 50 – Ch.1 turn, sc in every st across. (18,21,23)
-
Rows 51 thru 58 – Repeat Row 50. (18,21,23)
-
Row 59 – Ch.1 turn, sc in every st across, make a sc dec over the last two stitches. (17,20,22)
-
Row 60 – Ch.1 turn, sc dec over the first two stitches, make a sc in every remaining stitch across the row. (16,19,21)
-
Repeat Rows 59 & 60 respectively until you have (8,11,13) sc across the row. You will have a total of 20 rows of sc.
-
Bind off.
Shaping of Right Shoulder:
-
With right side facing you and front panel laying flat, count 3 stitches from right to left from where the left shoulder ended and attach yarn to 4th stitch. See Pic below
Editor's Note: Click image to enlarge. -
Row 49 – Ch.1, sc in the same st and the next (17,20,22) stitches. Leave the last (4,4,7) stitches unworked. (18,21,23)
-
Row 50 – Ch.1 turn, sc in every st across. (18,21,23)
-
Rows 51 thru 58 – Repeat Row 50. (18,21,23)
-
Row 59 – Ch.1 turn, sc dec over the first two stitches, sc in every st across. (17,20,22)
-
Row 60 – Ch.1 turn, sc in every st across, make a sc dec over the last two stitches. (16,19,21)
-
Repeat Rows 59 & 60 respectively until you have (8,11,13) stitches left. You will have a total of 20 sc rows. Bind off

Back Panel:
-
Follow pattern instructions of the Front Panel for the first 48 rows.
-
Row 49 – Ch.1 turn, sl st in the first (4,4,7) stitches. Sc in every st leaving last (4,4,7) stitches unworked. (39,45,49)
-
Row 50 – Ch.1 turn, sc in every st across (39,45,49)
-
Rows 51 thru 68 – Repeat Row 50
-
Bind off.
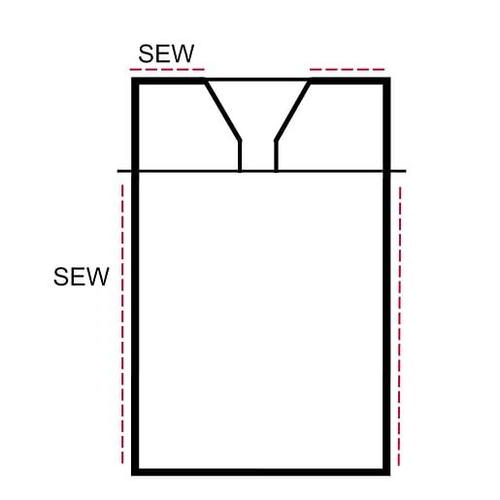
Sew/Seam:
-
Lay Front Panel flat on top of Back Panel and sew sides and shoulder together. See pic below
Editor's Note: Click image to enlarge.
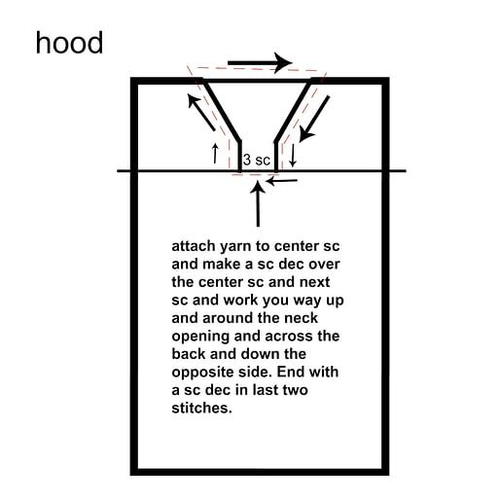
Hood Instructions:
-
Attach yarn to center stitch of the 3 sc that are in between each shoulder.
-
Row 1 – Ch.1, make a sc dec over the first 2 stitches (center st and ch.1). Work sc’s all the way around the neckline by working up the left side, across the back, and coming back down. End with a sc dec over the last 2 stitches (ch.1 and center st).
It does not matter how many sc you make as long as the st count is an odd number. For reference I made 71 sc all the way around.
Editor's Note: Click image to enlarge. -
Row 2 thru 4 – Ch.1 turn, sc in every st across.
-
Row 5 – Ch.4 turn, sk first sc, dc in the next. *ch.1, sk next st, dc in the next* Repeat *across the row.
-
Row 6 – Ch.4 turn, dc in the first dc. *ch.1, dc in the next dc* Repeat *across the row, ending with a dc in the 3rd ch of the ch.4 of previous row.
-
Rows 7 & 8 – Repeat Row 6
-
Repeat rows 1 thru 8 three more times for a total of 32 rows.
-
Rows 33 & 34 – Ch.1, sc in every st across.
-
Bind off leaving a long enough tail to sew hood together.
-
Next, fold the rectangle vertically and sew the top of the hood together.
-
For a cleaner edge, make a sc border around hood and neckline.
-
Bind off and weave in all ends!
You are now finished with your cute Sandy Shore Cover Up. I hope you enjoy wearing it!
Up Next:
Up Next:
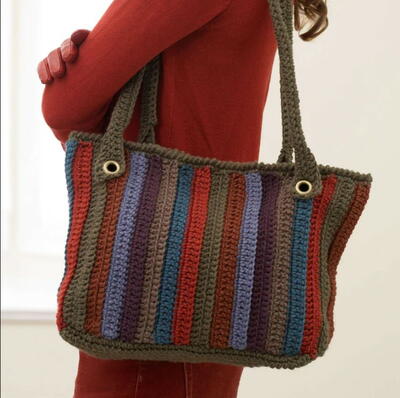
Summer Tote Bag
Read NextScrapbuster Sandals