Glowing Green Galaxy Hero Costume
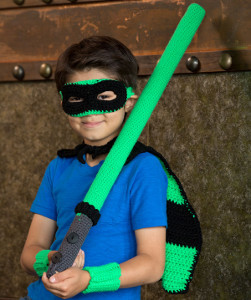
Pow, pow! Get your son excited for Halloween with this Glowing Green Galaxy Hero Costume. Work up a light saber, cape, mask, and wrist cuffs with this homemade Halloween costume crochet pattern that comes in sizes two, four, six, and eight. He will want to be running around trying to save the day any time of year, but it will be especially perfect to use as his costume for trick-or-treating.

Crochet HookH/8 or 5 mm hook, I/9 or 5.5 mm hook
Yarn Weight(4) Medium Weight/Worsted Weight and Aran (16-20 stitches to 4 inches)
MATERIALS:
- Red Heart Super Saver:
- A: Glowworm (1 skein)
- B: Black (1 skein)
- C: Charcoal (1 skein)
- Susan Bates Crochet Hooks (I/9, 5.5 mm; H/8, 5.0 mm)
- Yarn Needle
- Wrapping Paper Tube
- Two 1" Buttons
- Fiberfill
- Adhesive Tape
- Stitch Marker
GAUGE:
14 sts = 4" (10cm) in pattern; 10 rows in hdc = 4" (10cm).
Rounds 1-5 of saber - 1 1/2" (4cm).
SIZE:
Directions are for size 2. Changes for sizes 4, 6, and 8 are in parentheses.
Cape measures approximately 19 (19½, 20, 21)” [48.5 (49.5, 51, 53.5 cm] wide across lower edge x 11, 12, 14, 15½” [28 (30.5, 35.5, 39.5) cm] long, including tabs.
Mask measures approximately 16 (18, 20, 20)” [40.5 (45.5, 51, 51) cm] circumference.
SPECIAL STITCHES:
hdc2tog = [Yarn over, insert hook in next stitch, yarn over and pull up loop] 2 times, yarn over and draw through all 5 loops on hook.
sc2tog = [Insert hook in next stitch, yarn over and pull up a loop] twice, yarn over and draw through all 3 loops on hook.
PATTERN NOTES:
1. In cape, beginning ch-2 does not count as a half double crochet. Do not work last stitch into beginning ch-2.
2. Cape and cuffs are worked in rows; star is worked in joined rounds in any desired colors.
3. Cape is worked in varying bands of 2 colors; be sure to work in correct color sequence for your size.
4. Lightsaber is worked in continuous rounds (spiral) with right side facing; do not join unless instructed.
5. Although gauge is not critical for the lightsaber, stitching around the tube is intended to be close-fitting. If your tube has a larger diameter than the sample tube, add additional increase rounds until the tube fits into the first rows of lightsaber.
6. To change color, work last stitch of old color to last yarn over. Yarn over with new color and draw through all loops on hook to complete stitch. Proceed with new color. Fasten off old color
CAPE
Note: Work color sequence as follows: 7 (8, 9, 10) rows with A, 6 (6, 7, 9) rows with B, 7 (8, 9, 10) rows with A.
With larger and A, ch 56 (59, 61, 64).
Row 1: Hdc in 3rd ch from hook and each ch across, turn—55 (58, 60, 63) hdc.
Rows 2-4 (4, 8, 12): Ch 2, hdc in each st, turn.
Row 5 (5, 9, 13) (decrease row): Ch 2, hdc in first st, hdc2tog, hdc in each st to last 3 sts, hdc2tog, hdc in last st, turn—53, (56, 58, 61) hdc.
Size 2 only
Rows 6-19: Repeat Row 5—25 hdc.
Size 4 only
Row 6: Ch 2, hdc in each st, turn.
Row 7: Repeat Row 5—54 hdc.
Row 8: Ch 2, hdc in each st, turn.
Rows 9-21: Repeat Row 5—28 hdc.
Size 6 only
Row 10: Ch 2, hdc in each st, turn.
Rows 11-24: Repeat Row 9—30 hdc.
Size 8 only
Row 14: Ch 2, hdc in each st, turn.
Rows 15-28: Repeat Row 13—33 hdc.
All sizes
Row 20 (22, 25, 29): Ch 2, hdc in each st; change to B, turn.
First Tab
Row 1: Ch 2, hdc in first 8 (9, 10, 11) sts; leave remaining sts unworked, turn—8 (9, 10, 11) hdc.
Rows 2-6 (6, 8, 8): Ch 2, hdc in each st, turn. Fasten off B at end of Row 6 (6, 8, 8).
Second Tab
Holding cape with first tab to your right, skip next 9 (10, 10, 11) stitches and join B with slip st in next st.
Row 1: Ch 2, hdc in same st as joining and in each remaining st, turn—8 (9, 10, 11) hdc.
Rows 2-6 (6, 8, 8): Ch 2, hdc in each st, turn. Do not fasten off at end of Row 6 (6, 8, 8).
Edging
Ch 36, slip st in each ch (neck tie made), sc in each st of last row of second tab; working across ends of rows, sc evenly down outer side of second tab and cape to Row 1; working across opposite side of foundation ch, sc in each ch; working across ends of rows, sc evenly up opposite side of cape and outer side of first tab to last row of first tab, sc in each st of last row; ch 36, slip st in each ch (neck tie made); working across ends of rows, sc evenly across inner side of first tab to last row of cape, sc in each unworked st of last row; working across ends of rows, sc evenly up inner side of second tab to last row; join with slip st in first st.
Fasten off.
MASK
Eye Opening (make 2)
With larger hook and B, ch 15; join with slip st in first ch to form a ring.
Round 1 (right side): Ch 1 (does not count as a st), work 25 hdc into ring; join with slip st to first hdc—25 hdc. Fasten off, leaving 6” (15 cm) tail on 2nd eye opening for sewing.
With wrong sides of eye openings held together and sewing through both thicknesses, whipstitch 3 sts together (the first and 3rd stitches sewn are “joined sts”).
Face
Round 1: With right side facing, join B with sc in first joined st on left eye opening (if you are right-handed; right eye opening if you are left-handed), sc in next 22 st, sc in next joined st of same eye opening, sc in first joined st of 2nd eye opening, sc in next 22 st, sc in last joined st; join with slip st in first st—48 sc.
Round 2: Ch 2 (counts as first hdc), hdc in next 10 sts, 2 hdc in next st, place marker in first hdc made of 2 hdc, 2 hdc in next st, 2 sc in next st, sc in next 9 sts, sc in next 2 st, sc in next 9 sts, 2 sc in next st, 2 hdc in each of next 2 sts, place marker in last hdc made, hdc in last 11 sts; join with slip st to beginning ch-2; change to A.
Note: Move markers up in Round 3.
Round 3: Ch 1, sc in same st as joining and in each st; join with slip st to first st.
Fasten off.
Band
With right side facing, join A with sc at first marked hdc.
Row 1: Sc in next 3 hdc, turn—4 sc.
Row 2: Ch 1, sc in each st, turn.
Repeat last row until band measures 8 (10, 12, 12)” [20.5 (25.5, 30.5, 30.5) cm] or desired length, ending with a wrong side row. Do not fasten off. Being careful not to twist band, with wrong sides together, hold last row of band to opposite side of mask with first st of band at 2nd marked st; working through both thicknesses, join with slip st through 4 st of band.
Fasten off.
CUFFS (make 2)
With larger hook and A, ch 7 (9, 11, 13).
Row 1 (right side): Sc in 2nd ch and each ch, turn—6 (8, 10, 12) sc.
Rows 2-8 (8, 9, 9): Ch 1, working in back loops only, sc in each st, turn.
Rows 9-20 (9-20, 10-22, 10-22): Ch 1, sc in each st, turn.
Holding first and last rows with wrong sides together, slip st through back loops only of Row 1 and both loops of last row. Fasten off.
STAR
Note: If star is to be sewn to cape, leave long beginning and end tails.
With larger hook and A, ch 2.
Round 1: Work 5 sc in first ch; join with slip st to first st—5 sc.
Rounds 2 and 3: Ch 1, 2 sc in each st; join with slip st to first st—20 sc at end of Round 3.
Note: Points of star are made from rows worked within Round 4.
Round 4: *Sc in next 4 st (first row made), turn; ch 1, sc2tog twice (2nd row made), turn; ch 1, sc2tog, do not turn; ch 1, working in ends of rows, slip st in each row, slip st in base of 4th st of first row; repeat from * 4 times; join with slip st in first sc.
Fasten off.
LIGHTSABER
Top
With smaller hook and A, ch 2.
Round 1 (right side): Work 6 sc in first ch—6 sc. Place marker for beginning of round and move marker up as each round is completed.
Round 2: Work 2 sc in each st—12 sc.
Round 3: *Sc in next st, 2 sc in next st; repeat from * around—18 sc.
Note: At this point, rounds should be slightly larger than the end of your wrapping paper tube. If it is not, work an increase round.
Increase Round: *Sc in next 2 st, 2 sc in next st; repeat from * around—24 sc. If necessary, add additional increase rounds by working *sc into next 3 st, 4 st, 5 st…, 2 sc in next st; then repeating from * around.
Next Round: Sc in each st.
Next Round: Working in back loops only, sc in each st.
Next Round: Sc in each st.
Repeat last round until lightsaber is 5” (12.5 cm) shorter than length of tube; change to C. Repeat last round until one round extends past end of tube; join with slip st in first st.
Fasten off.
Bottom
With smaller hook and C, ch 2.
Repeat Rounds 1-3 and any Increase Rounds necessary to match diameter of last round of top.
Last Round: Sc in next 9 st, ch 10, sc in next 9 st; join with slip st in next st. Fasten off, leaving a long tail for sewing.
With right sides together, whipstitch bottom to top through 5 sc opposite ch-10 loop. Using photograph as a guide, sew button for closure on bottom approximately 1½” (4cm) from lower edge. Sew extra button above this for decoration.
Band
With smaller hook and B, ch 5.
Row 1: Sc in 2nd ch from hook and each st across, turn—4 sc.
Row 2: Ch 1, working in back loops only, sc in each st.
Repeat Row 2 until band is long enough to fit around tube snugly.
With wrong sides held together, working through inner loop of first row and outer loop of last row, slip st in each st. Fasten off.
Slide band into place to cover color change.
Whipstitch if desired.
FINISHING
Cape
Block cape lightly, if needed. Center star on B-colored band on cape; with beginning tail, backstitch center of star first, then sew points with end tail.
Lightsaber
Prepare wrapping paper tube for insertion by applying adhesive tape across one end, stuffing tube firmly with fiberfill, and taping other end closed. For added stability, wrap the tube with tape. Insert tube into lightsaber. The fit should be snug. Close bottom by wrapping loop around bottom button.
Weave in all ends.
Read NextCoolest Pirate Afghan Ever