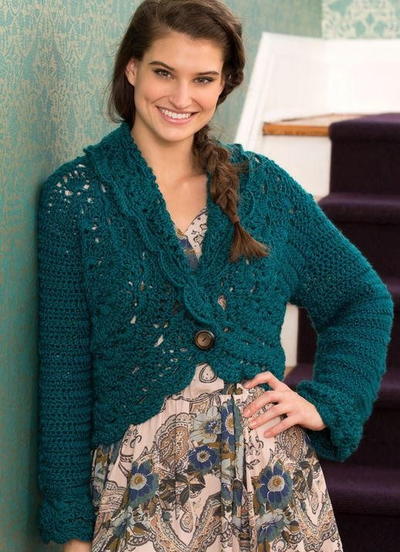
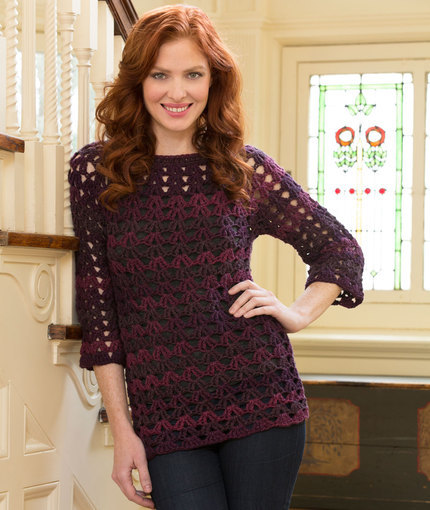
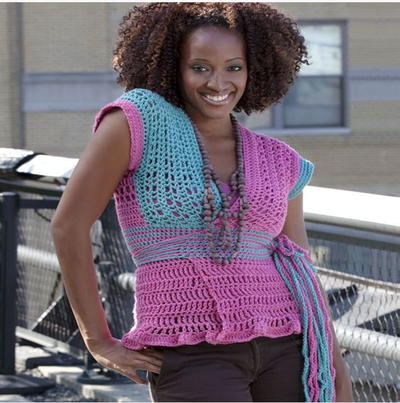
Pink and Blue Wrap-and-Go Sweater

Make this fabulous Pink and Blue Wrap-and-Go Sweater from Red Heart Yarn. Red Heart's Stitch Nation Alpaca Love is used in two colors for this free crochet pattern. Crochet this adorable sweater for yourself; the ruffles and waistband add the perfect touch to the design. Designed by The Double Stitch Twins, this this crochet sweater is a figure-flattering crochet design that will look great at on any woman. Its also a great layering piece to wear during any season.

Crochet HookI/9 or 5.5 mm hook
Yarn Weight(4) Medium Weight/Worsted Weight and Aran (16-20 stitches to 4 inches)
Directions are for size Small; changes for sizes
Medium and Large are in parentheses.
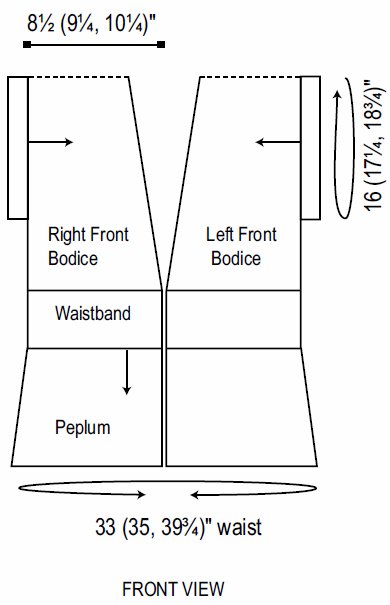
Finished Bust/Chest Measurement: 34 1/2 (36 1/2, 41)”
Finished length: 22 3/4 (23 1/2, 24 1/4)”
Materials:
- RED HEART® “Stitch Nation” Alpaca Love: 4 (4, 5) balls 3650 Lotus A and 2 (2, 3) balls 3810 Lake B.
- Crochet Hook: 5.5mm [US I-9] or size needed for gauge 6.5mm [US K-10.5] or two sizes larger than size needed for gauge
- Stitch markers
- Yarn needle
GAUGE: 12 sts = 4”; 11 rows = 4” in hdc using 5.5 mm
[US I-9] hook. 13 sts = 4”, 7 rows = 4” in dc using 5.5 mm
[US I-9] hook. CHECK YOUR GAUGE. Use any size hook to obtain the gauge.
NOTE: Use smaller hook throughout unless otherwise directed. Front bodice is longer than back bodice to create back neck shaping.
TOP
Right Cap Sleeve
With A and smaller hook, ch 48 (52, 56), slip st in 1st ch to join into ring.
Round 1: Ch 2 (counts as hdc), hdc in each ch around, join with slip st to top of ch-2.
Rounds 2 – 3: Ch 2 (counts as hdc), hdc in back loop only of each hdc around, join with slip st to top of ch-2.
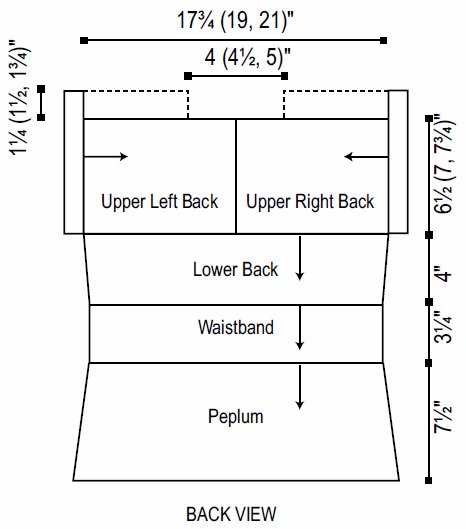
Upper Right Back
Row 1: Ch 3 (counts as dc), dc in back loop only of next hdc, dc in back loop only of next 20 (22, 24) hdc; place marker in last st, turn.
Row 2: Ch 3 (counts as dc), dc in next dc, *ch 1, skip 1 dc, dc in next dc; repeat from * 8 (9, 10) m ore times, dc in last dc, turn.
Rows 3 and 5: Ch 3 (counts as dc), dc in next dc, dc in next ch-1 space, *ch-1, skip 1 dc, dc in next ch-1 space; repeat from * 7 (8, 9) more times, dc in last 2 dc, turn.
Rows 4 and 6: Ch 3 (counts as dc), dc in next dc, ch 1, skip 1 dc, dc in next ch-1 space; repeat from * 7 (8, 9) more times, ch 1, skip 1 dc, dc in last 2 dc, turn.
Row 7: Ch 3 (counts as dc), dc in each dc and ch- 1 space across, turn—21 (23, 25) dc.
Row 8: Ch 3 (counts as dc), dc in next dc, *ch 1, skip 1 dc, dc in next dc; repeat from * 8 (9, 10) more times, dc in last dc, turn.
Rows 9 and 11: Repeat Row 3.
Rows 10 and 12: Repeat Row 4.
Row 13: Ch 3 (counts as dc), dc in each dc and ch- 1 space across, turn—21 (23, 25) dc.
Row 14: Ch 3 (counts as dc), dc in each dc across, turn.
Row(s) 15 (15 and 16, 15-18): Repeat Row 14 one (2, 4) more time(s). Fasten off at the end of Row 15 (16, 18).
Left Cap Sleeve
With B and smaller hook, work as for right cap sleeve.
Upper Left Back
Row 1: Ch 3 (counts as dc), turn, dc in back loop only of next 20 (22, 24) hdc, place marker in last st, turn.
Work Rows 2-15 (16, 18) as for upper right back. Fasten off.
Join Upper Backs: Hold upper backs with right sides together. Join A and sc in each dc of last rows of upper backs, working through both layers. Fasten off.
Lower Back
With right side facing and A, join yarn to marked st at upper left back.
Row 1: Working along ends of rows, ch 3 (counts as dc), work 57 (61, 67) dc evenly across upper back to second marked st, turn—58 (62, 68) dc. Remove markers.
Row 2: Ch 3 (counts as dc), dc in next dc, *ch 1, skip 1 dc, dc in next dc; repeat from * across, turn.
Row 3: Ch 3 (counts as dc), dc in next ch-1 space, *ch 1, skip 1 dc, dc in next ch-1 space; repeat from * across, ending ch 1, sk 1 dc, dc in last dc, turn.
Row 4: Ch 3 (counts as dc), dc in each dc and ch-1 space across, turn.
Rows 5-7: Ch 3 (counts as dc), dc in each dc across, turn.
Fasten off at the end of Row 7.
Left Front Bodice
With Right Side facing and A, join yarn to first unworked st on left sleeve at shoulder.
Row 1: Ch 3 (counts as dc), dc in back loops only of next 27 (29, 31) sleeve sts; continuing along upper back, dc 10
(11, 12) sts evenly along side of upper back, turn—38 (41, 44) sts.
Row 2: Ch 3 (counts as dc), dc in each dc across, turn.
Row 3: Ch 3 (counts as dc), dc in next dc, *ch 1, skip 1 dc, dc in next 2 dc; repeat from * across, dc in last dc, turn.
Row 4: Ch 3 (counts as dc), dc in next 2 dc, *ch 1, skip next ch-1 space, dc in next 2 dc; repeat from * across, turn.
Row 5: Ch 3 (counts as dc), dc in each dc and ch-1 space across, turn.
Repeat last three rows 2 (2, 3) more times.
Next row: Ch 3 (counts as dc), dc in each dc across, turn.
Repeat this row 1 (2, 1) more time(s). Fasten off at the end of the last row.
Right Front Bodice
With B, and wrong side facing, join yarn to first unworked st on right sleeve at shoulder.
Row 1: Ch 3 (counts as dc), dc in back loops only of next 27 (29, 31) sleeve sts; continuing along upper back, dc 10 (11, 12) sts evenly along side of upper back, turn—38 (41, 44) sts. Work Rows 2-13 as for left front bodice. Fasten off.
Join shoulders: Place markers 2 (2 1/4, 2 1/2)” either side of center back seam for back neck. With right sides together, pin corner of right front bodice to marked st on right back. With A, slip st ends of rows together, easing in fullness on front shoulder. Repeat for left shoulder.
Waistband/Belt
Note: All waistband/belt rows are right side rows. Do not turn at the end of each row.
Row 1 (right side): With B and right side facing, join yarn at front corner of left front bodice; ch 2 (counts as hdc), hdc 22 sts evenly along left front bodice, 53 (57, 63) sts along lower back, and 23 sts along right front bodice—99 (103, 109) sts. Fasten off.
Row 2: With A, ch 150, hdc in next 19 (22, 25) hdc, ch 2, skip next hdc, hdc in remaining hdc across, ch 100. Fasten off.
Rows 3, 5, 7 and 9: With B, ch 150, hdc in next 19 (22, 25) hdc, ch 2, skip ch-2 space, hdc in remaining hdc across, ch 100. Fasten off.
Rows 4, 6 and 8: With A, ch 150, hdc in next 19 (22, 25) hdc, ch 2, skip ch-2 space, hdc in remaining hdc across, ch 100. Fasten off.
Peplum
With A and right side facing, join yarn to first hdc of lower edge of waistband.
Row 1: Ch 3 (counts as dc), dc in next 19 (22, 25) hdc, 2 dc in ch-2 space, dc in remaining hdcs across, turn.
Row 2: Ch 3 (counts as dc), dc in each dc across, turn.
Row 3: Change to larger hook. Ch 4 (counts as tr), tr in each dc across, turn.
Rows 4-8: Ch 4 (counts as tr), tr in each tr across, turn.
Ruffle
Row 1: Ch 3 (counts as dc), 3 dc each tr to last st, dc in last tr, turn.
Row 2: Ch 1 (counts as sc), sc in each dc across. Fasten off.
Neck Trim
Change to smaller hook. With right side facing and B, join yarn at right front edge above waistband; ch 1, hdc in each st along right front bodice to shoulder, hdc evenly along back neck to center; with A, hdc evenly along back neck, then hdc in each st along left front bodice to waistband.
Fasten off.
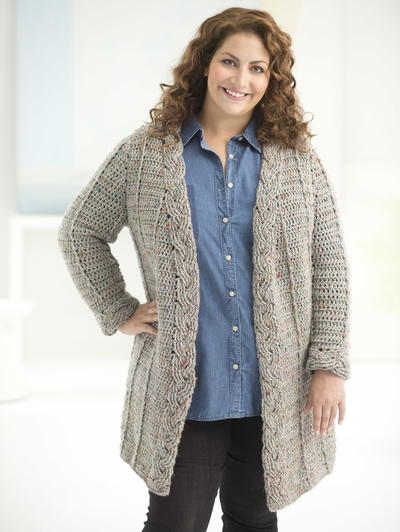
Read NextCurvy Girl Cable Crochet Cardigan
Your Recently Viewed Projects
Thanks for your comment. Don't forget to share!
Delphine Bryant
Aug 03, 2018
This pink and blue wrap and go sweater is so cool on so many levels. The only thing I may would alter would be the length of the piece. I like my sweaters to be a little longer than this one is but other than that, I just love this design. The tie to the side really makes it that much more nicer.
Morehouse17
Jul 18, 2018
I agree that this pattern is an intermediate design for sure with all of the pieces. However, all of the stitches being used are the basic crochet stitches. With some patience and time even as an intermediate design I think an advanced beginner may have some success with this piece by Red Heart.
Linda
Feb 06, 2017
This wrap sweater appears to resemble a vintage designed garment that I would like to make for my own personal use.
andrealuxton 00859 53
Jan 27, 2017
My friend made one of these sweaters but modified it by using a milk coloured cashmere-like yarn. It turned out brilliantly. I think using the single colour elevate the pattern from the already pretty sweater in the picture to something slightly more formal. It is simply beautiful, completely elegant and very figure-flattering.
achumley0003 31706 34
Oct 17, 2016
The love The Double Stitch Twins and I have almost all of there patterns. I have been wanting to make this for a while, but have put it off because I wasn't really sure what yarn I wanted to use because the yarn originally used was discontinued. After reading the comments on this page, I think I will try it in a solid color and just try some of the yarn i have on hand.
pamsceal 2678348
Jun 15, 2015
Looking for the yarn it says discontinued - is this correct please? If so what is the alternative?
ccalancea 6530401
Nov 27, 2012
the reason why i never tried following patterns was because they seem to be written in another language. i would not be able to finish even one row, eventhough, it doesn't seem too difficult when you look at the picture.
happyhandss
Oct 29, 2012
will definitely try this one. maybe in another color combination. i do mostly blouses and scarves. like to make stuff that i can wear.
jmyers1 3469143
Sep 11, 2011
I am almost finished with this, and while there are a few things that were kind of unclear in the pattern, it actually is very simple and it didn't take me very long at all. I work 2 jobs and am finishing it today. I bought the yarn 4 days ago, and am making the largest size offered. Don't let it intimidate you!! It is my first garment I've ever made, and I would definitely recommend it to other first-timers. I crocheted it in all brown with a 1 pounder, and did the waist in a softer sparkle brown. It's so pretty, and is very flattering.
shelleymcelhiney 0 587358
Sep 07, 2011
Adorable! This is maybe a bit difficult for me, but if I attempt it, I'll probably use different colors. I like the basic style.
Report Inappropriate Comment
Are you sure you would like to report this comment? It will be flagged for our moderators to take action.
Thank you for taking the time to improve the content on our site.