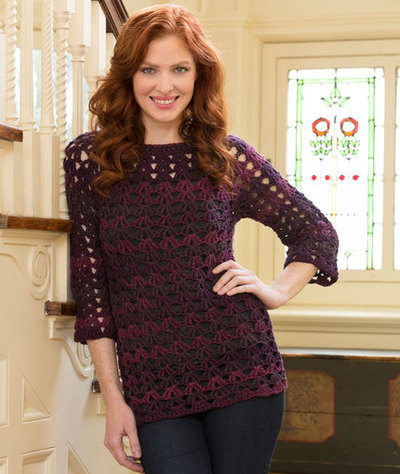
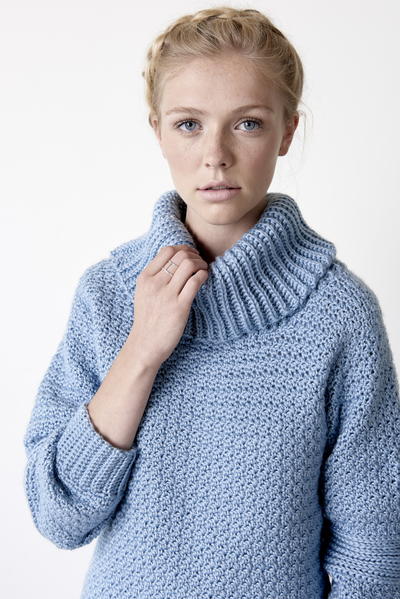
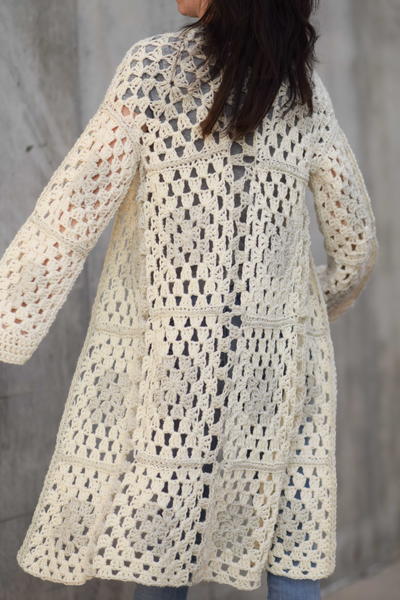
Flattering Seamless Tunic

If your wardrobe doesn't include this Flattering Seamless Tunic, then you might want to rethink your style. This crochet sweater pattern is worked in rounds from top to bottom so there are absolutely no seams to fuss with. The sweater pattern creates a really attractive fit to hug you in just the right places so you can be comfortable all day long. Wear it when you go to work in the morning, and keep it on for your dinner date. It will look good the whole time and make you feel great!
NotesNOTES:
1. Tunic is worked in joined rounds beginning at the neck edge. When piece reaches underarm, stitches are skipped to create armholes. Work then continues, in joined rounds, down to the lower edge over the remaining body stitches only.
2. Sleeves are worked directly into the armholes and worked down to the cuff edge.

Crochet HookJ/10 or 6 mm hook
Yarn Weight(4) Medium Weight/Worsted Weight and Aran (16-20 stitches to 4 inches)
Crochet Gauge12 sts = 4" (10 cm) in Fsc; 3 rows = 1" (2.5 cm) in single crochet; 4 shells = 7" (18 cm); 7 rows = 7" (18 cm) in shell pattern.
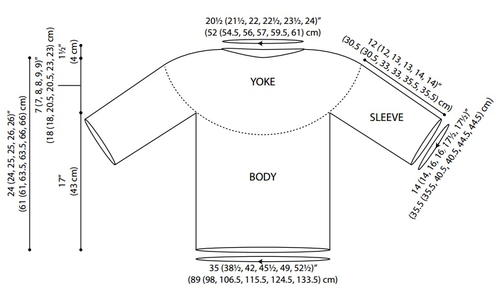
Finished SizeFinished Bust: 35 (38.5, 42, 45.5, 49, 52.5)" [89 (98, 106.5, 115.5, 124.5, 133.5) cm]; Finished Length: 24 (24, 25, 25, 26, 26)" [61 (61, 63.5, 66, 66) cm]
Materials List
- Red Heart Boutique Midnight 1942 Serenade 5 (6, 6, 7, 8, 8) balls
- Susan Bates Crochet Hook: 6 mm [J/10 US]
- Yarn Needle
Cushy Yarn
Learn all about different cushy yarn options for you to pick from before you get started on this stunning pattern!
Pattern
Yoke
-
Round 1 (right side): Fsc 62 (64, 66, 68, 70, 72); join with slip st in first sc to form a ring.
Note: The strip of Fsc should measure about 20½ (21½, 22, 22½, 23½, 24½)” (52 (54.5, 56, 57, 59.5, 62) cm) when laid flat. -
Round 2 (increase): Ch 1, [sc in next 7 (5, 6, 4, 5, 4) sts, 2 sc in next st] 7 (10, 9, 12, 11, 14) times, sc in each remaining st around; join with slip st in first sc—69 (74, 75, 80, 81, 86) sts.
-
Round 3 (increase): Ch 1, [sc in next 5 (4, 4, 4, 4, 3) sts, 2 sc in next st] 11 (14, 13, 16, 15, 18) times, sc in each remaining st around; join with slip st in first sc—80 (88, 88, 96, 96, 104) sts.
-
Round 4: Beg-shell in same st as joining, *[skip next 3 sts, shell in next st] 4 (5, 5, 6, 6, 7) times, skip next 3 sts, inc-shell in next st, [skip next 3 sts, shell in next st] 3 times, skip next 3 sts, inc-shell in next st, [skip next 3 sts, shell in next st] 5 (6, 6, 7, 7, 8) times, skip next 3 sts, inc-shell in next st, [skip next 3 sts, shell in next st] 3 times, skip next 3 sts, inc-shell in next st, skip next 3 sts join with slip st in top of beginning ch—16 (18, 18, 20, 20, 22) shells and 4 inc-shells (for 24 (26, 26, 28, 28, 30) ch-1 spaces)
-
Round 5: Slip st in next tr, (slip st, beg-shell) in next ch-1 space, shell in each ch-1 space around; join with slip st in top of beginning ch.
-
Round 6: Slip st in next tr, (slip st, beg-shell) in next ch-1 space, shell in each of next 5 (6, 6, 7, 7, 8) ch-1 spaces, inc-shell in next ch-1 space, shell in next 4 ch-1 spaces, inc-shell in next ch-1 space, shell in next 6 (7, 7, 8, 8, 9) ch-1 spaces, inc-shell in next ch-1 space, shell in next 4 ch-1 spaces, inc-shell in next ch-1 space; join with slip st in top of beginning ch—20 (22, 22, 24, 24, 26) shells and 4 inc-shells (for 28 (30, 30, 32, 32, 34) ch-1 spaces.
-
Round 7: Repeat Round 5.
-
Round 8: Slip st in next tr, (slip st, beg-shell) in next ch-1 space, shell in each of next 6 (7, 7, 8, 8, 9) ch-1 spaces, inc-shell in next ch-1 space, shell in next 5 ch-1 spaces, inc-shell in next ch-1 space, shell in next 7 (8, 8, 9, 9, 10) ch-1 spaces, inc-shell in next ch-1 space, shell in next 5 ch-1 spaces, inc-shell in next ch-1 space; join with slip st in top of beginning ch—24 (26, 26, 28, 28, 30) shells and 4 inc-shells (for 32 (34, 34, 36, 36, 38) ch-1 spaces.
-
Next 1 (2, 3) Rounds: Repeat Round 5.
Form Armholes
-
Round 1: Slip st in next tr, (slip st, beg-shell) in next ch-1 space, shell in each of next 6 (7, 7, 8, 8, 9) ch-1 spaces, half-shell in next ch-1 space; beginning by inserting hook in top vertical strand of last tr made, work 3 (3, 5, 5, 7, 7) Fsc (underarm base made), skip next 7 ch-1 spaces for armhole, half-shell in next ch-1 space, shell in each of next 7 (8, 8, 9, 9, 10) ch-1 spaces, half-shell in next ch-1 space; beginning by inserting hook in in top vertical strand of last tr made, work 3 (3, 5, 5, 7, 7) Fsc (underarm base made), skip next 7 ch-1 spaces form armhole, half-shell in last ch-1 space; join with slip st in top of beginning ch—14 (16, 16, 18, 20) shells, 4 half-shells, and 2 underarm bases (for 18 (18, 20, 20, 22, 24) ch-1 spaces).
Note: If making size 1X or 2X, when working across underarm bases in Round 2, work a half-shell (instead of a shell) in the center Fsc of each underarm base to slightly reduce bulk under the arm. -
Round 2: Slip st in next tr, (slip st, beg-shell) in next ch-1 space, *shell in each ch-1 space to next underarm base, skip first Fsc of underarm base, [shell in next Fsc, skip next Fsc] 1 (2, 3) time(s); repeat from * once more, shell in each ch-1 space around; join with slip st in top of beginning ch—20 (22, 24, 26, 28, 30) shells (for 20 (22, 24, 26, 28, 30) ch-1 spaces).
-
Rounds 3-16: Repeat Round 5.
-
Round 17: Slip st in next tr, (slip st, ch 4, 4 tr) in next ch-1 space (counts as 5-tr group), 5 tr in each ch-1 space around; join with slip st in top of beginning ch—20 (22, 24, 26, 28, 30) 5-tr groups. Fasten off.
Left Sleeve
Sizes Small (Medium) Only:
-
Round 1 (right side): With right side facing draw up a loop in last ch-1 space of armhole (just before underarm base), beg-shell in same ch-1 space, tr2tog over next ch-1 space of body (in which a half-shell has already been worked) and around the post of the outer tr of the half-shell that forms the side of the armhole opening, ch 1, tr2tog over the post of the same tr and the base of the center Fsc of the underarm base, ch 1, tr2tog over the same underarm base st, and around the post of the outer tr of the half-shell that forms the other side of the armhole opening, ch 1, tr2tog over the post of the same tr and the next ch-1 space (in which a half-shell has already been worked), shell in each of the remaining 6 ch-1 spaces of armhole; join with slip st in top of beginning ch—10 ch-1 spaces.
-
Round 2: Slip st in next tr, (slip st, beg-shell) in next ch-1 space, tr2tog over next 2 ch-1 spaces (at underarm), ch 1, tr2tog over same ch-1 space and next ch-1 space, shell in each remaining ch-1 space around; join with slip st in top of beginning ch—8 ch-1 spaces.
-
Rounds 3–11: Slip st in next tr, (slip st, beg-shell) in next ch-1 space, shell in each ch-1 space around; join with slip st in top of beginning ch.
-
Round 12: Slip st in next tr, (slip st, ch 4, 4 tr) in next ch-1 space (counts as 5-tr group), 5 tr in each ch-1 space around; join with slip st in top of beginning ch.
Left Sleeve
Sizes Large (1X, 2X, 3X) Only:
-
Round 1 (right side): With right side facing draw up a loop in last ch-1 space of armhole (just before underarm base), beg-shell in same ch-1 space, tr2tog over next ch-1 space of body (in which a half-shell has already been worked) and around the post of the outer tr of the half-shell that forms the side of the armhole opening; working across unworked side of underarm base, skip the first st of underarm base, [half-shell in next st, skip the next st] 2 (2, 3, 3) times, tr2tog over the post of the outer tr of the half-shell that forms the other side of the armhole opening and the next ch-1 space of the body (in which a half-shell has already been worked), shell in each of the remaining 6 ch-1 spaces of armhole; join with slip st in top of beginning ch—9 (9, 10, 10) ch-1 spaces.
-
Round 2: Slip st in next tr, (slip st, beg-shell) in next ch-1 space, tr2tog over the space between the 2 legs of next tr2tog and the next ch-1 space, half-shell in same ch-1 space, half-shell in next 0 (0, 1, 1) ch-1 spaces, (2 tr, ch 1, tr) in next ch-1 space, tr2tog over same ch-1 space and the space between the 2 legs of next tr2tog, shell in each remaining ch-1 space around; join with slip st in top of beginning ch—9 (9, 10, 10) ch-1 spaces.
-
Rounds 3–12 (12, 13, 13): Slip st in next tr, (slip st, beg-shell) in next ch-1 space, shell in each ch-1 space around; join with slip st in top of beginning ch.
-
Round 13 (13, 14, 14): Slip st in next tr, (slip st, ch 4, 4 tr) in next ch-1 space (counts as 5-tr group), 5 tr in each ch-1 space around; join with slip st in top of beginning ch.
Right Sleeve
Sizes Small (Medium) Only:
-
Round 1 (right side): With right side facing draw up a loop in last ch-1 space of armhole (immediately following underarm base), beg-shell in same ch-1 space, shell in next 6 ch-1 spaces of armhole, tr2tog over next ch-1 space (in which a half-shell has already been worked) and around the post of the outer tr of the half-shell that forms the side of the armhole opening, ch 1, tr2tog over the post of the same tr and the base of the center Fsc of the underarm base, ch 1, tr2tog over the same underarm base st, and around the post of the outer tr of the half-shell that forms the other side of the armhole opening, ch 1, tr2tog over the post of the same tr and the next ch-1 space (in which a half-shell has already been worked); join with slip st in top of beginning ch—10 ch-1 spaces.
-
Round 2: Slip st in next tr, (slip st, beg-shell) in next ch-1 space, shell in next 6 ch-1 spaces, tr2tog over next 2 ch-1 spaces (at underarm), ch 1, tr2tog over same ch-1 space and next ch-1 space; join with slip st in top of beginning ch—8 ch-1 spaces.
-
Rounds 3–11: Slip st in next tr, (slip st, beg-shell) in next ch-1 space, shell in each ch-1 space around; join with slip st in top of beginning ch.
-
Round 12: Slip st in next tr, (slip st, ch 4, 4 tr) in next ch-1 space (counts as 5-tr group), 5 tr in each ch-1 space around; join with slip st in top of beginning ch.
Right Sleeve
Sizes Large (1X, 2X, 3X) Only:
-
Round 1 (right side): With right side facing draw up a loop in last ch-1 space of armhole (immediately following underarm base), beg-shell in same ch-1 space, shell in next 6 ch-1 spaces of armhole, tr2tog over next ch-1 space of body (in which a half-shell has already been worked) and around the post of the outer tr of the half-shell that forms the side of the armhole opening; working across unworked side of underarm base, skip the first st of underarm base, [half-shell in next st, skip the next st] 2 (2, 3, 3) times, tr2tog over the post of the outer tr of the half-shell that forms the other side of the armhole opening and the next ch-1 space of the body (in which a halfshell has already been worked); join with slip st in top of beginning ch—9 (9, 10, 10) ch-1 spaces.
-
Round 2: Slip st in next tr, (slip st, beg-shell) in next ch-1 space, shell in next 6 ch-1 spaces, tr2tog over the space between the 2 legs of next tr2tog and the next ch-1 space, half-shell in same ch-1 space, half-shell in next 0 (0, 1, 1) ch-1 spaces, (2 tr, ch 1, tr) in next ch-1 space, tr2tog over same ch-1 space and the space between the 2 legs of next tr2tog; join with slip st in top of beginning ch—9 ch-1 spaces.
-
Rounds 3–12 (12, 13, 13): Slip st in next tr, (slip st, beg-shell) in next ch-1 space, shell in each ch-1 space around; join with slip st in top of beginning ch.
-
Round 13 (13, 14, 14): Slip st in next tr, (slip st, ch 4, 4 tr) in next ch-1 space (counts as 5-tr group), 5 tr in each ch-1 space around; join with slip st in top of beginning ch.
Finishing
Neckband (optional)
-
Note: Working additional round around neck opening will make neck a bit smaller. If you work the number of decreases (sc2tog) specified in Round 1, the neckline will be about 20” (51 cm) around. Work more or fewer decreases to achieve the desired fit
-
Round 1: With right side facing, draw up a loop at center back of neck edge, ch 1, sc in each st around, working 4 (6, 8, 10, 12, 14) sc2tog evenly spaced around; join with slip st in first sc—58 sts. Weave in ends.
-
Finished Schematics/Diagram - Click here for a larger version
Abbreviations
- beg-half-shell (beginning half shell)
- Ch 5 (counts as tr, ch 1), tr in indicated stitch or space.
- beg-shell (beginning shell)
- Ch 4 (counts as tr), (tr, ch 1, 2 tr) in indicated stitch or space.
- Fsc (foundation single crochet
- his technique creates a foundation chain and a row of single crochet stitches in one) = First st: Ch 2, insert hook in 2nd ch from hook and draw up a loop, yarn over, draw through 1 loop on hook (the “chain”), yarn over and draw through both loops on hook (the “single crochet”). Remaining sts: *Insert hook in “chain” of previous stitch and draw up a loop, yarn over, draw through 1 loop on hook (the “chain”), yarn over and draw through both loops on hook; repeat from * for desired number of stitches.
- half-shell
- (Tr, ch 1, tr) in indicated stitch or space.
- inc-shell (increase shell)
- (Tr, ch 1, 2 tr, ch 1, tr) in indicated stitch or space.
- sc2tog (single crochet 2 together)
- [Insert hook in next stitch, yarn over and pull up a loop] twice, yarn over and draw through all 3 loops on hook.
- shell
- (2 tr, ch 1, 2 tr) in indicated stitch or space
- tr2tog (treble crochet 2 stitches together)
- *[Yarn over] twice, insert hook in next st, yarn over and pull up a loop, [yarn over and draw through 2 loops on hook] twice; repeat from * once more, yarn over and draw through all 3 loops on hook. Note: When instructed to work a tr2tog “over” two stitches (the particular two stitches will be specified in the instructions), work the tr2tog and the first time you need to insert the hook into a stitch, insert it into the first of the specified stitches. The second time you need to insert the hook into a stitch, insert it into the 2nd of the specified stitches.
Read NextGranny Crochet Pullover
Your Recently Viewed Projects
Thanks for your comment. Don't forget to share!
Mygurl
Jun 09, 2020
I made it! Love it! I did not add the sleeves though, I tried it on before and decided I like it the way it is! I would like to post a pic, anywhere/way I can do that? (It did not give me a rating option, but I give it a 5 star!)
Morehouse17
Nov 18, 2018
Tunics are becoming my new item to save when I find. I like this one because of the crochet design. The sleeves are unique in that they are 3/4's length also. What I am not liking is that the bodice is form fitting. To me tunic means there will be a little wiggle room.
achumley0003 31706 34
Nov 20, 2017
I commented on this pattern a while back, and I have finally made it. It is easy to follow and it actually is really flattering because of the design. I really love. I wear a tank underneath. I am really glad I gave this pattern a try. It was worth it. But, I should have known, since I have yet to be disappointed with one of Lorene haythorn-eppolite's designs.
mulberrygalprinces s
Aug 07, 2017
This project has it all. Beautiful pattern and design, easy enough for me to do, and offers a wide variety of sizes. It's so frustrating to have to look thru sites to find larger sizes when I am making Christmas gifts for my northern friends and relatives. I can just use this one pattern. Thank you so much.
Hippie Chick
Aug 02, 2017
The pattern for this tunic is very detailed and contains a stock photo, written directions, and a schematics of the finished item. It could definitely use more photos showing a close up of some of the rows as they are beginning done. A video would be great also. I see this pattern is from Red Heart so I dont think they would probably have any other photos other than the stock one.
Zeemer
Aug 01, 2017
First, I would like to comment the very organized lay out of the pattern of this Flattering Seamless Tunic. I can't wait to do this of only because of the pattern complete with diagrams and drawings. This color used in this tunic is so lovely, very unique, very flattering. And the stitches used are easy to execute. I can't wait to make this lovely, lovely crochet project. It's so beautiful!
whats1more 9999801
May 31, 2017
I crochet left-handed and I'm having trouble with the sleeves because I crochet left to right rather than right to left. Can you offer some help?
Hippie Chick
Apr 28, 2017
My wardrobe does not include this tunic and I had always thought my style was good, but we live way down in SoFlo and we kinda have a style of our own and dont wear a lot of heavy clothing like this. I like the concept of this being seamless so there is not a lot of sewing at the end of the project.
Lynn K
Apr 06, 2017
Do you also love this tunic as much as I do? The pattern, shape, length, sleeves, everything is perfect for me! I have a sneaky feeling that the pattern may be a little more tricky than Intermediate but I am so drawn to actually wearing this tunic that I am going to be very happy to just dive in and address any difficulties as they come, lol!
princess6860504
Jan 14, 2017
OOh! Red Heart Boutique? Count me in! This is a very upscale looking pattern. The colors used are amazing. I can't say enough about this tunic sweater. I may even have to try this for myself, even though sweaters are always left half-finished in my house more often than not. After seeing the pictures that other users posted, it gives me the inspiration that "Yes I can!"
achumley0003 31706 34
Oct 16, 2016
I have had this pattern saved in my files for a while and I really want to make it. I have never seen Red Heart Boutique Midnight sold at any of my local stores. Has anyone had success making it with a different type of yarn?
siouxzan1 8434588
Mar 22, 2016
This is one thing I haven't done, made a sweater for myself. Part of the reason for this is that I really don't care for having to sew up the sides of a design to get the shape right. Also, I'm not sure it's me or if designers writing the pattern sometimes leave something out (by mistake) leaving me at a point where I don't feel like the project is turning out like it's supposed to or that I'm missing something. That's why this pattern is so interesting. I think a variegated yarn would be fun. What would/did you use?
arnts1ta
Apr 05, 2016
I haven't made this pattern yet but after coming across it on the site I am very intrigued and think I will go out looking for the perfect yarn for this sweater. I've only made a sweater for my daughter (so it was tiny!), so I'm a little scared to try a sweater for myself. Good luck with pattern!
mary3108
Mar 20, 2016
Love this pattern. Made two of these. Used the video on bobwilson123 site. Very easy and fast. I used Caron Simply Soft Party yarn. The sparkle dresses it up.
melissasea22
Apr 14, 2017
I agree there if anyone has problems RedHeart suggests to use bobwilson123's videos.
Melissa1108
Feb 03, 2016
sorry for the triple post. there are 2-3 other errors for the larger sizes in this patten. If you are making one of these sizes I Strongly recommend going to http//www.redheart.com/files/patterns/pdf/LW4161.p == df to get the original.
Melissa1108
Feb 03, 2016
If you go to http//www.redheart.com/files/patterns/pdf/LW4161.p == df you can get this pattern in the original.
Melissa1108
Feb 03, 2016
Am i the only 1 that noticed there are 3 different sets of directions for the L,1X, 2X, 3X for the LEFT SLEEVE? Which one do I use? Help!
dianah
Jul 28, 2015
This is a very lovely pattern. I plan on making it. Would you need to wear something under it?
CrochetDad
Jul 12, 2015
I've made several of these as short sleeved tops and beach coverups by continuing with the length. It works up really fast.
Report Inappropriate Comment
Are you sure you would like to report this comment? It will be flagged for our moderators to take action.
Thank you for taking the time to improve the content on our site.