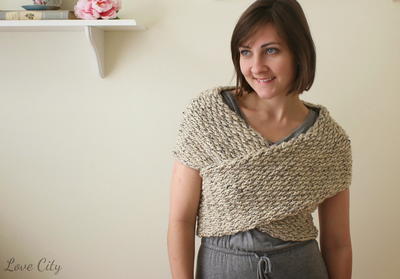
Over Easy Cowl Neck Pullover

Never worry about messing up your hair when you put on this Over Easy Cowl Neck Pullover. The cowl neck makes the head hole of this pullover sweater wide enough so you won't ruin your perfectly coiffed do. We spend enough time on our hair, so we shouldn't have to sacrifice that time for comfort. Worked in Caron Simply Soft yarn, you'll be tempted to throw on this sweater whenever you're cold. It's a perfect gift for the winter holidays, so you'll want to get crocheting now!
NotesNote:
The instructions are written for smallest size. If changes are necessary for larger size(s) the instructions will be written thus ( ). Numbers for each size are shown in the same color throughout the pattern. When only one number is given in black, it applies to all sizes.

Crochet HookH/8 or 5 mm hook
Yarn Weight(4) Medium Weight/Worsted Weight and Aran (16-20 stitches to 4 inches)
Crochet Gauge13 sts and 12 rows = 4 [10 cm] in Texture Pat.
Finished SizeBust measurement: Extra-Small/Small 28-34” [71-86.5 cm] Medium 36-38” [91.5-96.5 cm] Large 40-42” [101.5-106.5 cm] Extra-Large 44-46” [112-117 cm] 2/3 X-Large 48-54” [122-137 cm] 4/5 X-Large 56-62” [142-157.5 cm];; Finished bust Extra-Small/Small 39” [99
Materials List
- Caron® Simply Soft™ Light Country Blue (39709): 6 (7, 8, 9, 10) balls
- Size U.S. H/8 (5 mm) crochet hook or size needed to obtain gauge
- Stitch markers
Pattern
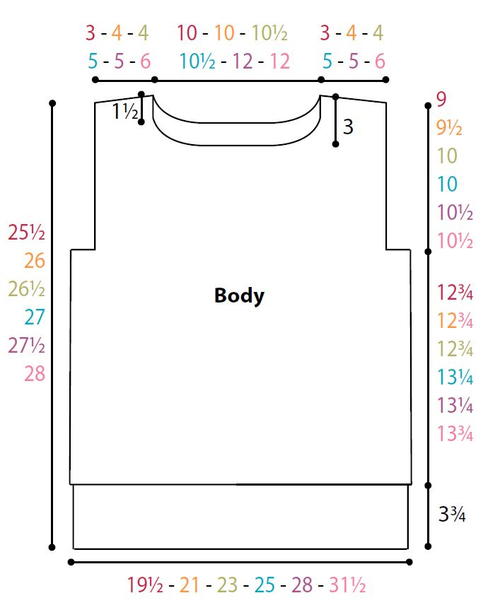
Back
-
**Ribbing: Ch 13.
-
1st row: (RS). 1 sc in 2nd ch from hook. 1 sc in each ch to end of chain. Turn. 12 sc.
-
2nd row: Ch 1. Working in back loops only, 1 sc in each sc to end of row. Turn.
-
Rep last row until Ribbing (when slightly stretched) measures 19 (20½-22½-24½-27½-31)” [48 (52-57-62-70-78.5) cm], ending on a RS row. Do not turn or fasten off. Work across long edge of Ribbing as follows:
-
Next row: (RS). Ch 1. Work 65 (69-75-83-91-103) sc evenly across. Turn.
-
Next row: Ch 3 (counts as dc). *1 sc in next sc. 1 dc in next sc. Rep from * to end of row. Turn.
-
Next row: Ch 1. 1 sc in first dc. *1 dc in next sc. 1 sc in next dc. Rep from * to end of row, working last sc in top of ch 3. Turn.
-
Next row: Ch 3 (counts as dc). *1 sc in next dc. 1 dc in next sc. Rep from * to end of row. Turn.
-
Rep last 2 rows for Texture Pat until work from lower edge measures 16½ (16½-16½-17-17-17½)” [42 (42-42-43-43-44.5) cm], ending on a WS row.
-
Shape armholes: Next row: (RS). Sl st in each of first 7 (7-9-9-11-13) sts. Ch 1. 1 sc in same sp as last sl st. *1 dc in next sc. 1 sc in next dc. Rep from * to last 6 (6-8-8-10-12) sts. Turn. Leave rem sts unworked.** Cont in pat on rem 53 (57-59-67-71-79) sts until armhole measures 7½ (8-8½-8½-9-9)” [19 (20.5-22.5-22.5-23-23) cm], ending on a WS row.
-
Shape neck: Next row: (RS). Pat across 12 (14-14-18-18-22) sts (neck edge).
-
Turn. Leave rem sts unworked.
-
Next row: Ch 2. Hdc2tog. Pat to end of row. Turn.
-
Next row: Pat to last 2 sts. Hdc2tog. Turn. 10 (12-12-16-16-20) sts.
-
Next row: Work even in pat.
-
Shape shoulder: Next row: (RS). Sl st in each of first 5 (6-6-8-8-10) sts. Ch 2. Pat to end of row. Fasten off.
-
With RS facing, skip next 29 (29-31-31-35-35) sts. Join yarn with sl st to next st. Ch 3 (counts as dc). Pat to end of row. Turn.
-
Next row: Pat to last 2 sts. Hdc2tog. Turn.
-
Next row: Ch 2. Hdc2tog. Pat to end of row. Turn. 10 (12-12-16-16-20) sts.
-
Next row: Work even in pat.
-
Shape shoulder: Next row: (RS). Pat across 5 (6-6-8-8-10) sts. Sl st in next st.
-
Fasten off.
Front
-
Work from ** to ** as given for Back.
-
Cont in pat on rem 53 (57-59-67-71-79) sts until armhole measures 6 (6½-7-7-7½-7½)” [15 (16.5-18-18-19-19) cm], ending on a WS row.
-
Shape neck: Next row: (RS). Pat across 14 (16-16-20-20-24) sts (neck edge). Turn. Leave rem sts unworked.
-
Next row: Ch 2. Hdc2tog. Pat to end of row. Turn.
-
Next row: Pat to last 2 sts. Hdc2tog. Turn.
-
Rep last 2 rows once more. 10 (12-12-16-16-20) sts.
-
Cont even in pat until Front measures same length as Back to shoulder, ending on a WS row.
-
Shape shoulder: Next row: (RS). Sl st in each of first 5 (6-6-8-8-10) sts. Ch 2. Pat to end of row. Fasten off.
-
With RS facing, skip next 25 (25-27-27-31-31) sts. Join yarn with sl st to next st. Ch 3 (counts as dc). Pat to end of row. Turn.
-
Next row: Pat to last 2 sts. Hdc2tog. Turn.
-
Next row: Ch 2. Hdc2tog. Pat to end of row. Turn.
-
Rep last 2 rows once more. 10 (12-12-16- 16-20) sts.
-
Next row: Work even in pat.
-
Shape shoulder: Next row: (RS). Pat across 5 (6-6-8-8-10) sts. Sl st in next st. Fasten off.
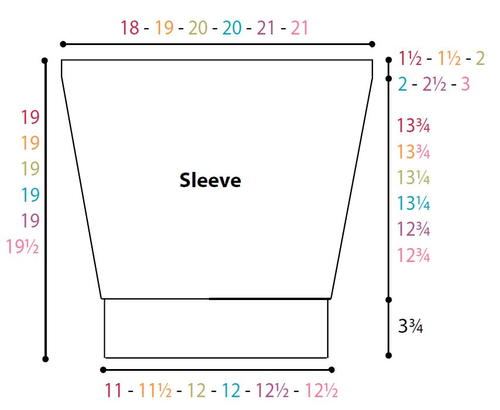
Sleeves
-
Ribbing: Ch 13.
-
1st row: (RS). 1 sc in 2nd ch from hook. 1 sc in each ch to end of chain. Turn. 12 sc.
-
2nd row: Ch 1. Working in back loops only, 1 sc in each sc to end of row. Turn.
-
Rep last row until Ribbing (when slightly stretched) measures 8 (8½-8½-8½-9-9)” [20.5 (21.5-21.5-21.5-23-23) cm], ending on a RS row. Do not turn or fasten off. Work across long edge of Ribbing as follows:
-
Next row: (RS). Ch 1. Work 35 (37-39-39-41-41) sc evenly across. Turn.
-
Next row: Ch 3 (counts as dc). *1 sc in next sc. 1 dc in next sc. Rep from * to end of row. Turn.
-
Next row: Ch 3 (counts as dc). 1 sc in first dc (inc made). *1 dc in next sc. 1 sc in next dc. Rep from * to end of row, working (1 sc. 1 dc) in top of ch 3 (inc made). Turn.
-
Next row: Ch 1. 1 sc in first dc. *1 dc in next sc. 1 sc in next dc. Rep from * to end of row, working last sc in top of ch 3. Turn.
-
Next row: Ch 1. (1 sc. 1 dc) in first sc (inc made). *1 sc in next dc. 1 dc in next sc. Rep from * to end of row, working (1 dc.1 sc) in last sc (inc made). Turn.
-
Next row: Ch 3 (counts as dc). *1 sc in next dc. 1 dc in next sc. Rep from * to end of row. Turn.
-
Keeping cont of Texture Pat, inc 1 st each end of next row and following RS rows 2 (4-4-4-5-5) times more, taking inc sts into pat. 45 (51-53-53-57-57) sts.
-
Work 3 (3-3-3-1-1) row(s) even in pat.
-
Size XS/S only: Inc 1 st each end of next row. 47 sts. Work 3 rows even in pat.
-
All sizes: Note: Ch 2 at beg of row does not count as st during Ridge Rows.
Make ridges: 1st row: (RS). Ch 2. 2 hdc in first st. 1 hdc in each st to last st. 2 hdc in last st. Turn. -
2nd row: Ch 2. *Work 1 hdc in horizontal bar created between sts of previous row (bar is below loops normally worked). Rep from * to end of row. Turn.
-
3rd row: Ch 2. Work 2 hdc in horizontal bar created between first st of previous row. *Work 1 hdc in horizontal bar created between sts of previous row. Rep from * to last st. Work 2 hdc in horizontal bar created between last st of previous row. Turn. Rep from * to end of row. Turn.
-
4th to 6th rows: As 2nd row
-
7th to 10th rows: As 3rd to 6th rows.
-
11th row: As 3rd row. 55 (59-61-61-65- 65) sts
-
12th and 13th rows: As 2nd row.
-
14th row: (WS). Ch 1. *Work 1 sc in horizontal bar created between sts of previous row. Rep from * to end of row. Turn. 55 (59-61-61-65-65) sc.
-
Proceed in Texture Pat as follows: 1st row: Ch 3 (counts as dc). *1 sc in next sc. 1 dc in next sc. Rep from * to end of row. Turn.
-
2nd row: Ch 1. 1 sc in first dc. *1 dc in next sc. 1 sc in next dc. Rep from * to end of row, working last sc in top of ch 3. Turn.
-
3rd row: Ch 1. (1 sc. 1 dc) in first sc (inc made). *1 sc in next dc. 1 dc in next sc. Rep from * to last 2 sts. 1 sc in next dc. (1 dc. 1 sc) in last sc (inc made). Turn. 57 (61-63-63-67-67) sts.
-
Cont even in Texture Pat until Sleeve from lower edge measures 17½ (17½-17-17- 16½-16½)” [44.5 (44.5-43-43-42-42) cm], ending on a WS row. Place markers at each end of last row.
-
Work a further 5 (5-7-7-9-10) rows in pat. Fasten off.
Finishing
-
Pin pieces to measurements. Cover with a damp cloth, leaving cloth to dry.
-
Sew shoulder seams. Sew in sleeves placing rows above markers along unworked edges of Front and Back to form square armholes. Sew side and sleeve seams.
Collar
Note: Collar is worked sideways. Ch 2 at beg of row does not count as st.
-
Ch 43.
-
1st row: (RS). 1 hdc in 3rd ch from hook. 1 hdc in each ch to end of chain. Turn. 41 hdc.
-
2nd row: Ch 2. *Work 1 hdc in horizontal bar created between sts of previous row (bar is below loops normally worked). Rep from * to end of row. Turn.
-
Rep last row until Collar measures 24 (24- 25-25-26-26)” [61 (61-63.5-63.5-66-66) cm] (when slightly stretched). Fasten off. Sew foundation row and last row tog.
-
Sew Collar to neck edge having Collar seam at left shoulder seam, stretching Collar to fit neck edge as needed.
Add some flair to your finished work with this video tutorial for an Easy 6-Petal Crochet flower!
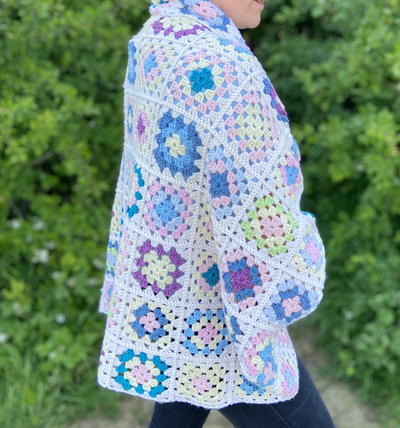
Read NextArlo Granny Square Cardigan
Your Recently Viewed Projects
Thanks for your comment. Don't forget to share!
taralynn1454 64653 69
Mar 09, 2020
russjules 8258138 I had a quick question (I hope you don't mind) since you stated you made this sweater. I'm making the sweater for my daughter in a size small. The bottom ribbing is supposed to be 19 inches wide. That seems way too wide for the bottom of the sweater for a small, petite young woman. Is it supposed to fit loosely at the bottom? Thank you so much for your response!
russjules 8258138
Jan 07, 2020
I have just completed this. Easy to follow pattern, looks just like the picture. Absolutely love it can't wait for winter!!!
taralynn1454 64653 69
Mar 09, 2020
russjules 8258138 I had a quick question (I hope you don't mind) since you stated you made this sweater. I'm making the sweater for my daughter in a size small. The bottom ribbing is supposed to be 19 inches wide. That seems way too wide for the bottom of the sweater for a small, petite young woman. Is it supposed to fit loosely at the bottom? Thank you so much for your response!
salexander0429 025 9625
Nov 26, 2019
Has anyone actually successfully made this yet? There's so many comments but I didn't see anything where someone had completed the pattern or posted a pic or anything. Has anyone done it?
elocin1104 2800379
Oct 04, 2018
This is such a pretty sweater pattern. I am looking for something different to make, and I think I will give this a try. It looks simple enough to make, with the pattern right here. I do wish there were more photos to go off of, but since I did not write the pattern I am not complaining.
Tricia108
Apr 04, 2018
I have not made the sweater yet but the instructions look straight forward. It is a bit of work since there are five parts but I am sure it is very warm. Crocheting does go fast so I have time until next winter. Thank you.
1257sg 4477750
Apr 04, 2018
Are you sure that this is easy to make? Looks like a lot of instructions!
Crocheting Fool
Apr 04, 2018
I am making this right now and am stuck on the shoulders and arm holes. Is there a video tutorial for this pattern? Can hardly wait to finish it!
Zeemer
Jan 30, 2018
This Over Easy Cowl Neck Pullover is the kind of clothing that I want to wear on cold days. This sample here is so simple but elegant, the color choice is perfect and it's just awesome! I can't wait to do this.
achumley0003 31706 34
Nov 30, 2017
I really love the stitch pattern this sweater uses. And I think it looks like it would be very warm and cozy. I love sweaters that are comfortable. The only thing , though, is a lot of cowl neck sweaters look horrible on me, so I think I would alter the neck to make it different. I just can't decide how I would want to do it.
Cheryl Y
Jul 05, 2017
This Over Easy Cowl Neck Pullover is for me! I like the warmth of the Cowl Neck with out the tightness that chocks you. The written pattern right here on this page is nicely written and easy to follow, with a nice chart for putting it together. I'm looking forward to making this one and think a few in different colors are in order. After reading all the comments below I think this one will work out nicely! Thank you so much for sharing this free crochet pattern.
Hippie Chick
Mar 17, 2017
Beautiful blue color. That is a great choice. This is a very lovely sweater. I would not make one for myself as I dont like to wear anything so bulky and high up on my neck area, but I know a few people who would love this. I am going to share the link to your pattern with them. Very nice to see that the pattern is included on this page and not direct me to an outside site.
jkercher 8238931
Feb 23, 2017
Under the instructions for the sleeves, in the third numbered group and just under the illustration, #3. 3rd Row Ch 2. Work 2 hdc in horizontal bar created between first st of previous row. Work 1 hdc in horizontal bar created between sts of previous row. Rep from to last st. Work 2 hdc in horizontal bar created between last st of previous row. Turn. Rep from to end of row. Turn. This instructions are confusing to me. Do I complete the 3rd row, making 2 hdc at the beginning and end of row 3 and then do I turn and do another row, but no increase at beginning and end? To me, that seems like I'd be crocheting 2 rows, not just one (3rd row). Could someone clear this up for me please? Otherwise this is a very clear pattern.
Linda
Feb 06, 2017
Cowl neck pullover sweaters are my favorite, this is genuinely crocheted to appear quite elegant in completed project.
Alysanne
Feb 05, 2017
Really was not planning on making another sweater any time soon but this one caught my attention. It looks so soft and compfy that I just may have to try it. The detail on the sleeves and the wide collar make it very attractive plus the easy on and off factor.
kerrynzkraftz 2512 879
Jan 22, 2017
I would really love this pattern in a v neck jumper. Any chance this could happen? Thank you.
Lynn K
Jan 20, 2017
Gorgeous pullover. So pretty and I was so surprised to see that its crocheted because to me it looks knitted. I prefer crochet because it is so much quicker. Has anyone finished making it yet? Before I start to make it I would just like to know if the size given in the pattern is fairly accurate. I would love you to please let me know. Look forward to hearing from you.
Mach2
Jan 18, 2017
I'm in love with this!!! 3 I get so cold in the winter time, so I need big thick sweaters or else I'm always dying. I really like the added detail at the elbows on the sleeves. The change in stitch pattern really adds something to the sweater. It makes it look very sophisticated instead of just being another oversized sweater.
pjc56ddc 7815630
Jan 16, 2017
I love the looks of this sweater, what size was the balls of yarn did you use or what was the oz. per ball? Looks easy and comfortable. Thanks for sharing your pattern, Phyllis
flowergirl
Dec 13, 2016
I am so glad that this pattern is in print and i feel really encouraged that lots of people are trying it out. This would make a great christmas gift for my little cousin. Am off to buy some yarn, will get back once i see how it goes.
princess6860504
Dec 07, 2016
The only reason why I am giving this 4 stars is because technically I have not finished this yet. I am on the sleeves. So far, I found it reasonably easy to construct. I like that it is SUPER soft and drapery. Yet it doesn't feel like it will be stifling or too, too heavy and hot. Plus, the cowl neck is a PLUS.
Zeemer
Oct 19, 2016
The cowl collar of this Over Easy Cowl Neck Pullover is what makes this simple but elegant pullover standout. The width of the cowl neck is just right for the model's size. The pattern of this pullover which used common crochet terms and abbreviations complete with diagrams is so easy to follow. Go ahead and try this pretty pullover.
Cheryl Y
Jul 20, 2016
Wow I've been looking for a pattern like this Over Easy Cowl Neck Pullover in crochet, I've only see it in knit. This pattern is very well written and looks easy enough to follow. I hope mine turns out as good as the one pictured, if it does I'll make a few in different colors. This one is a must do!! Thank you so much for this beautiful free pattern.
Nnjparker 1536159
Feb 18, 2016
I love this classic beautiful pattern. I hate something that is snug or fits tight. I would wear this constantly! thanks for the pattern, can't wait to try it.
leelalie
Jan 24, 2016
Very easy to do and quick Thank you
arnts1ta
Mar 01, 2016
Leelalie, I've never crocheted a sweater or other piece of clothing, only accessories and blankets, is this pattern really as easy as it says!? I love the look of it, it's chic and classic. I also love that it is not tight and looks very comfortable! Do you have any tips or tricks to share with others that you wish you had known when you first made this pattern?
kpj 9015711
Nov 13, 2015
Fairly simple pattern. I love how it turned out. Thanks for sharing it.
gtu61297 8983190
Oct 15, 2015
Hi never crochet a garment, love to try this. Would it be possible for someone to do a video as I find it easier to see something done.Thanks
barclaynorma 55664 77
Jan 03, 2018
Did you get a response to your request? I would like to see a video tutorial as well
Report Inappropriate Comment
Are you sure you would like to report this comment? It will be flagged for our moderators to take action.
Thank you for taking the time to improve the content on our site.