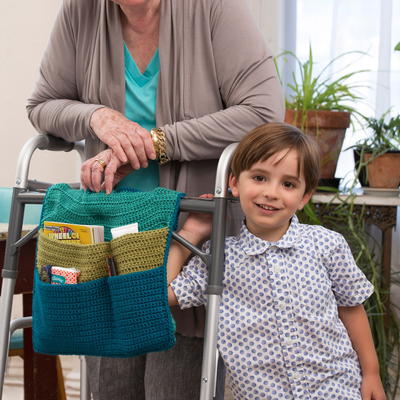
The Best Crochet Walker Organizer

I bet you have never seen this before! The Best Crochet Walker Organizer is here to make your life that much more simple. It can be a pain to carry things if you have to use a walker to get around, so there is a high need for a crochet organizer that can do it all for you. Use this crochet hanging organizer off the side of the walker to make life a little more hands-free. Don't worry about leaving grandma alone- she can carry around all the things she needs just by hooking this on to her walker.

Crochet HookG/6 or 4 mm hook
Yarn Weight(4) Medium Weight/Worsted Weight and Aran (16-20 stitches to 4 inches)
MATERIALS:
- Red Heart Soft: 1 ball each
- A: 9518 Teal
- B: 9522 Leaf
- C: 9870 Deep Sea
- Susan Bates Crochet Hook: 4mm [G-6 US]
- Yarn Needle
- Locking Stitch Markers or Seaming Pins
- 4 1/2" (11.5 cm) of 3/4" (2 cm) Wide Sew-on Velcro Sewing Needle
- Matching Thread
SIZE: Bag measures 14" wide x 13" long (35.5 x 33 cm) with flaps folded over
GAUGE: 16 sts = 4" (10cm); 16 rows = 4" (10 cm) in single crochet
NOTES:
- Bag is made in panels worked back and forth in rows and joined together to form pockets.
- Backstitching vertically across rows creates pockets of varying sizes.
- Velcro® fasteners are sewn to flaps to secure bag around the bar of a walker.
- At the beginning of each row on Panels 2 and 3, draw up first chain to height of half double crochet or double crochet stitch. This first chain does not count as a stitch; do not work into this chain at the end of a row. Work first stitch of each row in last stitch of previous row.
Special Stitches:
- sc2tog = [Insert hook in next stitch, yarn over and pull up a loop] twice, yarn over and draw through all 3 loops on hook.
- Join with sc = Place a slip knot on hook, insert hook in indicated stitch, yarn over and draw up a loop, yarn over and draw through both loops on hook.
ORGANIZER
Panel #1
- With A, ch 53.
- Row 1: Sc in 2nd ch from hook and in each ch across, turn—52 sc.
- Row 2: Ch 1, sc in each sc across, turn.Repeat Row 2 until piece measures 6” (15 cm). Fasten off.
Panel #2
- With B, ch 53.
- Row 1: Hdc in 2nd ch from hook and each ch across, turn—52 hdc.
- Row 2: Ch 1, hdc in each hdc across, turn.Repeat Row 2 until piece measures 9½” (24 cm). Fasten off.
Panel #3
- With C, ch 53.
- Row 1: Dc in 3rd ch from hook (beginning ch counts as first dc) and each ch across, turn—52 dc.
- Row 2: Ch 1, dc in each dc across, turn.Repeat Row 2 until piece measures 12” (30.5 cm) ending on wrong side row. Do not fasten off.
- Note: The three flaps that follow are added to the top edge of Panel #3.
Flap #1
- Row 1: Ch 1, dc in first 8 dc; leave remaining sts unworked, turn—8 dc.
- Rows 2–6: Ch 1, dc in each dc across, turn. Fasten off.
Flap #2
- With right side facing, skip next 14 dc from last flap and join C with slip st in next st.
- Row 1: Ch 1, dc in same st as join, dc in next 7 dc; leave remaining sts unworked, turn.
- Rows 2–6: Ch 1, dc in each dc across, turn.Fasten off.
Flap #3
- With right side facing, skip next 14 dc from last flap and join C with slip st in next st.
- Row 1: Ch 1, dc in same st as join, dc in last 7 dc, turn.
- Rows 2–6: Ch 1, dc in each dc across, turn. Fasten off.
FINISHING
Joining Panels
- Lay panel #2 on panel #3 with side and lower edges matching. Lay panel #1 on panel #2 in same manner. Hold panels together with locking stitch markers or seaming pins.
- Round 1 (right side): With right side of first row facing, insert hook through all thicknesses and join A with sc in opposite side of last foundation ch; working across ends of rows and through all thicknesses, sc 22 sts evenly across panel #1, sc 10 sts evenly across panel #2, sc 12 sts evenly across panel #3 to first row of flap #1, *sc 9 sts evenly across ends of rows of first side of flap, 3 sc in first st, sc in next 6 sts, 3 sc in last st, sc 9 sts evenly across ends of rows of other side of flap**, sc2tog over same st as last sc and first st after flap, sc in each st to last st before next flap, sc2tog over last st and end of first row of next flap; beginning in same row as last st made, repeat from * twice ending at **; continuing across ends of rows and through all thicknesses, sc 12 sts evenly across panel #3, sc 10 sts evenly across panel #2, sc 22 sts evenly across panel #1; working in opposite side of foundation ch and through all thicknesses, 3 sc in first ch, sc in each ch across to first sc, 2 sc in same ch as first sc; join with slip st in first sc—262 sc.
- Round 2: Slip st in each sc around; join with slip st in first slip st. Fasten off.
Pockets
- With right side facing, place stitch markers or seaming pins on 19th and 29th sts from right edge. Place additional markers or pins on same sts across various rows as a sewing guideline.
- With A and working through all thicknesses, backstitch over the 19th st of each row from bottom edge to top edge of panel #1. Secure and cut yarn.
- With B and working through all thicknesses, backstitch over 19th st of each row of panel #2. Secure and cut yarn.
- With A and working only through panels #1 and #2, backstitch over 29th stitch of each row of panel #1. Secure and cut yarn.
Flaps
- Cut three 1½” (4 cm) lengths of Velcro®.
- With sewing needle and thread, sew Velcro to wrong side of flaps and top of panel, leaving sufficient room to wrap around the bar of a walker.
- Weave in ends.
Read NextSimple Stash Basket
Your Recently Viewed Projects
Thanks for your comment. Don't forget to share!
jdhxjdh 1569676
Mar 17, 2024
I am working on the walker organizer and have a question. What colors are the flaps or do they follow the same color pattern of the 3 panels?
Delphine Bryant
Sep 09, 2018
This is a great idea. I would love to have one of these and I do not have a walker. I take a rolling shopping basket with me when I go to the market and this would be a great attachment to place in the inside of the shopping cart. I can place my coupons and and sales ads in there just to be sure I have everything I need.
Morehouse17
Aug 14, 2018
So my Auntie would love to have this to attach to her walker. She is still so very active and having this attached to her walker I know would make her life a lot easier. I hope to get her input on how large to construct the panels so that it is tailor made for her needs.
Crafty Suz
Jun 06, 2018
This is great! My mother has a walker now and it can be difficult for her to maneuver around while trying to be independent. I like the idea for sections for different things to carry around. I'd even consider making two of them, one for home and another for being out in the public at doctor appointments etc.
mulberrygalprinces s
Apr 24, 2018
This is a truly wonderful idea. I volunteer at an assisted living facility and there are a lot of residents that could use these. I think I will use this pattern to get my crocheting friends to make up a bunch at our next get together. It would really be a great surprise for them.
Zeemer
Mar 22, 2018
This crochet walker organizer is very practical, very functional. Perfect accessory to attach on grandma or grandpa's walker to accommodate all their stuff while going for a walk, going to the hospital, to see a doctor, going to the park, and many other activities. Color used here is perfect for the oldies.
jrlawrence98 08503 80
Jan 01, 2018
I made a walker organizer for a couple of ladies with MS a few years ago and they loved them. The only main difference was I made buttonholes and used buttons to hold it on instead of velcro.
lcarr
Aug 29, 2017
This is a simple project that I can make in a hurry. It would be very handy for my mothers walker, both in her apartment and outside of it. It would also be a very handy accessory for a stroller. You could have bottles, cups, toys, etc within easy reach.
mulberrygalprinces s
Jul 18, 2017
This is a wonderful idea.my grand daughter is learning to crochet and some of her friends wanted to learn so we started a crochet learning circle for the summer. I think this is just the project they need. It will not only teach them about crochet but when they are finished we can take them to a nursing home. I know they will be appreciated and what a great way for them to learn sharing at the same time. Thank you for offering this.
JaneEK
May 27, 2017
I recently retired from an administrative position at an assisted living facility, and I probably saw just about every version of a walker organizer out there. They are incredibly useful but some designs do have their faults. One adjustment I would suggest to this project is to make the pockets on both the inside and outside of the walker. It balances better that way.
FireFightersMoM
May 23, 2017
I had been looking for a pattern for two dear friends that are using walkers now. I was hoping to find one in my favorite hobby of crochet. Today it popped up and I can't wait to get started. My plan is to line the back with a heavy fabric to give it strength and keep it from slipping. I think I will make a few extra's and donate them to our local nursing homes. I had my knees replaced and it is hard to carry anything when you are using a walker
Cheryl Y
Apr 28, 2017
Wow this is The Best Crochet Walker Organizer is have seen yet. It has pockets for every thing and it straps on with velcro. I can see my mother-in-law using this with her walker. So much better then hearing her say, "Here, carry this". LOL She can put quite a bit in this and it will be organized. The pattern is well written and easy to understand. I think I'll do it in her favorite colors to add a little more spark. I like that the pattern is right here on this page and there is a print tab. Thank you so much for sharing this free crochet pattern.
Hippie Chick
Apr 27, 2017
This is a terrific idea. But it definitely needs more bright colors to cheer Grandma up. There is lots of roomy pockets in this organizer so she can stash lots of her important belongings to more around with her. Should make her feel a little more indepent. The grand kids will probably like hiding stuff in there too.
Rosalind
Mar 31, 2017
If you know a group of crocheters that need a project to work on this is ideal. This would be a great pattern / item to make for donation to charitable organizations, care homes, women children shelters, hospitals, senior centers and plenty of others I cant think of right now.
achumley0003 31706 34
Jun 28, 2017
I completely agree. This is a perfect charity project, especially for groups that are looking for something that wouldn't require a lot of time or yarn to make and donate. And this is a useful gift as well. This would definitely be a practical way for many elderly people using walkers to carry important things with them, especially the men who wouldn't be carrying a purse.
alicesnowden 97089 35
Aug 26, 2016
What a great idea! I'm quite a novice crocheter, and I'm going to make it for my mother (96 next!), then see if the Care Home would be interested in more for other residents. )
Meemo
May 24, 2016
Great little pattern. My first thought was to use for baby stroller. Can't wait to try with some pretty colors and happy buttons!
Notsonimblefingers
Apr 09, 2015
Love it! Its brilliant and can be put to so many different uses.
Report Inappropriate Comment
Are you sure you would like to report this comment? It will be flagged for our moderators to take action.
Thank you for taking the time to improve the content on our site.