This project was submitted by one of our readers, just like you.
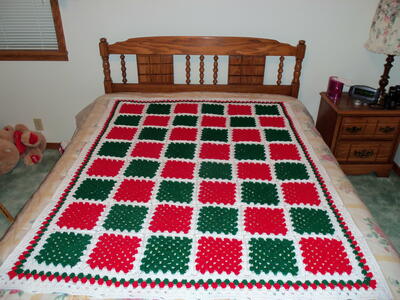
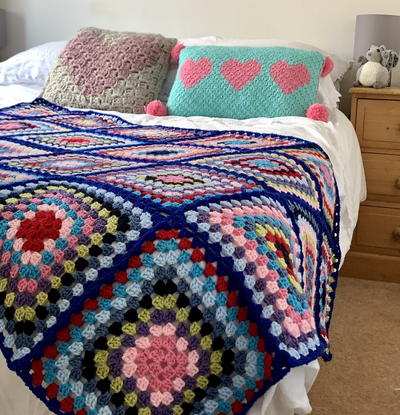
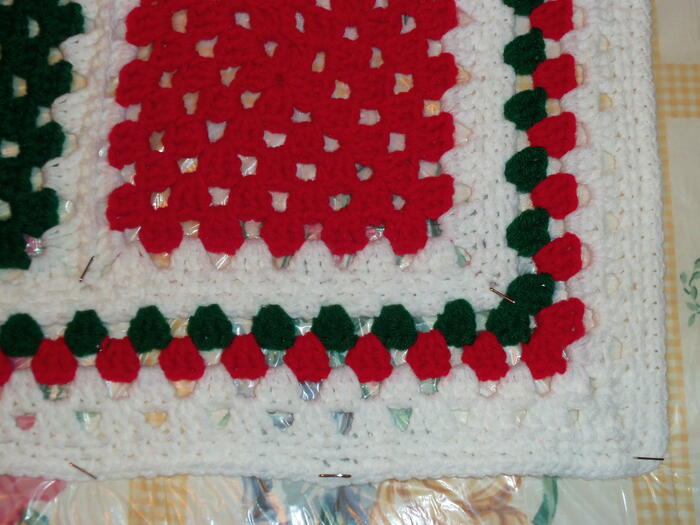
Christmas Granny Afghan

Christmas Granny Afghan
"This Christmas Granny Afghan is so fun to make that it has now become a family tradition for me! After about 7 Christmas seasons, I have now managed to give one to each of the ladies in our family. In fact, this year, one that I haven't given to yet has now become a grandmother. For a special treat, I am crocheting her one for this Christmas and am making a miniature one for my great-niece (her grand-daughter). It's fast because you can make squares while watching TV and before you know it you have the squares for assembly!"
NotesYou may use another method to put squares together (such as sewing), but I chose to crochet them together and included the instructions for that method. If you choose sewing them together, there should not be any adjustments needed when going on to the next step of edging. This makes a perfect Christmas gift and is fun and easy to make as well which helps to alleviate some of the stress at Christmas time!!

Crochet HookI/9 or 5.5 mm hook
Yarn Weight(4) Medium Weight/Worsted Weight and Aran (16-20 stitches to 4 inches)
Crochet Gauge16 ch = 5 in.
Finished SizeApprox. 64" X 50"
Materials List
- Size I Crochet Hook
- 2 Skeins Cherry Red (Red Heart)
- 2 Skeins Paddy Green (Red Heart)
- 2 Skeins White (Red Heart)
- Large Needle for working ends into the piece.
Instructions
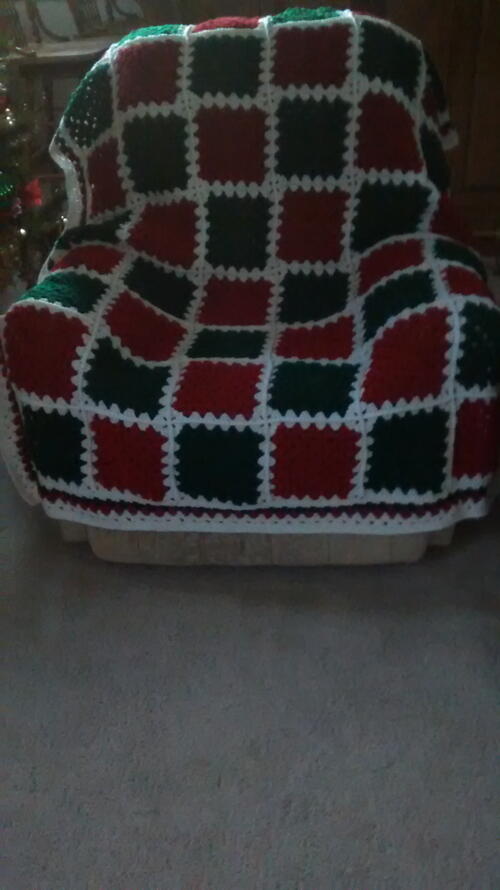
For this particular sized afghan pictured, you will make a total of 48 squares (24 Red Squares with white trim and 24 Green Squares with white trim).
-
Red Yarn & Green Yarn
Rnd. 1 – Ch 4, 2 dc in fourth ch from hook, ch 3, (3 dc in same ch, ch 3) 3 times, join with slip st to top of beginning ch-4, slip st in next dc, slip st in corner (ch 3) space. -
Rnd. 2 – Ch 3 (counts as first dc now and throughout), (2 dc, ch 3, 3 dc) in same sp, ch 1, *(3 dc, ch 3, 3 dc) in next ch-3 sp, ch 1; repeat from * 2 times more; join with slip st to first dc, slip st in next dc, slip st in corner (ch 3) space.
-
Rnd. 3 - Ch 3, 2 dc in corner space, ch3, 3 dc in same corner space, ch 1, 3 dc in next ch 1 space. Ch 1, 3 dc in corner space, Ch 3, 3 dc in same corner space, Ch 1, *3 dc in next ch 1 space, ch 1, 3 dc in corner space, ch 3, 3 dc in same corner space, ch 1, Repeat from * until back to beginning of round3, sl st in top of ch 3 stitch, sl st in top of next dc, sl st in corner ch 3 space.
-
Rnd. 4 & Rnd. 5 – Repeat same stitch pattern around spuare. This will add 1 more ch1 space on each straight side or 4 total in all for each row. (Rnd 4 = 3 ch 1 spaces on each straight side or 12 ch 1 spaces total on all straight sides) Rnd 5 = 4 ch 1 spaces on each straight side or 16 total on all straight sides.)
Join with sl st in top of first ch 3 of 5th Round. Tie off and work ends into square. -
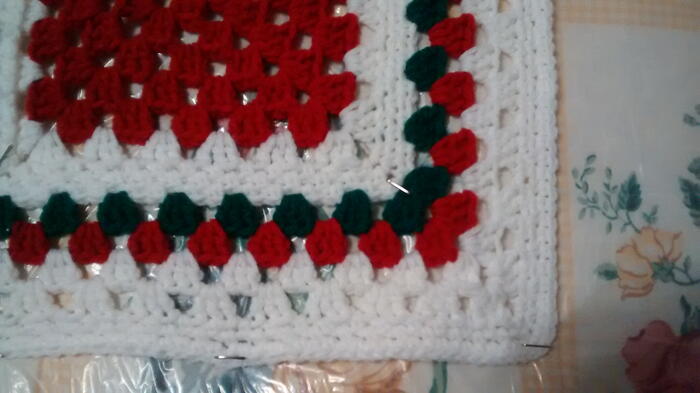
White Yarn – (Final Round of Each Individual Square)
Rnd. 6 – Using White, sl st in any corner ch 3 space, 2 dc in same corner, ch 3, 3 dc in same corner, ch 1. Repeat same pattern as in Round 5 around square. Join with sl st in top of first ch 3. Tie off and work ends into square.
Assembly
Placement Diagram
R G R G R G
G R G R G R
R G R G R G
G R G R G R
R G R G R G
G R G R G R
R G R G R G
G R G R G R
Note: For uniform look, take note of front and back of squares and place all the same. (Front sides up and back sides down.)
-
Start with 2 rows of squares and from right to left. Place the two right end squares of row 1 and row 2 back side to back side. Make a loop with your yarn and sl st in right corner of both squares. Sc in same corner. Sc in top of first dc stitches (both squares) using both loops in the tops of the stitch. Sc in top of second dc stitches (both squares). Sc in top of third dc stitches (both squares). Sc in next ch 1 space. Continue across following this pattern ending with a sc in both left corners of the squares.
-
Place next two squares back to back and sc in right corners of both squares. Repeat the pattern for the first two squares across and for each pair of squares until you complete the first row by ending with a dc in the left corner of the last two squares on the row. Tie off ends and work ends into squares.
-
Join the left square of the next row to the left square of the second row and repeat stitching pattern across entire row. Tie off ends and work ends into squares.
-
Continue this crochet pattern for each row until all rows are crocheted together horizontally.
-
Turn your work to the right one time so the gaps (not crocheted) are horizontal to you. Crochet each row together using the same crochet pattern you used for the now vertical rows. Tie off ends and work ends into squares.
Edging
-
Rnd. 1: With white, sl st in any corner sp, sc in same corner sp, ch 2, sc in same corner sp, ch 1, *skip next dc and sc in next dc, ch 1, skip next dc and sc in next ch 1 space. Repeat from * across to next corner. Work corner with sc in corner space, ch 2, sc in same corner space. *skip next dc and sc in next dc, ch 1. Repeat from * across. Work corner space. Repeat same pattern (across and to work corner) two more times until back to beginning. Sl st in beg sl st. Do Not fasten off.
-
Rnd. 2 & 3: Sc in corner ch 2 sp, Ch 2, sc in same corner. Repeat Rnd. 1 for rows 2 & 3. Fasten off and weave ends in.
-
Rnd. 4: With Green, sl st in any corner other than the one you started Rnd. 1 in. (I have found alternating starting corners after fastening off will prevent any one corner from getting out-of-shape.) Ch 3, 2 dc, ch 1, 3 dc, ch 1. ** *3 dc in next ch 1 space. Repeat from * across. Work corner (3dc, ch 1, 3 dc, ch 1). Repeat from ** for next 3 sides until back to beginning. Sl st to first ch 3. Tie off and weave in end.
-
Rnd 5: With Red, repeat Rnd 4. (Remember to start in a different corner than you last started.)
-
Rnd 6 & 7: With White repeat Rnd 5 twice. (No need to tie off after row 6 – after sl st to join to beg ch 3, sl st in top of next dc, sl st in corner ch 1 sp and begin the corner pattern to move on to row 7.) Remember to start Rnd 6 in different corner than previously started.)
(Effect: After white rows around you will have 1 row green, 1 row red and 2 rows white.) -
Rnd 8: With white, sl st in different corner that last started in. Sc in same corner, ch 2, sc in same corner (equivalent of working a corner when working rnd 8 – 10), Ch 1. ** *Skip next dc and sc in next dc, ch 1. Skip next dc and sc in next ch 1 space, ch 1. Repeat from * across to corner. Work corner (sc, ch 2, sc). Repeat from ** 3 times until back to beginning. Sl st to beg. sl st. Do Not fasten off.
-
Rnd. 9 - 10: Continuing with white, sc in ch 2 corner space, ch 2, sc in same corner space, ch 1. Repeat Rnd 8 twice. Fasten off and weave ends in.
-
Rnd. 11: With white, sl st in “different corner,” 2 sc in corner space, *sc in each ch 1 space across to corner. 2 sc in corner space. Repeat from * 3 times until back to beginning. Fasten off and tie ends in.
-
This will complete your afghan. Recommended: Wash and block before use or giving as a gift!

Read NextLily Of The Valley Square