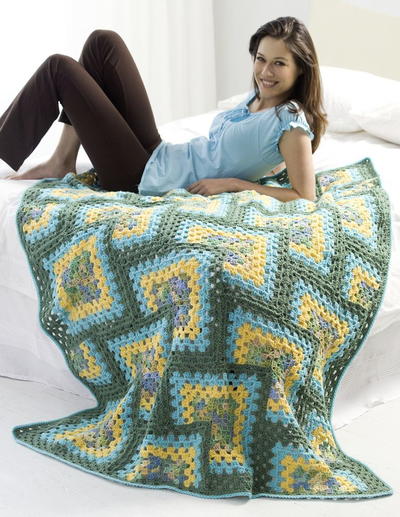
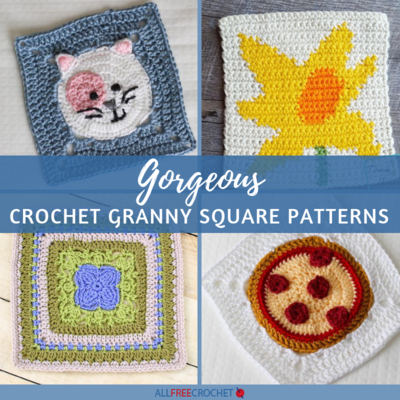
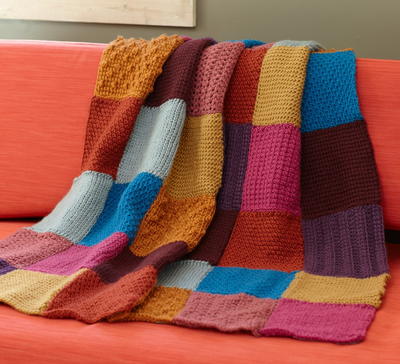
Granny Square Tunisian Throw

This Granny Square Tunisian Throw will look great draped over your family room sofa and will definitely add a pop of color to any room of your home. The tunisian crochet stitch is used to complete this free crochet afghan pattern. This is an easy pattern to complete using Lion Brand Vanna's Choice yarn in any color combination you prefer. Use yarn colors that match your home decor, or go with something totally off-the-wall. Either way, the geometric design of this free crochet pattern is stunning.
This throw is made from four each of 9 different Squares. Each of the 9 different Squares is worked in a different color and a different Tunisian crochet pattern stitch. As you work, work loosely and evenly as Tunisian crochet fabric can have a tendency to curl.

Crochet HookJ/10 or 6 mm hook
Yarn Weight(4) Medium Weight/Worsted Weight and Aran (16-20 stitches to 4 inches)
Finished Size1 Square = 7 x 7 in. (18 x 18 cm)
Materials List
- LION BRAND® VANNA'S CHOICE® (Art. #860): #148 Burgundy 1 ball (A), #144 Magenta 1 ball (B), #149 Silver Grey 1 ball (C), #133 Brick 1 ball (D), #130 Honey 1 ball (E), #145 Eggplant 1 ball (F), #143 Antique Rose 1 ball (G), #107 Sapphire 1 ball (H), #135 Rust 1 ball (I) or colors of your choice
- LION BRAND® crochet hook size J-10 (6 mm)
- LION BRAND® large-eyed blunt needle
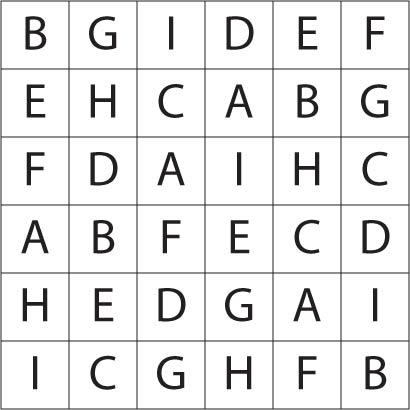
- Assembly Diagram
Pattern
SQUARE A – BASIC TUNISIAN CROCHET
(make 4)
-
With A, ch 27.
-
Foundation Row (forward pass): Insert hook in 2nd ch from hook, yo and draw up a loop (2 loops on hook), *keeping all loops on hook, insert hook in next ch, yo and draw up a loop; rep from * across – 27 loops on hook. Do not turn.
-
Foundation Row (return pass): Yo and draw through first loop, *yo and draw through 2 loops; rep from * until 1 loop remains (this loop becomes the first st of the next row) – 27 sts. Do not turn.
-
Row 1 (forward pass): Sk first vertical bar of previous row (against edge of piece), *keeping all loops on hook, insert hook from right to left under next vertical bar, yo and draw up a loop; rep from * across. Do not turn.
-
Row 1 (return pass): Work same as Foundation Row (return pass).
-
Rep both passes of Row 1 until a total of 20 rows have been worked.
-
Last Row: Sk first vertical bar, sl st in each vertical bar across. Fasten off.
SQUARE B – TUNISIAN CROSSED STITCH
(make 4)
-
With B, ch 29.
-
Foundation Row (both passes): Work same as Foundation Row of Square A – 29 sts.
-
Row 1 (forward pass): Sk first vertical bar of previous row, *keeping all loops on hook, sk next vertical bar, insert hook from right to left under next vertical bar, yo and draw up a loop, insert hook from right to left under skipped vertical bar, yo and draw up a loop; rep from * across. Do not turn.
-
Row 1 (return pass): Work same as Foundation Row (return pass).
-
Rep both passes of Row 1 until a total of 18 rows have been worked.
-
Last Row: Sk first vertical bar, sl st in each vertical bar across. Fasten off.
SQUARE C – TUNISIAN KNIT
(make 4)
Note: In this square, the hook is inserted all the way through the fabric, from front to back.
-
With C, ch 25.
-
Foundation Row (both passes): Work same as Foundation Row of Square A – 25 sts.
-
Row 1 (forward pass): Sk first vertical bar of previous row, *keeping all loops on hook, insert hook from right to left under next vertical bar and through the fabric (to the wrong side of the piece), yo and draw up a loop; rep from * across. Do not turn.
-
Row 1 (return pass): Work same as Foundation Row (return pass).
-
Rep both passes of Row 1 until a total of 25 rows have been worked.
-
Last Row: Sk first vertical bar, sl st in each vertical bar across. Fasten off.
SQUARE D – TUNISIAN BIAS STITCH
(make 4)
-
With D, ch 31.
-
Foundation Row (both passes): Work same as Foundation Row of Square A – 31 sts.
-
Row 1 (forward pass): Sk first vertical bar of previous row, *keeping all loops on hook, sk next vertical bar, insert hook from right to left under next vertical bar, yo and draw up a loop, insert hook from right to left under skipped vertical bar, yo and draw up a loop; rep from * across. Do not turn.
-
Row 1 (return pass): Work same as Foundation Row (return pass).
-
Row 2 (forward pass): Sk first vertical bar of previous row, insert hook from right to left under next vertical bar, yo and draw up a loop, *keeping all loops on hook, sk next vertical bar, insert hook from right to left under next vertical bar, yo and draw up a loop, insert hook from right to left under skipped vertical bar, yo and draw up a loop; rep from * across to last vertical bar, insert hook from right to left under last vertical bar, yo and draw up a loop.
-
Row 2 (return pass): Work same as Foundation Row (return pass).
-
Rep both passes of Rows 1 and 2 until a total of 19 rows have been worked.
-
Last Row: Sk first vertical bar, sl st in each vertical bar across. Fasten off.
SQUARE E – TUNISIAN PURL
(make 4)
-
With E, ch 27.
-
Foundation Row (both passes): Work same as Foundation Row of Square A – 27 sts.
-
Row 1 (forward pass): Sk first vertical bar of previous row, *holding yarn to the front and keeping all loops on hook, insert hook from right to left under next vertical bar, yo and draw up a loop; rep from * across.
-
Row 1 (return pass): Work same as Foundation Row (return pass).
-
Rep both passes of Row 1 until a total of 19 rows have been worked.
-
Last Row: Sk first vertical bar, sl st in each vertical bar across. Fasten off.
SQUARE F – TUNISIAN RIB
(make 4)
Note: In this square, 3 basic Tunisian sts are alternated with 3 Tunisian purl sts.
-
With F, ch 28.
-
Foundation Row (both passes): Work same as Foundation Row of Square A – 28 sts.
-
Row 1 (forward pass): Sk first vertical bar of previous row, keeping all loops on hook, (insert hook from right to left under next vertical bar, yo and draw up a loop) 3 times (3 basic Tunisian sts made), *(holding yarn to the front, insert hook from right to left under next vertical bar, yo and draw up a loop) 3 times (3 Tunisian purl sts made), (insert hook from right to left under next vertical bar, yo and draw up a loop) 3 times; rep from * across.
-
Row 1 (return pass): Work same as Foundation Row (return pass).
-
Rep both passes of Row 1 until a total of 21 rows have been worked.
-
Last Row: Sk first vertical bar, sl st in each vertical bar across. Fasten off.
SQUARE G – TUNISIAN LACE
(make 4)
-
With G, ch 29.
-
Foundation Row (forward pass): Work same as Foundation Row (forward pass) of Square A – 29 loops on hook.
-
Foundation Row (return pass): *Ch 3, yo and draw through 5 loops, yo and draw through 1 loop (cluster made); rep from * until 1 loop remains.
-
Row 1 (forward pass): *Keeping all loops on hook, insert hook into top of next cluster, yo and draw up a loop; working in next ch-3 (insert hook in next ch, yo and draw up a loop) 3 times; rep from * across.
-
Row 1 (return pass): *Ch 3, yo and draw through 5 loops, yo and draw through 1 loop (cluster made); rep from * until 1 loop remains.
-
Rep both passes of Row 1 until a total of 14 rows have been worked.
-
Last Row: Sk first vertical bar, sl st in each vertical bar across. Fasten off.
SQUARE H – TUNISIAN HONEYCOMB
(make 4)
Note: In this square, basic Tunisian sts are alternated with Tunisian purl sts on odd-numbered rows, and Tunisian purl sts are alternated with basic Tunisian sts on even-numbered rows.
-
With H, ch 27.
-
Foundation Row (both passes): Work same as Foundation Row of Square A – 27 sts.
-
Row 1 (forward pass): Sk first vertical bar of previous row, keeping all loops on hook, *holding yarn to the front, insert hook from right to left under next vertical bar, yo and draw up a loop (Tunisian purl st made), insert hook from right to left under next vertical bar, yo and draw up a loop (basic Tunisian st made); rep from * across.
-
Row 1 (return pass): Work same as Foundation Row (return pass).
-
Row 2 (forward pass): Sk first vertical bar of previous row, keeping all loops on hook, *insert hook from right to left under next vertical bar, yo and draw up a loop (basic Tunisian st made), holding yarn to the front, insert hook from right to left under next vertical bar, yo and draw up a loop (Tunisian purl st made); rep from * across.
-
Row 2 (return pass): Work same as Foundation Row (return pass).
-
Rep both passes of Rows 1 and 2 until a total of 18 rows have been worked.
-
Last Row: Sk first vertical bar, sl st in each vertical bar across. Fasten off.
SQUARE I – TUNISIAN POPCORN
(make 4)
-
With I, ch 25.
-
Foundation Row (both passes): Work same as Foundation Row of Square A – 25 sts.
-
Row 1 (forward pass): Sk first vertical bar of previous row, keeping all loops on hook, (insert hook from right to left under next vertical bar, yo and draw up a loop) 4 times, *ch 3, (insert hook from right to left under next vertical bar, yo and draw up a loop) 4 times; rep from * across.
-
Row 1 (return pass): Work same as Foundation Row (return pass).
-
Row 2 (both passes): Work same as Row 1 of Square A.
-
Row 3 (forward pass): Sk first vertical bar of previous row, keeping all loops on hook, (insert hook from right to left under next vertical bar, yo and draw up a loop) twice, *ch 3, (insert hook from right to left under next vertical bar, yo and draw up a loop) 4 times; rep from * across to last 2 vertical bars, ch 3, (insert hook from right to left under next vertical bar) twice.
-
Row 3 (return pass): Work same as Foundation Row (return pass).
-
Row 4 (both passes): Work same as Row 1 of Square A.
-
Rep both passes of Rows 1–4 until a total of 17 rows have been worked.
-
Last Row: Sk first vertical bar, sl st in each vertical bar across. Fasten off.
FINISHING
-
Following Assembly Diagram (click image to enlarge), sew Squares together. Weave in ends.
Why AFC Loves This Pattern
Tunisian crochet is such a gorgeous crochet technique, and sampler blankets are unique and eclectic all on their own. When you combine the two, though, the end results are breathtaking. Sampler blanket patterns are comprised of different sections (or, in this case, granny squares) that each features a different pattern or crochet technique. The goal is to "sample" different methods and then mix and match them to create a finished piece. For this particular Tunisian crochet blanket, there are nine different Tunisian crochet stitches that are featured that range from a basic Tunisian crochet stitch and a Tunisian crossed stitch all the way through Tunisian honeycomb and popcorn stitches. This, plus the bright and bold colors used, makes for a varied and textured afghan that looks great whether it's draped on a couch or over a bed.
Read NextLily Of The Valley Square
Your Recently Viewed Projects
Thanks for your comment. Don't forget to share!
tfrusso77 2936526
Mar 22, 2019
Hi there -- I was wondering if anyone has made this blanket in a baby size. If so, how many squares did you make?
Tricia108
Oct 19, 2018
I really like the diversity in this afghan. I have done some Tunisian stitch but this patterns takes the basic and adds other variations which is really nice. It will keep it from getting boring. It is a good scrap buster as well. I have not bought throws in a long time. I just make them. Thank you for the pattern.
JaneEK
Oct 31, 2017
If you only know the most basic Tunisian stitches, this project is the perfect opportunity to learn new techniques and see just what textures you can work up. Each square is worked separately using a different stitch pattern. Probably the most difficult aspect of Tunisian is learning to control the tension so the work doesnt curl. Just remember its no big deal to pull work out and start again. Crochet is a lot more forgiving than knitting.
Zeemer
Aug 06, 2017
So beautiful, this Granny Square Tunisian Throw. I love how the different colored squares alternate with each other. I also love the squares done in various stitches. This is a project made of different Tunisian stitches, I've watched the video with the lady doing one Tunisian stitch. There's a lot to learn. Whew!
lcarr
Mar 05, 2017
This makes a nice texture blanket for anyone who needs or enjoys the extra sensory input. My youngest is on the spectrum and this would be right up his alley! I bet young children would love it too. It makes a great sampler blanket for anyone wanting to try out variety of different stitches. This one is definitely on my to-do list.
mg57
Feb 20, 2017
This is a nice way to practice Tunisian crochet. The title of this pattern is a little misleading as it is not a granny square you are crocheting, rather you are crocheting Tunisian stitch squares. You an also use these stitch patterns to make dishcloths in a kitchen cotton yarn. Try a couple of rows of the Tunisian purl stitch at the beginning and end of each square to help minimize the curling.
Tammy
Jan 26, 2017
This is by far the most awesome pattern for a crocheted blanket I have ever seen. It has the best of both blanket and quilt. This is a definite on my must do list. I am sure I will change the colors up some, but I am so looking forward to making this treasure. I have a feeling there will be lots of these on my list to make. Perfect for a baby, man woman or child. With this pattern, it is all in the colors. Thanks for posting this.
mdjr11 4659542
Aug 03, 2016
Did I miss something? I did not find the Assembly Diagram. I am looking forward to trying the tunisian crochet.
suejohnson2301 291 8589
Jun 17, 2016
Hi just finished the first two stitches squares. Questions, how do you get them from rolling up, block when you sew em toghter? Love the pattern.
Cheryl Y
Apr 26, 2016
Wow I almost past this one up because of the name Granny Square. Then I seen Tunisian Throw, That got me.. I don't like doing the Granny Square but love the Tunisian Stitches. After reading the pattern and the comments below, I will be matching my yarns and colors to make a beautiful Blanket. Thank you for this free pattern that I have on my "must do" list.
marilynwood1940 12 01645
Aug 30, 2015
I have never Tunisian crochet but have crochet many other projects in the past. Looking forward to making this throw.
statbolen 8763975
Jan 24, 2014
Changing the colors but so looking forward to work this project!!!
ellenrappaport 999 7512
Jan 15, 2014
finally finished. stayed true to the colors, Tunisian stitches and pattern but added borders. Tried to enclose a picture. Ellen Rappaport's photo.
ellenrappaport 999 7512
Aug 25, 2013
The Tunisian lace, G, does not have the same body or texture as the other yarns and is a bit flimsy. Does not hold its shape as the other squares/yarn do. Also the colors shown in the picture are much more vibrant than the actually yarn colors. So if I had known that from the start I may have had the opportunity to choose other colors for my yarn. If anyone else needs assistance with some of the Tunisian stitches you find almost everyone of them online & at YouTube.
ellenrappaport 999 7512
Aug 18, 2013
I have finished A B C D E & F. Now on G-Tunisian Lace and having a difficult time. I need a visual and the few I've found online have not helped. Can you send pictures or better detailed instructions to me? Ellen
Report Inappropriate Comment
Are you sure you would like to report this comment? It will be flagged for our moderators to take action.
Thank you for taking the time to improve the content on our site.