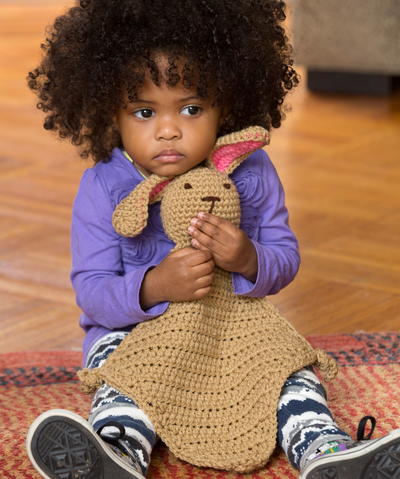
Comforting Bunny Lovey

Kids of all age will love snuggling up with this Comforting Bunny Lovey. Crochet one for your own little one, or make this sweet crochet pattern for a homemade baby shower gift. It's a quick crochet pattern to work up using just a few skeins of yarn. Measuring only about 11 inches wide and 13 inches long, this carry-along baby blanket is the perfect size to take with you everywhere you go. It's sure to be cherished for years to come.

Crochet HookI/9 or 5.5 mm hook
Yarn Weight(4) Medium Weight/Worsted Weight and Aran (16-20 stitches to 4 inches)
MATERIALS:
- RED HEART® With Love®: 1 skein each of 1308 Tan (A), 1704 Bubble Gum (B), and 1321 Chocolate (C)
- Susan Bates® Crochet Hook: 5.5 mm [US I-9]
- Yarn needle
- Stitch markers
- Polyfill stuffing
- Ear Assembly Diagram
SIZE:
Blankie measures 11” (28 cm) wide x 13” (33 cm) long. Head measures 10” (25.5 cm) in circumference and 3½” (9 cm)
GAUGE:
12 sts and 9 rows hdc = 4” (10 cm). CHECK YOUR GAUGE. Use any size hook to obtain the gauge.
SPECIAL STITCHES:
Single crochet 2 together (sc2tog): [Insert hook in next st, yarn over, draw yarn through st] twice, yarn over, draw yarn though 3 loops on hook.
Half double crochet 2 together (hdc2tog): [Yarn over, insert hook in next st, yarn over and draw up a loop] twice as indicated, yarn over, draw yarn through all loops on hook.
Half double crochet 3 together (hdc3tog): [Yarn over, insert hook in next st, yarn over and draw up a loop] 3 times as indicated, yarn over, draw yarn through all loops on hook.
INSTRUCTIONS:
EAR (make 2 with A for outer ear, and 2 with B for inner ear)
Ch 15.
Row 1 (right side): Dc in 4th ch from hook and in each of next 10 ch, 6 dc in last ch, working across opposite side of foundation ch, dc in each of next 11 ch, ch 2, sl st in last ch—30 dc. Fasten off, leaving a 6” (15 cm) sewing length.
Assemble Ears
Place 1 inner and 1 outer ear together, with wrong sides are together, matching stitches.
Edging:
With inner ear facing, leaving a 6” (15 cm) sewing length, join A with a slip st in bottom right-hand corner through double thickness of assembled ear, ch 1, working through double thickness, sc in each st around top of ear, to bottom left-hand corner—30 sc.
Fasten off, leaving a 6” (15 cm) sewing length.
HEAD
With A make an adjustable ring.
Round 1: Ch 1, work 6 sc in ring, do not join—6 sc. Work in a spiral. Place marker in first st of round and move marker up as work progresses.
Round 2: 2 sc in each st around—12 sc.
Round 3: *2 sc in next st, sc in next st; repeat from * around—18 sc.
Round 4: *2 sc in next st, sc in each of next 2 sts; repeat from * around—24 sc.
Round 5: *2 sc in next st, sc in each of next 3 sts; repeat from * around—30 sc.
Round 6: *2 sc in next st, sc in each of next 3 sts; repeat from * around—36 sc.
Round 7-12: Sc in each st around—36 sc. Do not fasten off. Drop loop to be picked up later.
Assemble Head
Flatten Head. Place markers on row 3 for ear placement. For each marked side, use a crochet hook to pull A tails through rows 3 and 4 of head; knot together on inside of head to secure. Use a crochet hook to pull B tails through head 3 stitches back from where A tails are attached; knot together on inside of head to secure. With a 24” (61 cm) length of C and yarn needle, work straight stitches in the shape of a T for nose and mouth as pictured. With C, work 1 French knot for each eye as pictured. Weave in ends.
Continue Head
Round 13: Pick up dropped loop at end of Round 12 of Head, *sc2tog over next 2 sts, sc in each of next 6 sts; repeat from * around—30 sc.
Round 14: *Sc2tog over next 2 sts, sc in each of next 3 sts; repeat from * around—24 sc.
Round 15: *Sc2tog over next 2 sts, sc in each of next 2 sts; repeat from * around—18 sc. Do not fasten off. Stuff Head with polyfill stuffing.
Close Head
With face forward and Ears on either side, flatten last round of Head. If hook is not positioned at side of flattened round, sc in each st across to fold directly under right ear.
BLANKIE
Row 1 (right side): Ch 2 (does not count as a st here and throughout), working through double thickness of last round of Head, matching sts, hdc in each st across, turn— 9 hdc.
Row 2: Ch 2, 2 hdc in first st, hdc in each of next 7 sts, 2 hdc in last st—11 hdc.
Rows 3-12: Ch 2, 2 hdc in first st, hdc in each st across to last st, 2 hdc in last st—31 hdc at end of last row.
Row 13: Ch 2, hdc in each st across, turn.
Row 14: Ch 2, hdc2tog over first 2 sts, hdc in each of next 27 sts, hdc2tog over last 2 sts, turn—29 sts
Row 15-27: Ch 2, hdc2tog over first 2 sts, hdc in each st across to last 2 sts, hdc2tog over last 2 sts, turn—3 sts at end of last row.
Row 28: Ch 2, hdc3tog over next 3 sts—1 st. Fasten off A.
Border and Knot Hands:
With right side facing, join A with a slip st in base of first st of Row 1 of Blankie, ch 1, working across side edge of Blankie, work 2 sc in each of first 12 row-end sts, *ch 17, hdc in third ch from hook and each ch across (first hand made)*, work 2 sc in each of next 15 row-end sts ending at bottom tip, sc in tip of Blankie, working across other side edge, work 2 sc in each of next 15 row-end sts, repeat from * to * for second hand, work 2 sc in each of next 12 row-end sts. Fasten off A.
FINISHING
Weave in ends. Ties each Hand in an over- hand knot at base of Hand.
Read NextQuick Scrap Yarn Baby Blanket
Your Recently Viewed Projects
Thanks for your comment. Don't forget to share!
Daughter of Light
Mar 29, 2018
Oh! I don't know which is more cute! Our model or the bunny! I just found this in the nick of time! Easter is right around the corner and I can see several of these sitting atop wee ones baskets this year. How special and precious! This will remain after all the candy is gone too! I'm thankful that it's labeled "easy" and they even have an ear assembly diagram.
maddockfamily 8188 802
Sep 20, 2016
It would be helpful to know how much yarn is needed (approximately, in yards) to complete this project.
jenmom22 5757307
Apr 11, 2015
Confused with "adjustable ring" and "drop loop." These are not easy directions. Maybe intermediate?
Report Inappropriate Comment
Are you sure you would like to report this comment? It will be flagged for our moderators to take action.
Thank you for taking the time to improve the content on our site.