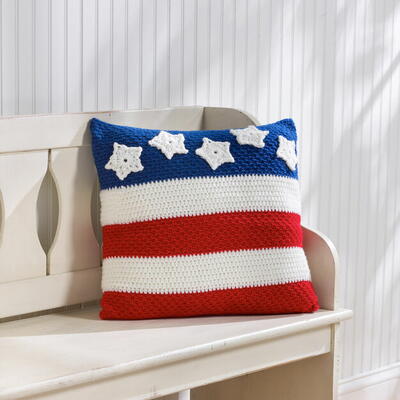
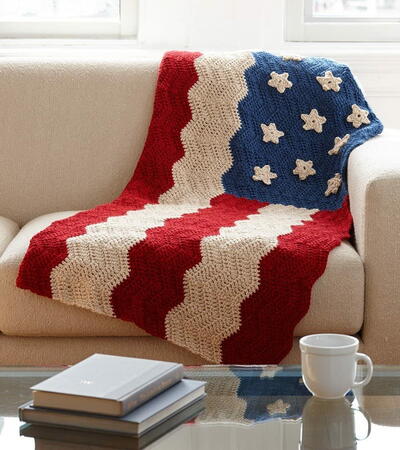
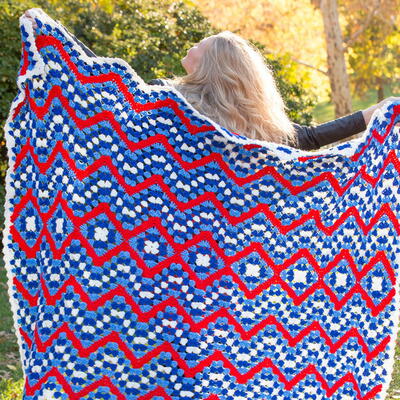
Rippling Pride Granny Square Blanket
Show your patriotism with this beautiful red, white, and blue ripple blanket!

Show off your 4th of July pride with this patriotic crochet pattern from Red Heart. The Rippling Pride Granny Square Blanket is the combination of two crochet favorites: granny squares and the crochet ripple stitch.
This granny square pattern is a join as you go pattern.
You'll pick this one out of your other crochet blanket patterns to sit on to watch the Fourth of July fireworks because it's red, white, and blue as well as stunning in design.
Celebrate the American spirit by working up this afghan blanket.
Sign Up For More Free Patterns >>>

Crochet HookH/8 or 5 mm hook, J/10 or 6 mm hook
Yarn Weight(4) Medium Weight/Worsted Weight and Aran (16-20 stitches to 4 inches)
Crochet Gauge1 granny square = 4 (11.5 cm) with larger hook; 1 ripple = 7 (18 cm) from peak to peak; Rows 18 = 5 (14.5 cm) in ripple pattern. CHECK YOUR GAUGE. Use any size hook to obtain the gauge.
Finished SizeThrow measures 65 at widest points x 46 long (165 x 117 cm).
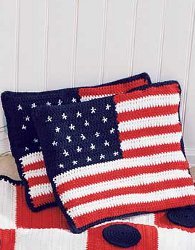
Find even more Fourth of July inspired crochet patterns in our collection of 16 4th of July Crochet Designs!
Materials:
- RED HEART® Super Saver®: 2 skeins each 316 Soft White A, 385 Royal B, 885 Delft C, and 319 Cherry Red D
- Susan Bates® Crochet Hook: 5mm [US H-8] and 6mm [US J-10]
- Yarn needle
Special Stitches
- sc2tog = [Insert hook in next stitch, yarn over and pull up a loop] twice, yarn over and draw through all 3 loops on hook.
- sc2tog-over-4 (single crochet 2 together over 3 stitches) = Insert hook in next stitch, yarn over and draw up a loop (2 loops on hook), skip next 2 stitches, insert hook in next stitch, yarn over and draw up a loop, yarn over and draw through all 3 loops on hook.
- Special Techniques
- Join with dc = Place a slip knot on hook, yarn over, insert hook in indicated stitch, yarn over and draw up a loop, [yarn over and draw through 2 loops on hook] 2 times.
- Join with sc = Place a slip knot on hook, insert hook in indicated stitch, yarn over and draw up a loop, yarn over and draw through both loops on hook.
Notes
- Nine granny squares are made in joined rounds with right side facing at all times. Squares are joined together to form center strip of throw with a “join as you go” technique.
- Rows are worked from top and bottom edges of center strip in a ripple pattern.
- Work with larger hook throughout entire throw except last round of border.
- Border is made in joined rounds written in steps for ease of reading.
THROW
Granny Square (make 9)
With larger hook and A, ch 4; join with slip st in first ch to form a ring.
Round 1: Ch 3 (counts as first dc), 2 dc in ring, [ch 2, 3 dc in ring] 3 times, ch 2; join with slip st in top of beginning ch—12 dc and 4 ch-2 spaces. Fasten off. Continue with larger hook for remaining rounds.
Round 2: With right side facing, join B with dc in any ch-2 space (2 dc, ch 2, 3 dc) in same space, [ch 1, (3 dc, ch 2, 3 dc) in next ch-2 space] 3 times, ch 1; join with slip st in first dc—24 dc, 4 ch-1 spaces, and 4 ch-2 spaces. Fasten off.
Round 3: With right side facing, join C with dc in any ch-1 space, 2 dc in same space, [ch 1, (3 dc, ch 2, 3 dc) in next ch-2 space*, ch 1, 3 dc in next ch-1 space] 4 times ending last repeat at *, ch 1; join with slip st in first dc—36 dc, 8 ch-1 spaces, and 4 ch-2 spaces.
Fasten off.
Ripple Section
Side 1
Row 1 (joining row): With right side facing and larger hook, join D with sc in any ch-2 space of any square, *sc in each dc and ch-1 space across to next ch-2 space, (sc, ch 2, sc) in next ch-2 space, sc in each dc and ch-1 space across to next ch-2 space, sc in next ch-2 space**; with right side of next square facing, sc in any ch-2 space; repeat from * until all squares are joined, ending last repeat at **, turn—234 sc and 9 ch-2 spaces.
Rows 2 and 3: Ch 1, sc2tog, *sc in each sc across to next ch-2 space, (sc, ch 2, sc) in next ch-2 space, sc in next 11 sts**, sc2tog-over-4; repeat from * across ending last repeat at **, sc2tog, turn.
Fasten off. Continue with larger hook for remaining rows.
Row 4: With right side facing, join C with dc in 2nd sc, 2 dc in same sc, *[ch 1, skip next 3 sc, 3 dc in next sc] twice, ch 1, skip next 3 sc, (3 dc, ch 2, 3 dc) in next ch-2 space, [ch 1, skip next 3 sc, 3 dc in next sc] 3 times**, skip next sc, 3 dc in next sc; repeat from * across ending last repeat at **—288 dc, 54 ch-1 spaces, and 9 ch-2 spaces. Fasten off.
Row 5: With right side facing, join B with dc in first ch-1 space, 2 dc in same space, *[ch 1, 3 dc in next ch-1 space] twice, ch 1, (3 dc, ch 2, 3 dc) in next ch-2 space, [ch 1, 3 dc in next ch-1 space] 3 times**, skip next 6 dc, 3 dc in next ch-1 space; repeat from * across ending last repeat at **. Fasten off.
Row 6: With A, repeat Row 5.
Row 7: With B, repeat Row 5.
Row 8: With C, repeat Row 5.
Row 9: With right side facing, join D with sc in first ch-1 space, *sc in each dc and ch-1 space across to next ch-2 space, (sc, ch 2, sc) in next ch-2 space, [sc in next 3 dc, sc in next ch-1 space] 3 times**, skip next 6 dc; repeat from * across ending last repeat at **, turn—234 sc and 9 ch-2 spaces.
Rows 10–25: Repeat Rows 2–9 twice.
Rows 26–29: Repeat Rows 2–5.
Side 2
Row 1 (joining row): With right side of unworked edges of squares facing, join D with sc in first and previously worked ch-2 space of first square, *sc in each dc and ch-1space across to next ch-2 space, (sc, ch 2, sc) in next ch-2 space, sc in each dc and ch-1 space across to next previously worked ch-2 space, sc in first previously worked ch-2 space of next square**; repeat from * across ending last repeat at **, turn—234 sc and 9 ch-2 spaces.
Rows 2–29: Work same as Side 1.
Border
Round 1:
Step 1: With right side of top edge facing and larger hook, join A with dc in first ch-1 space, 2 dc in same space, *[ch 1, 3 dc in next ch-1 space] twice, ch 1, ***(3 dc, ch 2, 3 dc) in next ch-2 space, [ch 1, 3 dc in next ch-1 space] 3 times**, 3 dc in next ch-1 space; repeat from * across ending last repeat at **, ch 1, skip next 2 dc, (3 dc, ch 2, 3 dc) in last dc (corner made).
Step 2: Working across side edge and in top of sts (not around the posts), sc in last dc of next C row, 3 dc in same sc of next D row as last 3-dc group made in last C row, sc in last dc of next D row.
Step 3: Work *[3 dc in last ch-1 space of next row, sc in last dc of same row] 5 times, 3 dc in same sc of next D row as last 3-dc group made in last C row, sc in last dc of next D row; repeat from * twice, 3 dc in next ch-2 space (in last round of granny square between last and next D rows).
Step 4: *Skip next D row, sc in first sc of next D row, 3 dc in same sc of next D row as first 3-dc group made in next C row**, [sc in first dc of next row, 3 dc in first ch-1 space of same row] 5 times; repeat from * 3 times ending last repeat at **, sc in first dc of next C row, 3 dc in first ch-1 space of same row, skip first dc of next B row, (3 dc, ch 2, 3 dc) in next dc of same B row (corner made).
Step 5: Working across bottom edge, [ch 1, 3 dc in next ch-1 space] 3 times; repeat all steps beginning at *** of Step 1, ch 1; join with slip st in first dc—230 3-dc groups.
Round 2:
Step 1: Working across top edge, slip st in next dc, ch 1, (sc, ch 2, sc) in same dc, *[skip next dc, (sc, ch 2, sc) in next ch-1 space, skip next dc, (sc, ch 2, sc) in next dc] 3 times, ch 1, skip next dc, (sc, ch 2, sc) in next ch-2 space, ch 1, [skip next dc, (sc, ch 2, sc) in next dc, skip next dc, (sc, ch 2, sc) in next ch-1 space] 3 times**, skip next dc, sc in next dc, skip next 2 dc, sc in next dc; repeat from * across ending last repeat at **, skip next dc, (sc, ch 2, sc) in next dc, skip next dc, (sc, ch 2, sc) in next ch-1 space.
Step 2: Working around corner, skip next dc, (sc, ch 2, sc) in next dc, ch 1, skip next dc, (sc, ch 2, sc) in next ch-2 space, ch 1, skip next dc, (sc, ch 2, sc) in next dc, skip next dc, sc in next sc; change to smaller hook.
Step 3: Working across side edge, ch 1, skip next dc, (sc, ch 2, sc) in next dc, *ch 1, skip next dc, slip st in next sc, ch 1, skip next dc, (sc, ch 2, sc) in next dc; repeat from * across to last sc before next corner, ch 1; change to larger hook, sc in last sc.
Step 4: Working around corner, skip next dc, (sc, ch 2, sc) in next dc, ch 1, skip next dc, (sc, ch 2, sc) in next ch-2 space, ch 1, skip next dc, (sc, ch 2, sc) in next dc.
Step 5: Working across bottom edge, skip next dc, (sc, ch 2, sc) in next ch-1 space, skip next dc, (sc, ch 2, sc) in next dc; repeat Steps 1–4 beginning at * of Step 1; join with slip st in first sc. Fasten off.
FINISHING
Weave in ends. Block lightly if desired.
ABBREVIATIONS
A, B, C = Color A, Color B, Color C, etc.
ch = chain
dc = double crochet
sc = single crochet
st(s) = stitch(es)
( ) = work directions in parentheses into same st
[ ] = work directions in brackets the number of times specified
* = repeat whatever follows the * as indicated
Want to save this pattern for later or print it out in an easy-to-follow format? Get the free printable PDF from Yarnspirations:
Click Here to Download the Rippling Pride Granny Square Blanket Pattern PDF
How to Print the PDF:
Printing this is as easy as 1-2-3! If you're not familiar with printing PDFs, here's the step-by-step, along with a few tips.
- Click the red button right above this section that reads, "Click Here to Download the Rippling Pride Granny Square Blanket Pattern PDF". Or, just click this link here to download.
- Find and open the PDF.
Pro tip: You may see the download appear at the bottom of your browser window, and you can open it from there. Or check wherever your downloads are set to save to (the Downloads folder is often a default location).
- Click the "Print File" button, choose the printer, choose how many copies you want, make any additional adjustments needed for personal preference, and click the "Print" button.
- Grab your hook, yarn, and any other supplies needed and you'll be ready to crochet this beauty!
Read NextAmerican Flag Crochet Afghan Pattern
Thanks for your comment. Don't forget to share!
JaneEK
Oct 30, 2017
My oldest granddaughter is a member of a Native American dance troupe, and as soon as I saw this project, I thought Dance Blanket. She has either made individual pieces of her ensemble herself, or has traded with others in the community. Shes turning 21 next May (cant believe that!), and this will make the perfect birthday gift for her. Ill have to double check the colors with her mom, but Ill probably swap out the blue for black.
princess6860504
Apr 14, 2017
How fun is this blanket! This is just the right thing to take with you to see your fireworks show! Take it to the lake for your 4th of July family BBQ and the kids can sit on it while they are making their s'mores. I am adding this to my "save pattern" tab and get my supplies. Red Heart SUper Saver is cheap and can be had anywhere, really.
Zeemer
Jul 02, 2016
Perfect for a 4th of July celebration or any patriotic day celebration. The colors are well-defined with clean ripple lines. I was toying with the idea of making this for Christmas maybe just substitute the blue yarn with green. Thanks for having the pattern right in front for easy access to crocheters.
faeryqueen96 38547 25
Aug 16, 2015
I think there's a misprint for Row 4 of the Side 1 Ripple Section. It says there should be 288 dc, but there's 72 clusters of 3 dc, meaning there are actually 216 dc. Other than that enjoying this pattern
Report Inappropriate Comment
Are you sure you would like to report this comment? It will be flagged for our moderators to take action.
Thank you for taking the time to improve the content on our site.