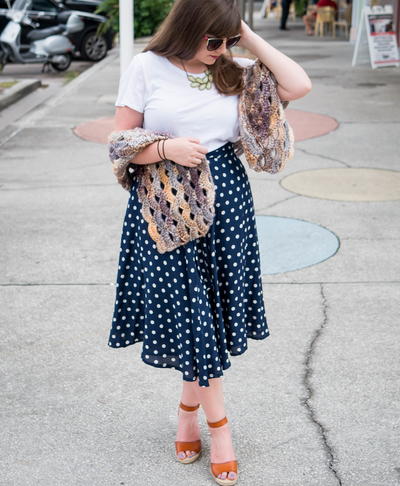
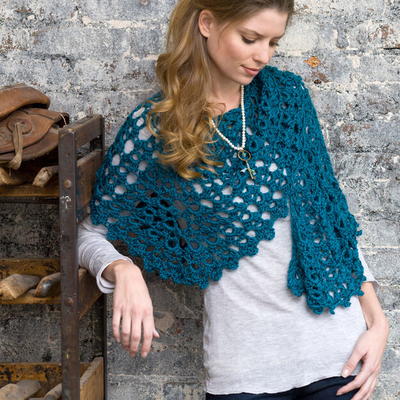
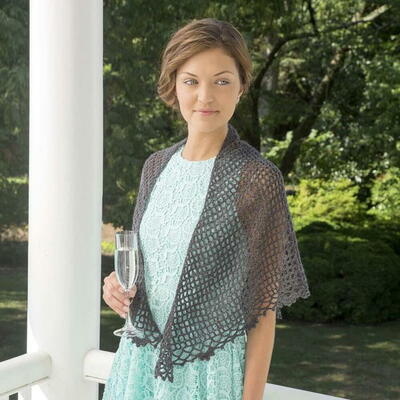
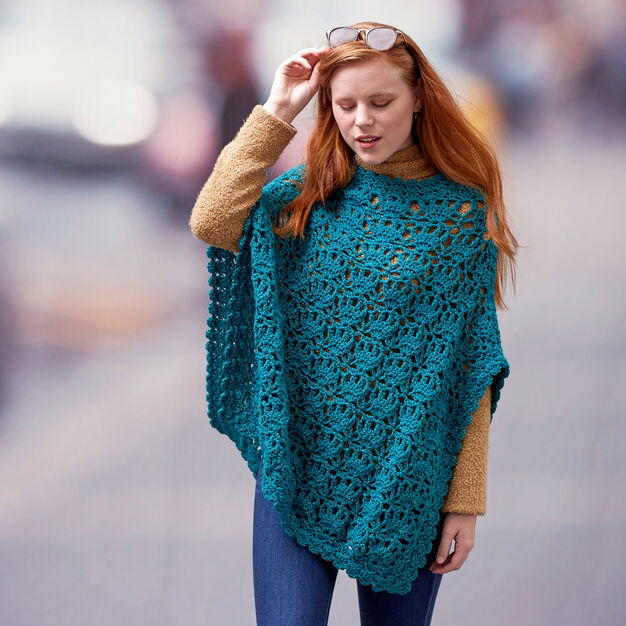
Let’s Party Poncho

Do you ever feel that your outfits need something extra? You might have the best accessories at your fingertips, but have you thought about shaking things up with a new crochet poncho? With its bold color and intricate design, the Lets Party Poncho is just the right addition to almost any outfit in your wardrobe. You'll also love that this crochet shawl pattern is available in an assortment of sizes, so you're sure to find the right dimensions that will fit you. Just keep in mind this crochet pattern is ideal for crocheters at the intermediate level.
NotesNOTES: Directions are for size Small/Medium. Changes for sizes Large/1X and 2X/3X are in parentheses.
Poncho is made from 2 panels sewn together at neck and shoulder lines. Sleeves hang open and are not sewn closed across bottom or side seams.

Crochet HookI/9 or 5.5 mm hook
Yarn Weight(4) Medium Weight/Worsted Weight and Aran (16-20 stitches to 4 inches)
Crochet GaugeGAUGE: 1 pattern repeat = 2½" (6.5 cm); 8 rows = 4" (10 cm) in Lace Pattern. CHECK YOUR GAUGE. Use any size hook to obtain the gauge.
Materials List
- RED HEART With Love Metallic: 6 (7, 8) balls 8524 Teal
- Susan Bates Crochet Hook: 5.5mm [US I-9]
- Yarn needle
- 3 stitch markers
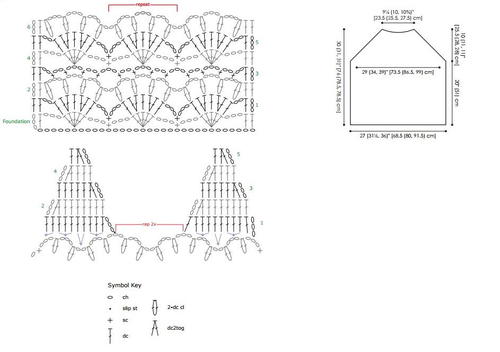
Finished Sizes
To Fit Bust: 32-38 (40-46, 48-54)" [81.5- 86.5 (101.5-117, 122-137) cm]
Finished length from shoulder to lower edge: 30 (31, 31)" [76 (78.5, 78.5) cm]
Finished side length: 20" (51 cm)
Finished body width: 29 (34, 39)" [73.5 (86.5, 99) cm]
Finished width at lower edge: 27 (31½, 36)" [68.5 (80, 91.5) cm]
Special Stitches
-
2-dc Cl (2-double crochet cluster) = Yarn over, insert hook in indicated stitch, yarn over and pull up loop, yarn over, draw through 2 loops on hook (2 loops remain on hook); yarn over, insert hook in same stitch, yarn over and pull up loop, yarn over, draw through 2 loops, yarn over, draw through all 3 loops on hook.
-
dc2tog = [Yarn over, insert hook in next stitch, yarn over and pull up loop, yarn over, draw through 2 loops] 2 times, yarn over, draw through all 3 loops on hook.
-
Edging shell: (Sc, ch 1, 3 dc, ch 1, sc) in indicated stitch or space.
-
Shell: 5 dc in indicated stitch or space.
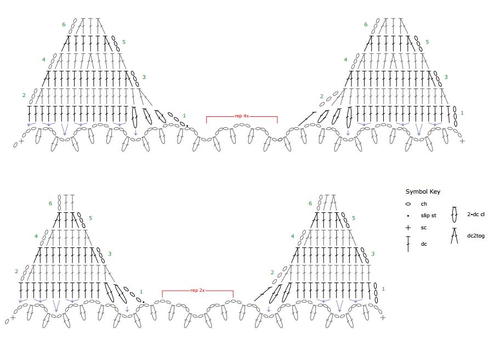
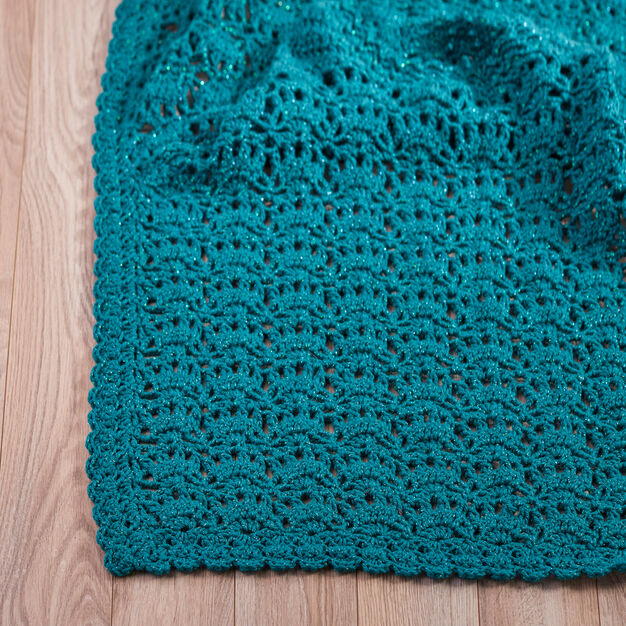
Pattern Stitch: Lace Pattern
-
Row 1 (right side): Ch 3 (counts as first dc here and throughout), dc in next dc, ch 2, working in first shell, dc in next dc, [2 dc in next dc, dc in next dc] twice, *ch 3, sc in next sc, ch 3, working in next shell, dc in first dc, [2 dc in next dc, dc in next dc] twice; repeat from * across to last 2 sts, ch 2, dc in last dc, dc in top of beginning ch, turn.
-
Row 2: Ch 3, dc in next dc, 2-dc Cl in next dc, [ch 3, skip next dc, 2-dc Cl in next dc] 3 times, *ch 2, 2-dc Cl in next dc, [ch 3, skip next dc, 2-dc Cl in next dc] 3 times; repeat from * across to last 2 sts, dc in last dc, dc in top of beginning ch, turn.
-
Row 3: Ch 3, dc in next dc, ch 2, [sc in next ch-3 space, ch 2, (sc, ch 3, sc) in next ch-3 space, ch 2, sc in next ch-3 space*, ch 3] across to last 2 sts, ending last repeat at *, ch 2, dc in last dc, dc in top of beginning ch, turn.
-
Row 4: Ch 3, dc in next dc, *ch 3, shell in next ch-3 space, ch 3, sc in next ch-3 space; repeat from * across to last last 2 sts, ch 3, dc in last dc, dc in top of beginning ch, turn.
-
Repeat Rows 1–4 for Lace Pattern.
Poncho
-
FRONT/BACK PANEL (make 2) Ch 105 (125, 145).
-
Foundation Row (wrong side): Dc in 4th ch from hook (beginning ch count as first dc), ch 3, skip next 4 ch, shell in next ch, [ch 3, skip next 4 ch, sc in next ch, ch 3, skip next 4 ch, shell in next ch] across to last 6 ch, ch 3, skip next 4 ch, dc in last 2 ch, turn—2 dc at each end, 10 (12, 14) shells, 9 (11, 13) sc, 20 (24, 28) ch-3 spaces.
-
Rows 1–28: Work Lace Pattern Rows 1–4 seven times
-
Rows 29–31: Repeat Rows 1–3—2 dc at each end, 22 (26, 30) ch-2 spaces, 19 (23, 27) ch-3 spaces at end of Row 31.
Shape Sleeves
-
Row 1 (wrong side): Ch 3, skip next dc, 2 dc in next ch-2 space, shell in next ch-3 space, [ch 3, sc in next ch-3 space, ch 3, shell in next ch-3 space] 9 (11, 13) times, 2 dc in last ch-2 space, skip next dc, dc in top of beginning ch, turn—3 dc at each end, 10 (12, 14) dc, 9 (11, 13) sc. Place marker at each end of row for seam.
-
Row 2 (right side): Ch 3, dc2tog, working in next shell, dc2tog, dc in next dc, 2 dc in next dc, dc in next dc, *ch 3, sc in next sc, ch 3, working in next shell, dc in first dc, [2 dc in next dc, dc in next dc] twice; repeat from * 7 (9, 11) times, ch 3, sc in next sc, ch 3, dc in next dc, 2 dc in next dc, dc in next dc, [dc2tog] twice; leave beginning ch unworked, turn—69 (83, 97) dc and 9 (11, 13) sc.
-
Row 3: Ch 1, skip first dc, sc in next dc, [ch 3, skip next dc, 2 dc-cl in next dc] twice, *ch 2, 2-dc Cl in next dc, [ch 3, skip next dc, 2 dc cl in next dc] 3 times; repeat from * 7 (9, 11) times, ch 2, [2-dc Cl in next dc, ch 3, skip next dc] twice, sc in next dc; leave last dc unworked, turn—28 (34, 40) ch-3 spaces.
-
Row 4: Ch 3, dc in first ch-3 space, ch 2, sc in next ch-3 space, [ch 3, sc in next ch-3 space, ch 2, (sc, ch 3, sc) in next ch-3 space, ch 2, sc in next ch-3 space] across to last 2 ch-3 spaces, ch 3, sc in next ch-3 space, ch 2, dc in last ch-3 space, turn—18 (22, 26) ch-3 spaces.
-
Row 5: Ch 3, sc in first ch-3 space, [ch 3, shell in next ch-3 space, ch 3, sc in next ch-3 space] across, turn—8 (10, 12) shells and 9 (11, 13) sc.
-
Row 6: Ch 3, 2-dc Cl in first ch-3 space, working in first shell, dc2tog, dc in next dc, 2 dc in next dc, dc in last dc, ch 3, sc in next sc, *ch 3, working in next shell, dc in first dc, [2 dc in next dc, dc in next dc] twice, ch 3, sc in next sc; repeat from * across to last shell, ch 3, working in last shell, dc in first dc, 2 dc in next dc, dc in next dc, dc2tog, 2-dc Cl in next ch-3 space; leave last ch-3 space unworked, turn—54 (68, 82) dc.
-
Row 7: Ch 1, skip first dc, sc in next dc, [ch 3, skip next dc, 2 dc-cl in next dc] twice, *ch 2, 2-dc Cl in next dc, [ch 3, skip next dc, 2 dc cl in next dc] 3 times; repeat from * 5 (7, 9) times, ch 2, [2- dc Cl in next dc, ch 3, skip next dc] twice, sc in next dc; leave remaining dc unworked, turn—22 (28, 34) ch-3 spaces.
-
Rows 8–10: Repeat Rows 4–6—40 (54, 68) dc at end of Row 10.
-
Row 11: Ch 1, skip first dc, sc in next dc, [ch 3, skip next dc, 2 dc-cl in next dc] twice, *ch 2, 2-dc Cl in next dc, [ch 3, skip next dc, 2-dc Cl in next dc] 3 times; repeat from * 3 (5, 7) times, ch 2, [2-dc Cl in next dc, ch 3, skip next dc] twice, sc in next dc, turn—5 (7, 9) ch-2 spaces and 16 (22, 28) ch-3 spaces.
Neckline: Size Small/Medium Only
-
Left Neck Shaping
Row 1 (right side): Ch 3, dc in first ch-3 space, 3 dc in next ch-3 space, 2 dc in next ch-2 space, 3 dc in next ch-3 space, dc in next ch-3 space; leave remaining ch spaces unworked, turn—11 dc. Place marker on 12th ch space from last ch-3 space worked.
Rows 2–5: Ch 3, dc2tog, dc in each remaining dc; leave beginning ch unworked, turn—3 dc.
Fasten off. -
Right Neck Shaping
Row 1 (right side): With right side facing, join with slip st in marked ch-3 space, ch 3, 3 dc in next ch-3 space, 2 dc in next ch-2 space, 3 dc in next ch-3 space, dc in next ch-3 space, turn—11 dc. Rows 2–5: Repeat Rows 2–5 of left neck shaping.
Fasten off.
Neckline: Size Large/1X Only
-
Left Neck Shaping
Row 1 (right side): Ch 3, dc in first ch-3 space, 3 dc in next ch-3 space, 2 dc in next ch-2 space, 3 dc in next 2 ch-3 spaces, 2-dc Cl in next 2 ch spaces, dc in next ch-3 space; leave remaining ch spaces unworked, turn—16 dc. Place marker on 10th ch space from last ch-3 space worked. Row 2: Ch 3, dc2tog, dc in each remaining st; leave beginning ch unworked, turn—14 dc. Rows 3–5: Ch 3, dc2tog, dc in each dc across to last 2 dc, dc2tog; leave beginning ch unworked, turn—5 dc. Row 6: Ch 3, dc in next st, dc2tog over next 2 sts; leave beginning ch unworked – 3 dc.
Fasten off. -
Right Neck Shaping
Row 1 (right side): With right side facing, join with slip st in marked ch-3 space, ch 3, 2-dc Cl in next 2 ch spaces, 3 dc in next 2 ch-3 spaces, 2 dc in next ch-2 space, 3 dc in next ch-3 space, 2 dc in last ch-3 space, turn—16 dc. Row 2: Ch 3, dc2tog, dc in next 10 dc, dc2tog, turn—13 dc. Rows 3–5: Repeat Rows 3–5 of left neck shaping – 4 dc. Row 6: Ch 3, dc in next 2 sts; leave beginning ch unworked – 3 dc.
Fasten off.
Neckline: Size 2X/3X Only
-
Left Neck Shaping
Row 1 (right side): Ch 3, dc in first ch-3 space, 3 dc in next ch-3 space, 2 dc in next ch-2 space, 3 dc in next 3 ch-3 spaces, 2-dc Cl in next 3 ch spaces, dc in next ch-3 space; leave remaining ch spaces unworked, turn—20 dc. Place marker on 18th ch space from last ch-3 space worked. Rows 2 and 3: Ch 3, dc2tog, dc in each dc across to last 2 dc, dc2tog; leave beginning ch unworked, turn—14 dc. Row 4: Ch 3, [dc2tog, dc in next 3 dc] twice, dc2tog; leave beginning ch unworked, turn—10 dc. Row 5: Ch 3, dc2tog, dc in next 4 dc, dc2tog; leave beginning ch unworked, turn—7 dc. Row 6: Ch 3, dc2tog, dc in next dc, dc2tog; leave beginning ch unworked—4 dc.
Fasten off. -
Right Neck Shaping
Row 1 (right side): With right side facing, join with slip st in marked ch-3 space, ch 3, 2-dc Cl in next 2 ch-3 spaces, 2-dc Cl in next ch-2 space, 3 dc in next 3 ch-3 spaces, 2 dc in next ch-2 space, 3 dc in next ch-3 space, 2 dc in last ch-3 space, turn—20 dc. Rows 2–6: Repeat Rows 2–6 of left neck shaping.
Fasten off.
Finishing
-
With right sides of front/back panels held together, whipstitch sleeve seams from last row of neckline to marked row. Determine which panel will be front of piece.
-
Lower Edging
Row 1 (right side): With right side of front panel Foundation Row facing, working in opposite side of foundation ch, join with slip st in first ch, ch 1, edging shell in next ch, [skip next 4 ch, edging shell in next ch] across, slip st in last dc, turn—21 (25, 29) edging shells. Rows 2 and 3: (Slip st in first sc, ch 1-space, and first 2 dc) of first edging shell, ch 1, edging shell in center dc of each edging shell across, turn. Fasten off. Repeat for Rows 1–3 for back panel. -
Sleeve Edging (work twice)
Row 1 (right side): With right side facing, join with slip st in lower edge of sleeve, ch 1, work 17 edging shells evenly spaced across to seam, edging shell in seam, work 17 edging shells evenly spaced across remaining edge, turn—35 edging shells. Rows 2 and 3: Repeat Rows 2 and 3 of Front Edging.
Fasten off. -
Neck Edging
Round 1 (right side): With right side facing, join with slip st in any seam, ch 1, work 14 (18, 22) edging shells evenly spaced around to next seam, work 14 (18, 22) edging shells evenly spaced around to first edging shell; join with slip st in first sc—28 (26, 44) edging shells. Rounds 2 and 3: Repeat Rows 2 and 3 of Front Edging.
Fasten off. -
Weave in ends.
-
Block to finished measurements, if desired.
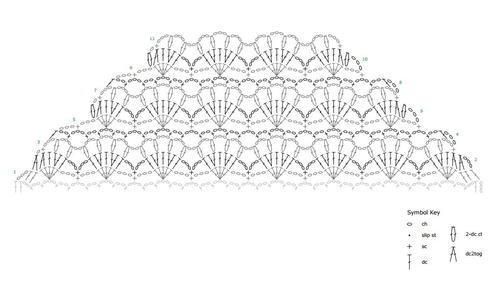
Project Diagrams
-
Click below for enlarged version, or click here for a larger version of the diagram.
-
Click below for enlarged version, or click here for a larger version of the diagram.
-
Click below for enlarged version, or click here for a larger version of the diagram.
Abbreviations
- ch
- chain(s)
- dc
- double crochet
- sc
- single crochet
- st(s)
- stitch(es)
- ( )
- work directions in parentheses into same st
- [ ]
- work directions in brackets the number of times specified
- *
- repeat whatever follows the * as indicated
Read NextEasy Dreamy Shawl
Your Recently Viewed Projects

Thanks for your comment. Don't forget to share!
Delphine Bryant
Nov 14, 2018
This is an interesting poncho. From the single photo provided it does have the appearance of a tunic. All of the directions are just a little too involved for me without having any video or pictures along the way.
Morehouse17
Oct 29, 2018
This is very interesting. I see in the directions that the sleeves hang open as they are not sewn closed across the bottom or side seams. From this photo, I would have thought that that would not have been the case. This pattern can be created in multiple sizes and by making two panels and sewing them together this may be considered intermediate because of special stitches.
peggyst 0304644
Dec 06, 2017
I so wanted to make this, and after reading the pattern I couldn't figure out where the sleeves came in, I made one panel, and the diagrmas don't even show the sleeves.
rdtripn
Nov 28, 2017
This is one time it would be nice to have a link to the designer. That way one could ask questions and get answers instead of starting the project and getting all the way to the point of putting it together and get stuck. I have hit a roadblock where the shoulders are stitched together. The pattern "design" doesn't flow (front side row doesn't match up with back side row) with the way the pattern is written to connect the shoulders. Has anyone else figured this part of the pattern out? If so, I would greatly appreciate your tips.
Hippie Chick
May 01, 2017
Pattern for this poncho is available on this page without having to go to the designers blog, which is a plus. I have never had trouble accessing any of the patterns via the links, but I have read that a lot of others have. A diagram is available here for this pattern also. The only thing it needs is a few pictures or illustrations to show how it looks at various stages of construction.
Cheryl Y
Apr 24, 2017
I love this Let's Party Poncho pattern, and it's right here with a easy print tab. I've been looking for a unique crocheted poncho and this one is it! I love the shell pattern and the color, wow. This pattern is well written and reads well so it should work out great. I like that you make two panels and sew it together at the top and the sides are left open. Plus the pattern has different sizes already written out taking the guess work out of it. I'm looking forward to doing this one and will be proud to wear it. Has anyone made this one and if yes, how long did it take you? I'm hoping to have it done for this summer.. Thank you for sharing this free crochet pattern.
debbrand26 5619800
Apr 24, 2017
Hi Cheryl, Have you already started crocheting this? Me too I fell in love with the pattern and started crocheting it however I got stuck at the neckline shaping part and I am not understanding what to do! I am crocheting the size small/medium. What is confusing me are these triangles and how they are being done.There is no tutorial on the Red Heart site. I have been crocheting for a couple of years so I'm not the really experienced crocheter but this has stumped me. Maybe you can help me to figure it out? )
rdtripn
Nov 28, 2017
Did you ever get an answer to your question? Did you complete the pattern?
Lynn K
Apr 16, 2017
One look at this divine poncho and I just KNEW I had to have it, lol! Because we are in the southern hemisphere our seasons are opposite to those in the United States so we are in the process of putting on items for extra warmth while in the US everyone is welcoming Spring and Summer. The pattern is beautiful and even love the color is just perfect for me.
princess6860504
Apr 14, 2017
Absolutely stunning! The color is a universally flattering color, by the way. I appreciate the pattern being right on this page and so I don't have to click over to a different website where I have to battle pop-up ads all over the place! A range of sizes are provided including for plus sized gals like me. I would proudly wear this during the late summer and through fall months. It is worthy of showing off. The pattern doesn't seem too difficult, either, as there are pictures/graphics to show how it is put together and what the stitch pattern is supposed to look like. Thank you for this free pattern!!
Report Inappropriate Comment
Are you sure you would like to report this comment? It will be flagged for our moderators to take action.
Thank you for taking the time to improve the content on our site.