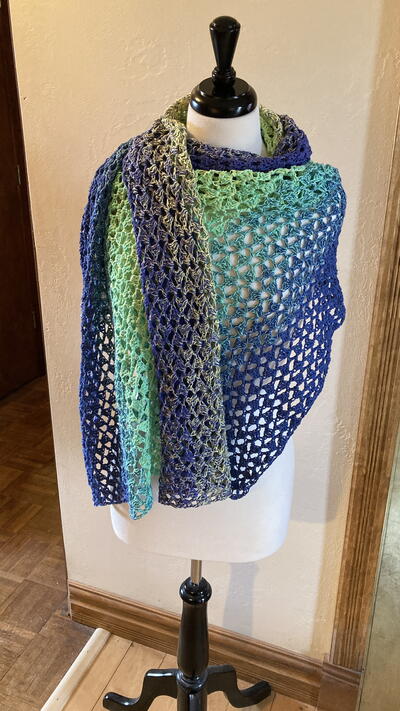
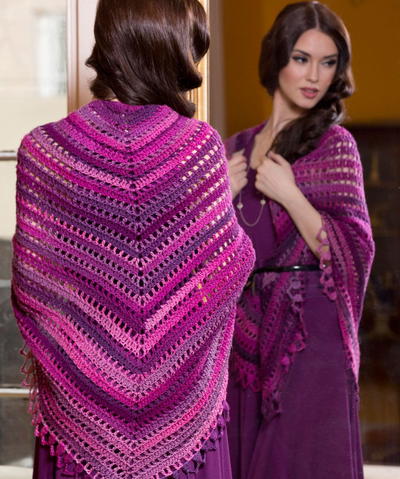
Glitter Goddess Shawl

Add some glam to your closet with the Glitter Goddess Shawl. Red Heart Boutique Swanky yarn is used to work up this stunning crochet shawl, which features oval shaped sequins that have been dyed to match the yarn color. Drape this elegant shawl over your shoulders before a fancy dinner date or a night out on the town. The lightweight design makes this particular shawl a great layering piece for in-between seasons.

Crochet HookH/8 or 5 mm hook
Yarn Weight(4) Medium Weight/Worsted Weight and Aran (16-20 stitches to 4 inches)
MATERIALS:
- RED HEART Boutique Swanky: 3 balls 9562 Purple Panache
- Susan Bates Crochet Hook:5mm [US H-8]
- Stitch markers, yarn needle
SIZE:
Motif 1 = 3” (7.5 cm) diameter; Motif (other than Motif 1) = about 2” (5 cm) tall.
Shawl measures 28” (71cm) long from center back to lower tip, and 44” (112 cm) wide not including ties
GAUGE:
CHECK YOUR GAUGE. Use any size hook to obtain the gauge
Special Stitches
beg-3-dtr Cl:
(beginning 3 double treble crochet cluster) = Ch 5 (counts as dtr), *[yarn over] 3 times, insert hook in indicated stitch, yarn over and draw up a loop, [yarn over and draw through 2 loops on hook] 3 times; repeat from * once more, yarn over and draw through all 3 loops on hook.
3-dtr Cl: (3 double treble crochet cluster) = *[Yarn over] 3 times, insert hook in indicated stitch, yarn over and draw up a loop, [yarn over and draw through 2 loops on hook] 3 times; repeat from * 2 more times, yarn over and draw through all 4 loops on hook
Notes
1. Lower edging of shawl is worked first. Lower edging is worked in two halves forming a V-shape. Motif 1 forms the lower center point of the lower edging. The next motif is worked over a portion
of the stitches of the last round of Motif 1. Subsequent motifs are worked directly onto the outer edge of the previous motif until a strip of motifs has been made (for the first half of the lower edging and first tie). Another motif is then worked over a portion of the remaining stitches of the last round of Motif 1 and subsequent motifs are worked to complete the second half of the lower edging and second tie. The last 13 motifs of each half of the lower edging form the ties.
2. Stitches are worked across the long inner edge of the lower edging and the shawl is worked up to the neck. Decreases are worked in each row to shape the piece.
3. All pieces are crocheted onto existing pieces as you go, for a seamless project.
L OWER EDGING
First Half
Motif 1
Ch 5; join with slip st in first ch to form ring
Round 1 (right side): Beg-3-dtr Cl in ring, [ch 4, 3-dtr Cl in ring] 5 times, ch 4; join with slip st in top of first cluster, turn—6 clusters and 6 ch-4 spaces.
Round 2: Slip st in first ch-4 space, ch 3 (counts as dc), 6 dc in same ch-4 space, 7 dc in each ch-4 space around; join with slip st in top of beginning ch, turn—42 dc. Do not fasten off.
Motif 2
Note: The next motif is worked back and forth in rows across a portion of the stitches of the last round of the previous motif.
Row 1: Slip st in next 4 sts, ch 4, skip next 4 sts, slip st in next 4 sts, turn, ch 4, (3-dtr Cl, [ch 4, 3-dtr Cl] twice) in ch-4 space just made, ch 4, skip next 2 sts (these are slip sts you worked at the beginning of this row), slip st in next 3 sts, turn; leave remaining sts of previous Motif unworked—3 clusters and 4 ch-4 spaces.
Row 2: Work 7 dc in each of the 4 ch-4 spaces, skip next st of last round of previous motif, slip st in next st, turn. Do not fasten off.
Motif 3
Row 1: Slip st in next 12 sts, ch 4, skip next 4 sts, slip st in next 4 sts, turn, ch 4, (3-dtr Cl, [ch 4, 3-dtr Cl] twice) in ch-4 space just made, skip next 2 sts, slip st in next 3 sts, turn.
Row 2: Work 7 dc in each of the 4 ch-4 spaces, skip next st of last row of previous motif, slip st in next st, turn. Do not fasten off.
Motifs 4–2
Work same as Motif 3. Place a marker in space between last two 7-dc groups in Row 2 of Motif 20 for beginning of first row of shawl.
Tie Motifs
Work 13 more motifs same as Motif 3.
Fasten off.
Second Half
Motif 2
Row 1: With right side facing, skip next 5 unworked sts of last round of Motif 1 following Motif 2, join yarn with slip st in next st, ch 4, skip next 4 sts, slip st in next 4 sts, turn, ch 4, (3-dtr Cl, [ch 4, 3-dtr Cl] twice) in ch-4 space just made, skip next 2 sts, slip st in next 3 sts, turn.
Row 2: Work 7 dc in each of the 4 ch-4 spaces, skip next st of last round of previous motif, slip st in next st, turn. Do not fasten off.
Motifs 3-20
Work same as Motif 3. Place a marker in space between first two 7-dc groups in Row 2 of Motif 20 for end of first row of shawl. Do not fasten off.
Tie Motifs
Work 13 more motifs same as Motif 3.
Fasten off.
Shawl
With right side facing, join yarn with slip st in marked space of Motif 20, to work down inside edge of lower edging.
Row 1: Ch 5, sc in center dc of next 7-dc group, *ch 5, sc in space between motifs, ch 5, sc in center dc of next 7-dc group; repeat from * to Motif 1, ch 5, skip Motif 1; sc in center dc of next 7-dc group, **ch 5, sc in space between motifs, ch 5, sc in center dc of next 7-dc group; repeat from ** to next marker, ch 2, dc in marked space (dc, ch 2 counts as last ch-5 space), turn—75 ch-5 spaces. Remove markers. Place a marker in the center ch-5 space (at lower center point).
Row 2: *Ch 5, sc in next ch-5 space; repeat from * to 2 ch-spaces before marked center ch-5 space, ch 5, insert hook in next ch-5 space and draw up a loop (2 loops on hook), insert hook in next ch-5 space and draw up a loop (3 loops on hook), yarn over and draw through all 3 loops on hook (sc2tog worked over 2 ch-5 spaces), ch 5, skip marked ch-5 space and move marker to ch-5 just made, work sc2tog over next 2 ch-5 spaces, **ch 5, sc in next ch-5 space; repeat from ** to last ch-5 space, ch 5, ch 2, dc in last ch-5 space—71 ch-5 spaces. Repeat Row 2 until only 3 ch-5 spaces remain.
Fasten off.
Top Edging
With right side facing, join yarn with slip st in dc before first ch-5 space at beginning of top edge of shawl, 5 dc in first ch-5 space and each ch-space across top of shawl, slip st in dc following last ch-5 space. Fasten off.
FINISHING
Weave in ends.
Read NextOctober Shawl
Your Recently Viewed Projects
Thanks for your comment. Don't forget to share!
mulberrygalprinces s
Sep 16, 2018
This is another one of those wonderful projects that I can use year around in florida Plus it's easy, doesn't take a lot of yarn and is pretty. Put those attributes all together and you have the makings of your next favorite pattern. I am working some up for Christmas presents asap
Report Inappropriate Comment
Are you sure you would like to report this comment? It will be flagged for our moderators to take action.
Thank you for taking the time to improve the content on our site.