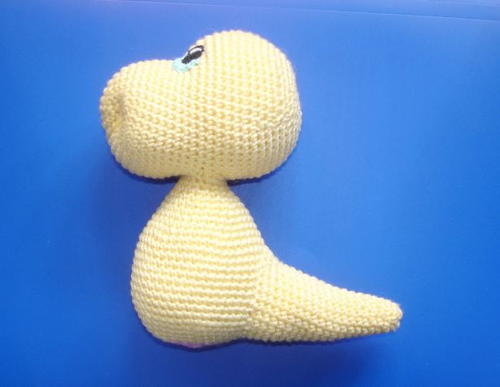
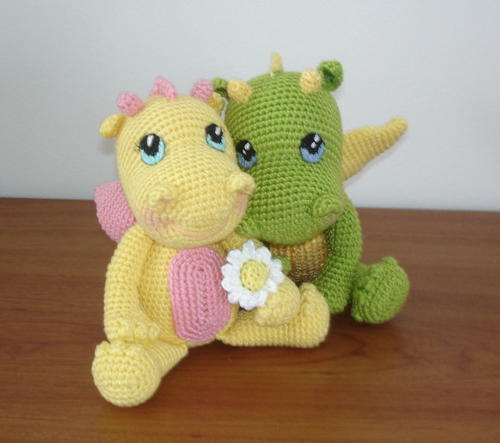
Crochet Amigurumi Dragon (Free Pattern)
This dragon amigurumi is a fun crochet project that you'll enjoy working up and keeping around forever.
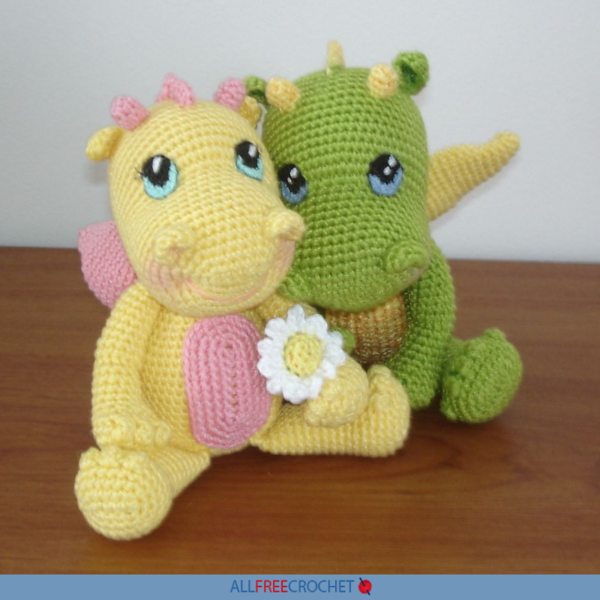
This adorable Crochet Amigurumi Dragon is an intermediate project that allows for lots of color variation and personalization. Though you work with very simple and basic stitches, like single crochet stitches, you're also working with thinner yarn and much smaller hooks, which can be a little tricky.
Plus, once you finish all the individual body parts of the dragon, you will have to sew them together. Once you've worked up your crochet amigurumi friend, go ahead and crochet a little embellishment, like a flower, to accessorize your little dragon friend.
Make a pair of sweet baby crochet dragons as you see in the image here or make only one. This pattern is for an amigurumi dragon that's quite small, like your typical amigurumi, so it can fit in your hand.
You can choose colors that you think fit or copy these exactly in yellow or green. The friendly and bright eyes make this crochet dragon far from scary, so it would be a delightful gift for a child.

Crochet Hook8 or 1.5 mm hook (steel), C/2 or 2.75 mm hook
Yarn Weight(0) Lace (33-40 stitches to 4 inches). Includes crochet thread.
Finished Size5 inches (13 cm) seated
Materials List
- Double knit cotton yarn in color of your choice (basic color for the body, additional color(s) for wings, horns, backbone ridge)
- Cotton thread No.10 or any similar weight thread in black and color of your choice for eyes), tiny bit of white
- Crochet hook 2.5 mm (1.5mm or 1.75 mm for eyes)
- Embroidery needle for finishing touches on eyes
- Cotton darning needle for sewing the parts together
- Glue and/or invisible thread for attaching the eyes
- Fabric marker, permanent marker, or oil-based crayons for mouth
Crochet Amigurumi Dragon
Work in rounds unless otherwise stated.
CLICK ON ANY IMAGE TO ENLARGE.
Amigurumi Dragon Crochet Pattern:
-
Head:
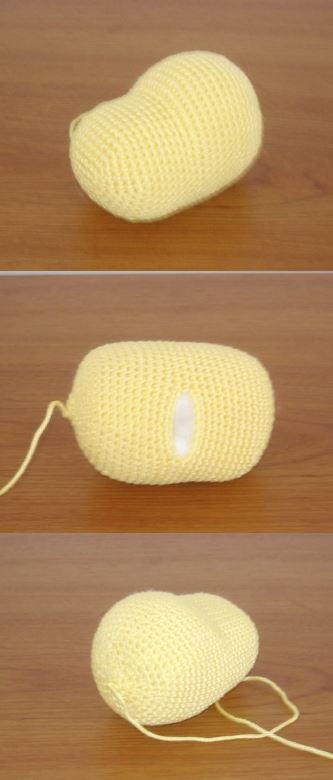
Ch6.
Rnd 1: Starting from the second chain from hook sc4, 3 sc in the last chain stitch, continue working around chain. Sc3, stitch 2sc in the last stitich. (12 sts)
Rnd 2: Inc1, sc3, inc3, sc3, inc2. (18 sts)
Rnd 3: Sc1, inc1, sc4, inc1, sc1, inc1, sc1 inc1, sc4, inc1, sc1, inc1. (24 sts)
Rnd 4: Sc2, inc1, sc5, inc1, sc2, inc1, sc2, inc1, sc5, inc1, sc2, inc1. (30 sts)
Rnd 5: Sc3, inc1, sc6, inc1, sc3, inc1, sc3, inc1, sc6, inc1, sc3, inc1. (36 sts)
Rnd 6: Sc4, inc1, sc7, inc1, sc4, inc1, sc4, inc1, sc7, inc1, sc4, inc1. (42 sts)
Rnds 7-14: Sc42.
Rnd 15: Sc4, inc11, sc27. (53 sts)
Rnd 16: Sc14, inc1, sc38. (54 sts)
Rnd 17: Sc40, ch8, skip8 sts, sc6. (46 sts, 8 ch = 54 sts)
Rnd 18: Sc40, sc8 using chain stitches, sc6. (54 sts)
Rnds 19-23: Sc54.
Rnd 24: *dec1, sc7* x6. (48 sts)
Rnd 25: Sc48.
Rnd 26: *dec1, sc6* x6. (42 sts)
Rnd 27: Sc42.
Rnd 28: *dec1, sc5* x6. (36 sts)
Rnd 29: *dec1, sc4* x6. (30 sts)
Rnd 30: *dec1, sc3* x6. (24 sts)
Rnd 31: *dec1, sc2* x6. (18 sts)
Stuff the head nice and firm.
Rnd 32: *dec1, sc1* x6. (12 sts)
Rnd 33: Dec6. (6 sts)
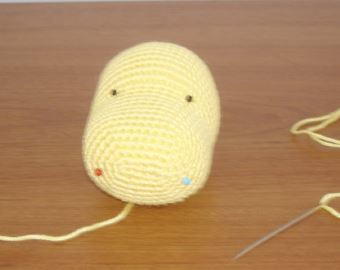
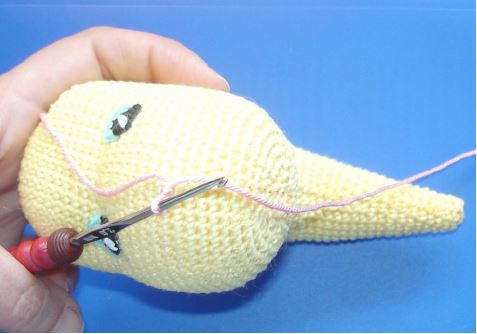
Now, thread the cotton darning needle and make some needle sculpting to the face.
It should be easy and simple. You want to make the dragon smile. -
Needle Sculpting the Head:
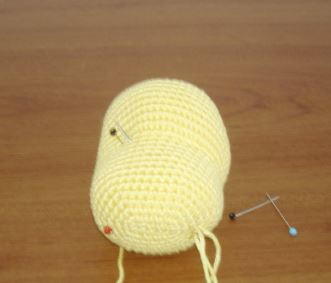
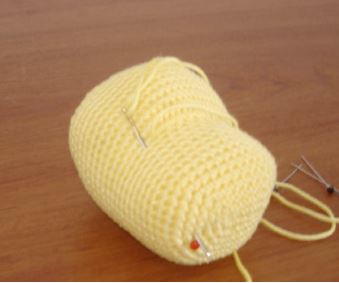
- Place 4 pins on the head for easier sculpting: two for eyes, two for ends of the mouth.
- Thread the needle with the same yarn used for crocheting the body. Make a knot on one side of the yarn threaded on the needle so it will stick and hold our work inside the stuffing.
- Start from the back of the head. Push the needle towards left eye and pin we placed.
- Wrap the yarn over one stitch and push the needle towards the mouth edge or lower pin on the same face side.
- Pull yarn a little so you create a place where the eye will come later.
- Now wrap one stitch with the yarn where the edge of the mouth will be and again push the needle on the head. This time push it towards the second eye, or next pin we placed for where eyes will be.
- Once the needle is out, pull a little to sculpt the face.
- Now the last one push and pull before our sculpting is done. We have to finish with the last pin or the other edge of the mouth.
- And one more time, wrap the yarn over one stitch (where a pin for the eye was placed or where eye place will be created) and push the needle through the head, towards mouth corner or last pin there is to be worked.
- Pull the needle out, wrap it around one stitch here and push the needle towards the bottom head opening (for easier tying the yarn and hiding yarn later).
- Now pull slightly and try to sculpt the face.
- Pull the yarn few times, observe the face. Look how the sculpting is working and what tension of yarn pulled you like the best.
- Place 4 pins on the head for easier sculpting: two for eyes, two for ends of the mouth.
-
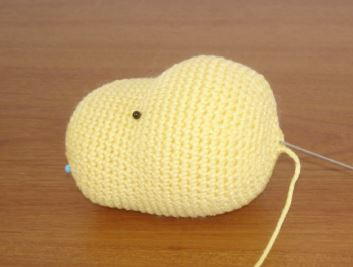
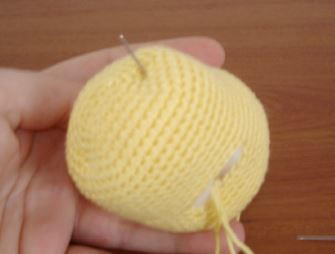
Adding Yarn Mouth:
- I added the mouth using the same color yarn as I used for the body. When I finished the dragon I colored the mouth using a permanent marker. Added just tiny bit of color. You can do the same way, coloring the mouth later, with permanent markers or oil-based crayons. Or you can use red, or pink, or any other thread color of your choice and add mouth during this step.
- Thread the needle again, and push it towards one side of the mouth we previously created. This is very simple! You just need to add yarn mouth in one simple wrap.
- Once the needle and yarn are out, simply place the yarn over the front part of the face where you wish mouth to be. Push the needle back to the head. Observe if one layer of yarn is enough and if you like it this way. If you wish you can add one more layer, repeating what we just did one more time (but do not repeat it more than two times, otherwise your mouth will end up messy and bulky).
- Once you are done, finish with pushing needle towards the bottom head opening.
- Tie the yarn making knots inside the stuffing, cut and hide inside the head.
- I added the mouth using the same color yarn as I used for the body. When I finished the dragon I colored the mouth using a permanent marker. Added just tiny bit of color. You can do the same way, coloring the mouth later, with permanent markers or oil-based crayons. Or you can use red, or pink, or any other thread color of your choice and add mouth during this step.
-
Eyes (make 2):
With crochet thread No.10 and steel hook of 1.50 or 1.75 mm, start using black, for the pupil.
Rnd 1: Sc6 in magic ring.
Rnd 2: Inc6. (12 sts)
Change color to your choice to make iris.
Rnd 3: Ssl st, 2sc in next st, 2hdc in next 2 stitches, 2sc in next st, slip stitch to next and tie off.
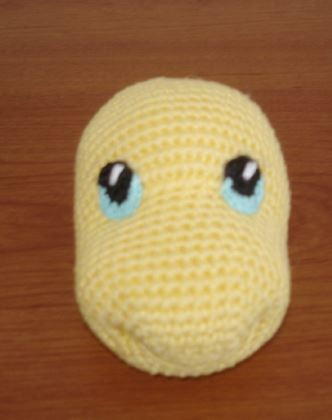
Embroider white lines or dots on each of the eyes to bring life to them. Use photo as reference. -
Ears (make 2):
Ch4.
Rnd 1: Sc2, 3 sc in one stitch, work around chain, sc2.
Rnd 2: Ch1 turn. Sc2, 2sc in next st, 2dc in next st, 2 sc in next st, sc2.
Tie off, leaving long end for sewing ears on the head later. -
Nostril (make 2):
Rnd 1: Sc6 in magic ring.
Rnd 2: Inc6. (12 sts)
Rnd 3: Sc12.
Tie off, leaving long end for sewing later. -
Horns (make 2):
Rnd 1: Sc4 in magic ring.
Rnd 2: *inc1, sc1* x2. (6 sts)
Rnds 3-4: Sc6.
Tie off, leaving long end for sewing later. Stuff a little. -
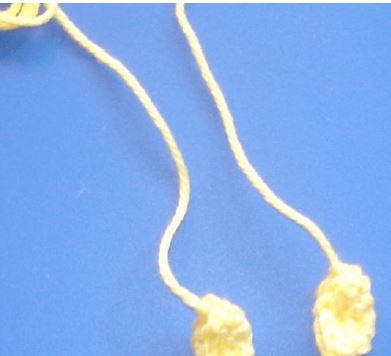
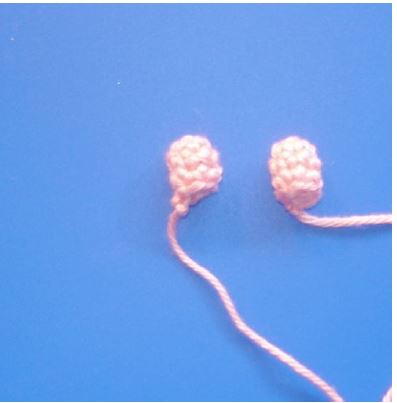
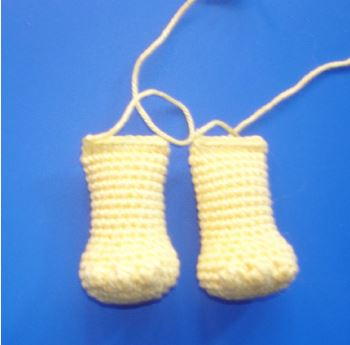
Legs (make 2):
Ch6.
Rnd 1: Sc4, 3sc in one st, continue working around the chain, sc3, 2sc in last st. (12 sts)
Rnd 2: Inc1, sc3, inc3, sc3, inc2. (18 sts)
Rnd 3: Sc1, inc1, sc4, inc1, sc1, inc1, sc1, inc1, sc4, inc1, sc1, inc1. (24 sts)
Rnd 4: Sc24.
Rnd 5: Sc3, popcorn stitch,sc1, popcorn, sc1, popcorn, sc16. (24 sts)
Rnds 6-7: Sc24.
Rnd 8: *dec1, sc1* x5, sc6, dec1, sc1. (18 sts)
Rnds 9-18: Sc18.
Stuff the leg nice and firm, flatten the last row and stitch through both sides making 8 sc across. Tie off and leave long end for sewing later. -
Arms (make 2):
Ch6.
Rnd 1: Sc4 starting from second chain from hook, 3 sc in one st, continue working around chain, sc3, 2sc in one st. (12)
Rnd 2: Inc1, sc3, inc3, sc3, inc2. (18 sts)
Rnd 3: Sc18.
Rnd 4: Sc1, popcorn, sc1, popcorn, sc1, pop corn, sc12.
Rnds 5-9: Sc12.
Rnd 10: Fpsc8, sc4. (12 sts)
Rnds 11-20: Sc12.
Stuff the arm nice and firm, Flatten the last row and stitch through both sides with 5sc (use photo as a guide).
Tie off, leaving long end for sewing later. -
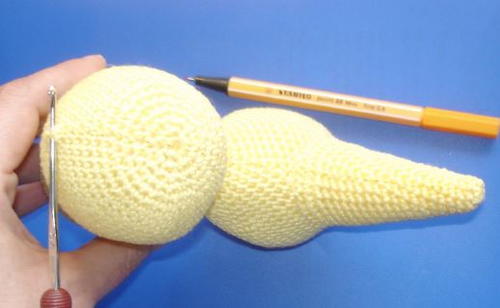
Tail:
Rnd 1: Sc6 in magic ring. (6 sts)
Rnd 2: *inc1, sc2* x2. (8 sts)
Rnd 3: Sc8.
Rnd 4: *inc1, sc3* x2. (10 sts)
Rnd 5: Sc10.
Rnd 6: *inc1, sc4* x2. (12 sts)
Rnd 7: Sc12.
Rnd 8: *inc1, sc5* x2. (14 sts)
Rnd 9: Sc14.
Rnd 10: *inc1, sc6* x2. (16 sts)
Rnd 11: Sc16.
Rnd 12: *inc1, sc7* x2. (18 sts)
Rnd 13: Sc18.
Rnd 14: *inc1, sc8* x2. (20 sts)
Rnd 15: Sc20.
Rnd 16: *inc1, sc9* x2. (22 sts)
Rnd 17: Sc22.
Rnd 18: *inc1, sc10* x2. (24 sts)
Rnd 19: Sc24.
Rnd 20: inc6, sc18 sts. (30 sts)
Rnd 21: Sc30.
Tie off, leaving long end for sewing tail to the body later.
Stuff the tail before attaching and sewing. -
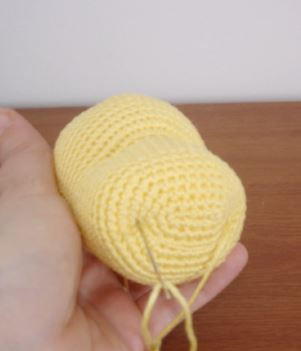
Body:
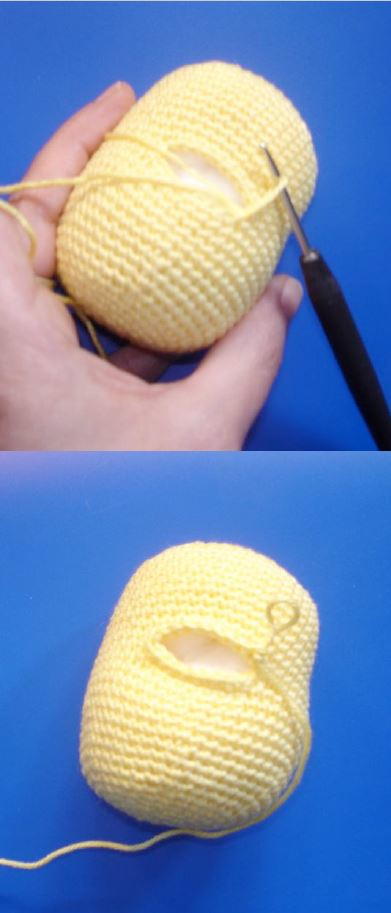
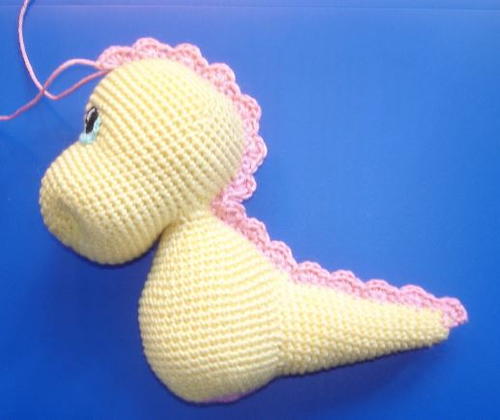
Slip stitch to one of the side stitches one the head opening (look at the photo).
Rnd 1: Sc18. (18 sts)
Rnds 2-3: Sc18.
Rnd 4: *inc1, sc2* x6. (24 sts)
Rnd 5: Sc24.
Rnd 6: *inc1, sc3* x6. (30 sts)
Rnd 7: Sc30.
Rnd 8: *inc1, sc4* x6. (36 sts)
Rnd 9: Sc36.
Rnd 10 *inc1, sc5* x6. (42 sts)
Rnd 11: Sc42.
Rnd 12: *inc1, sc6* x6. (48 sts)
Rnds 13-22: Sc48.
Rnd 23: *dec1, sc6* x6. (42 sts)
Rnd 24; *dec1, sc5* x6. (36 sts)
Rnd 25: *dec1, sc4* x6. (30 sts)
Rnd 26: *dec1, sc3* x6. (24 sts)
Rnd 27: *dec1, sc2* x6. (18 sts)
Stuff the body nice and firm.
Rnd 28: *dec1, sc1* x6. (12 sts)
Add some more stuffing if needed.
Rnd 29: Dec6. (6 sts)
Tie off, leaving long end for sewing.
Close the last round nicely and hide the yarn inside the body. -
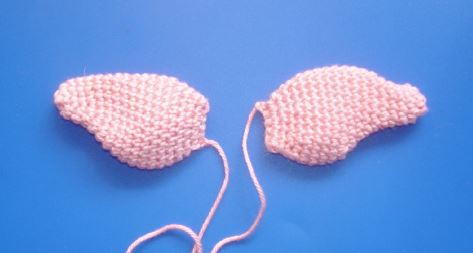
Wings (make 2):
Rnd 1: Sc6 in magic ring.
Rnd 2: *inc1, sc2* x2. (8 sts)
Rnd 3: Inc1, sc7. (9 sts)
Rnd 4: Inc1, sc8. (10 sts)
Rnd 5: Inc2, sc8. (12 sts)
Rnd 6: Inc2, sc10. (14 sts)
Rnd 7: Inc2, sc12. (16 sts)
Rnd 8: Inc2, sc14. (18 sts)
Rnd 9: Inc2, sc16. (20 sts)
Rnd 10: Inc2, sc18. (22 sts)
Rnd 11: Inc2, sc20. (24 sts)
Rnds 12-14: Sc24.
Rnd 15: *dec1, sc2* x6. (18 sts)
Rnd 16: Stc18.
Rnd 17: *dec1, sc1* x6. (12 sts)
Rnd 18: Flatten the working piece so it takes shape of a wing. Add stitch or two to reach the edge and stitch through both side stitches with 5sc.
Tie off, leaving long end for sewing the wing to the body later. -
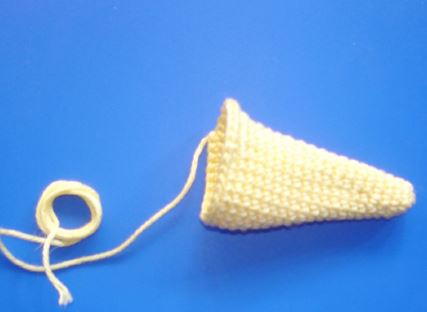
Belly Applique:
Ch10.
Rnd 1: Sc8. 3sc in one st, continue working around the chain, sc7, 2sc in one st. (20 sts)
Rnd 2: Inc1, sc7, inc3, sc7, inc2. (26 sts)
Rnd 3: Sc1, inc1, sc8, inc1, sc1, inc1, sc1, inc1, sc7, inc1, sc1, inc1. (32 sts)
Rnd 4: Sc2, in1, sc9, inc1, sc2, inc1, sc2, inc1, sc9, inc1, sc2, inc1. (38 sts)
Tie off, leaving long end for sewing. -
Backbone Ridge:
Before creating backbone ridge, tail to the body has to be added and sewed. Place the tail (looking from the bottom of the body) right after 5th round. The tail has to be centered in the back. Stuff it very well and very firm, pin it all the way and sew around.
In this tutorial, I will show you one way, crocheting directly on the body, for making a backbone ridge. For those that find this way difficult, you can simply make it separately. Do so by making a chain, long enough to fit the top of the head, over the body and finishing at the end of dragons tail. 55 chains is what you will have to start with (but depending on your crochet work, you might want to check it before continuing with the next row (simply place it on the dragon and measure the length and how it fits). Once you have the chain ready, follow the pattern described below:- To make it as easy as possible, as we have to crochet creating straight line over the head, back and tail area, I used sharpie in the light color, matching the color of the yarn I used (so it doesn’t show and can’t be seen later) and simply draw the line I will crochet over.
- Now slip stitch on the first stitch marked on top of the head, and let us start. Body is stuffed very firm, and stitching through stitches like this can be frustrating.
- Using your line as a guide stitch through all stitches marked. From the top of the head to the end of the tail. You should finish with approximately 55 stitches across. Don’t worry if you have them less or more. It depends on how you stitch through this guideline and the stitches used on the body.
- As you finished the last stitch, chain 2 and stitch 4dc in the 3st from hook *skip one st, sl st to next st, skip one st, 4 dc in next st* repeat this pattern across Around the neck area, slip stitch several stitches, 3-4, simply to make it easier to continue work and not to make shells overlapping each other.
- Reaching the last stitch on the head, finish with 5dc and tie off hiding the thread inside the head.
Little piece of advice: I have worked with pink colored both rows when crocheting backbone ridge. I suggest you use the same color yarn you used for the body when crocheting the first row and change the color before starting the second row. This way, even if you make little mistake crocheting the first row directly through stitches on head, body, tail, they will not be so visible and your work will look perfect. - To make it as easy as possible, as we have to crochet creating straight line over the head, back and tail area, I used sharpie in the light color, matching the color of the yarn I used (so it doesn’t show and can’t be seen later) and simply draw the line I will crochet over.
-
Assembly:
By now we have sewn the tail and added the backbone ridge.- Turn your dragon upside down, and observe where the tail is added. We wait to place it right after 5th round.
- Do the same with placing the legs. Place them right after 5th round. I have left 5 stitches between them but you try different ways to see which one suits you the best.
- Important: When legs are placed, together with tail, they make it easy for the dragon to sit. So keep that in mind when adding legs.
- Place arms on each side of the body, right below the head (or using R3 of the body to place them).
- Wings: Sew them on the back, one on each side of the backbone ridge, right below the back of the head.
- Belly applique: Place it on the belly and simply sew on.
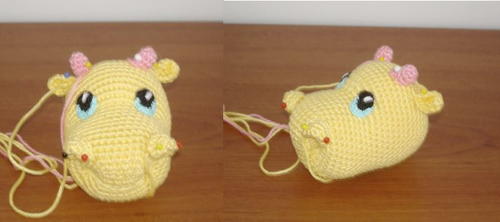
- Head features: Use these two photos as your guide.
Advice:- The only thing I would like to add is when placing the eyes on, I like to use glue when attaching the eyes. If the eye is big, I like to sew it around using invisible thread. This is just the way I like my eyes to be. I also like to use a very thin black marker to outline the eye to give them cartoon look.
- Never use yarn when attaching the eyes. They will end up bulky and not nice. If you dislike the idea of using glue or invisible thread (or don’t have them at home), simply take and use thread in matching the color of your eyes. This way you will get the seamless edge and your eyes will look nice.
- Turn your dragon upside down, and observe where the tail is added. We wait to place it right after 5th round.


What would you name these dragons?
Read NextLeo The Lovey
Your Recently Viewed Projects

Thanks for your comment. Don't forget to share!
genamckenna 966821 5
Jan 06, 2024
I made this dragon a while ago when I first began crocheting. Despite being one of my fist attempts at amigurumi I found the pattern very easy to follow and the finished dragon looked just like the pictures in the pattern. Its really adorable and I went on to make a second dragon for my little brother.
Bobzashell
Jul 11, 2020
Just finished making this for my daughter. I used 10ply acrylic yarn and 3.25mm hook and its about 20-25cm sitting down. For those wondering about the arms, I noticed there were 2-3 extra rows between the popcorn fingers and the fpsc row, so I used the leg pattern as a guide and did 2 rows 18sc then 5dec, 6sc, 1dec to get to 12 stitches and followed from round 5. Other changes were the nostrils and eyes. For the nostrils, I flattened it after the last round and closed it with 5-6 sc before tying off and sewing on. The eyes I did 6sc in a magic ring with 10ply black then followed the pattern for the colour. Happy baby girl )
sonutty 4572255
Feb 28, 2019
when doing the arms it seems to me there is a problem with doing row 5 to 9 u have marked 12 stiches but i just finished row 4 and now am stuck as you say to crochet 12 sc please help
KLC
Jan 24, 2019
These are some of the cutest little dragons I've ever seen! I like that they are sweet rather than scary.
JaneEK
May 30, 2017
These little dragons are just precious, and photos! lots of photos! One of my other hobbies is soft sculpture doll making, and the designers explanation of how to sculpt the face is spot on. I love her method of working the eyes, too. I have used glue to place the eyes, but I always stitch around them so they will be completely secure. Pay special attention to her tips at the bottom of the pattern, too.
franriley4 9691736
Aug 12, 2016
Arms- how did you go from 18 st (popcorn- row 4) to 12 on row 5-9 ? Am I doing the popcorn stitch wrong?
AFC Editor Julia
Aug 16, 2016
Hi Franriley, For your question, I would recommend you post it to AllFreeCrochet's Facebook wall (facebook.com/allfreecrochet) - we have a community of friendly crocheters who frequent the page, and they can surely offer some advice! Thanks, Julia, editor for AllFreeCrochet
Report Inappropriate Comment
Are you sure you would like to report this comment? It will be flagged for our moderators to take action.
Thank you for taking the time to improve the content on our site.