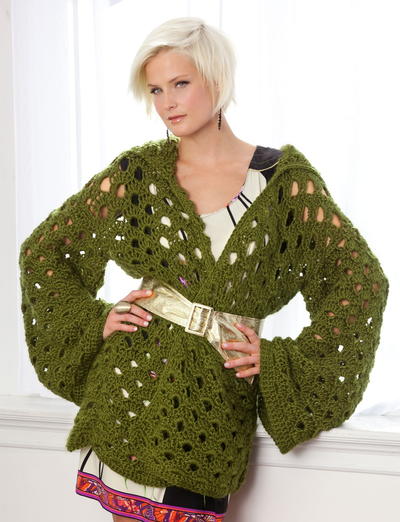
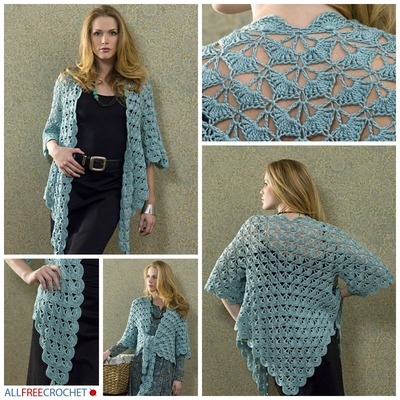
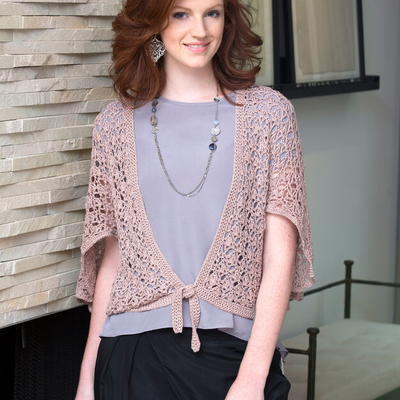
Romantic Ruffled Cardigan

"This is a fairly easy pattern and I think would make a great Christmas cardiganespecially if done in a beautiful metallic red or green or even a snowy white color. Perfect for those holiday gatherings. Will look equally chic with a pair of skinny jeans or your go to LBD for holiday parties."

Crochet HookH/8 or 5 mm hook
Yarn Weight(4) Medium Weight/Worsted Weight and Aran (16-20 stitches to 4 inches)
Crochet Gauge16 sts = 4in; 10 rows = 4in
Finished SizeSmall through Extra large
Materials List
- Red Heart Shimmer Yarn in Pewter 5,(6,6,7)
- Size H crochet hook
- Yarn needle
Back
- Row 1: Ch 70, (76, 82, 88), sc in second ch from hook, *ch 1, sk next ch, sc in next ch, rep from * across. Turn
- Row 2: RIGHT SIDE--Ch 3, dc in first ch 1 sp, *ch 1, sk next sc, dc in next ch sp, rep from * across to last sc, dc in last sc. Turn.
- Row 3: Ch 1, sc in first dc, *ch 1, sk next dc, sc in next ch 1 sp, rep from * across.
- Rows 4-40: Rep row 2 & 3 end by working row 2. Place marker at each end of row 40. Turn.
- Rows 41-57: Continue in est pattern. Turn.
Large and X-Large only: Work 2 more rows of pattern (rows 58 &59)
Shoulders - all sizes:
- Row 1: Ch 3, dc in next ch 1 sp, *ch 1, sk next sc, dc in next ch 1 sp, rep from * 9 times more. Turn.
- Row 2: Ch 1, sc in first st, sc in in next ch 1 sp, *ch1, sk next dc, sc in next ch 1 sp, rep from * across. Fasten off.
- Skip next 25,(31,37,43) sts on row 57, (57, 59, 59) rejoin with sl st to next ch 1 sp, Ch 4, (counts as dc and ch 1 sp), dc in next ch 1 sp, *ch 1, sk next sc, dc in next ch 1 sp, rep from * to last st, dc in last st. Turn.
- Next row: Ch 1, sc in first dc, *ch1, sk next dc, sc in next ch 1 sp, Rep from * across, sc in 3rd ch of turning ch. Fasten off.
LEFT FRONT:
- Ch 36,(42.48,54)
- Rows 1-40: Work same as for back, place st markers at end of row 40.
- Rows 41-53: Continue in est pattern.
Large & X-Large Only:
Row 54-55: Continue in est pattern
All Sizes:
- Row 54(54,56,56): Ch 3, dc in next ch 1 sp, *ch1, sk next sc, dc in next ch 1 sp, rep from * 12 times more. Turn.
- Row 55(55,57,57): Ch 1, sc in first st, sc in next ch 1 sp, *ch 1, sk next sc, dc in next st, rep from * across. Turn.
- Row 56(56,58,58): Ch 3, dc in next ch 1 sp, *ch1, sk next sc, dc in next st, rep from * 11 times more. Turn.
- Row 57(57,59,59): Rep row 55.
- Row 58(58,60,60): Ch 3, dc in next ch 1 sp, *ch 1, sk next st, dc in next st, rep from * 9 times more. Turn.
- Row 59(59,61,61): Rep row 55. Fasten off.
RIGHT FRONT:
- (work same as left front to row 53,(53,55,55) Fasten off at end of 53(55).
- Row 54(54,56,56): Skip first 6 sts on previous row, rejoin with sl st in next st, ch 4, sk next st, dc in next st, *ch 1, sk next st, dc in next st, rep from *across to last st, dc in last st. Turn.
- Rows 55(55,57,57): Rep row 55 of left front.
- Row 56(56,58,58)--59(59,61,61): Rep as for left front. Fasten off.
Joining
Using yarn needle and holding right sides together, sew together at shoulder seams. Sew together from row 1 up to row 40 at side seams.
SLEEVES:
- You will be working in rounds for sleeves
- Join yarn with sl st at bottom of armhole.
- Rnd 1: Work 59,(65,71,77) sc evenly spaced around armhole. Join with sl st to first sc.
- Rnd 2: Ch 4, sk next sc, *dc in next sc, ch 1, sk next sc. Rep from * around. Join with sl st to 3rd ch of beg ch 4.
- Rnd 3: Ch 1, sc in same st as joining, sc in next ch 1 sp, *ch 1, sk next dc, sc in next ch 1 sp, rep from * around. Join with sl st to first sc.
- Rnds 4-20(22,24,26): Rep Rnds 2 & 3, ending with rnd 2. Fasten off. Rep for other sleeve.
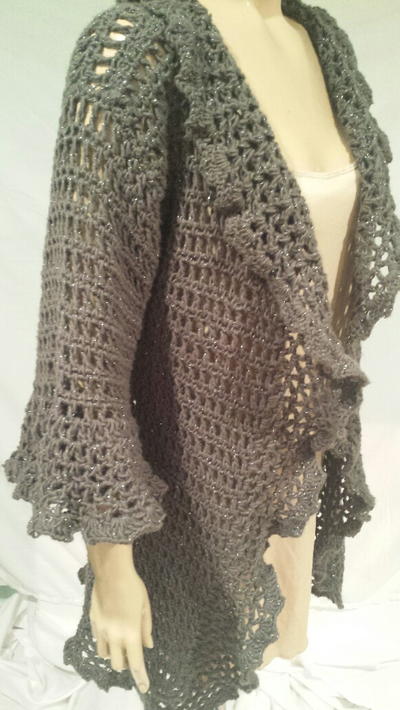
Edging:
- Rnd 1: Join with sl st to bottom right corner of rt front, ch 5, dc in same st, work (dc, ch1, dc) (v-st made), in end of each dc row to neckline. Work V-st in every 3rd st around neck. Work v-st in end of each dc row down left front, work v-st in corner and in every 3rd st around bottom. Join with sl st to 3rd ch of beg ch 5.
- Rnds 2-5: Sl st to first ch 2 sp, ch 5, dc in same sp, work v-st in each ch 2 sp around. Join to 3rd ch of beg ch 3. Fasten off.
- Rnd 6: Sl st to first ch 2 sp, ch 3, work (2 dc, ch 2, 3 dc) in first ch 2 sp, work (3dc, ch 2, 3dc)(shell made) in each ch 2 sp around. Join to beg ch 3. Fasten off.
Sleeve edging:
- Rnd 1: Join with sl st to ch 1 sp, ch 5, dc in same sp, V-st in each ch sp around. Join with sl st to 3rd ch of beg ch 5.
- Rnds 2-6: Rep rnds 26 of body edging. Fasten off
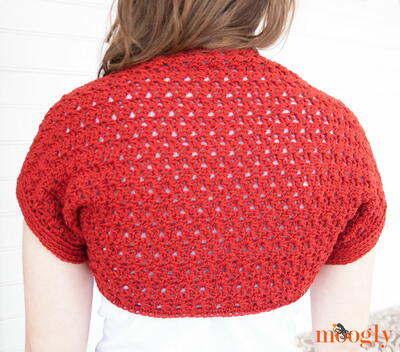
Read NextSimple Scarlet Crochet Shrug Pattern
Your Recently Viewed Projects
Thanks for your comment. Don't forget to share!
princess6860504
Oct 28, 2018
I agree with the designer's suggestion of making this in a holiday red sparkle to wear for Christmas! There are lots of casual holiday inspired sweaters sold at the mall, but rarely do I see a PRETTY and feminine cardigan with ruffles like this one. Now, in black with a metallic thread in the yarn would make this an outstanding piece to wear for nights out on the town or New Year's Eve.
monikaluijsmans 63 97800
Oct 06, 2018
can someone tell me if Row 55(55,57,57) Ch 1, sc in first st, sc in next ch 1 sp, ch 1, sk next sc, dc in next st, rep from across. Turn. is correct??? I think it should be sc instead of dc and in next ch 1 space instead of next st or is it a change in the pattern??
neldabrinums 70095 95
Jun 12, 2018
Can someone please explain Right Front, especially row 54 where it say Skip the first 6 sts. The Right Front does not make sense I am unable to join it to shoulder. Shouldn't it be the same as Left Front?
monikaluijsmans 63 97800
Oct 06, 2018
no you have to mirror the other side, otherwise you will have you're good side facing inwards in the end. you're good side is the one that is facing you when you are making the double crochets
telybarger 2028535
Mar 21, 2018
Hope someone can help me.......I know that "est" means established pattern but I don't know what I go to, or where the established pattern is
Morehouse17
Jan 30, 2018
This romantic ruffled cardigan is timeless. I find the selection of yarn choice to be interesting. Is it me, or are there specks of glitter in the yarn? By title of the yarn, "shimmer", I guess so. To stand the test of time, a solid neutral color would have been better. None the less, the article is beautiful.
Zeemer
Jan 17, 2018
I like the shiny and shimmering yarn used in this Romantic Ruffled Cardigan. The stitches used are just right, very appropriate for the style of the outfit. The center of attraction here are the sleeves with the bell shaped cuffs. It's the "in" thing, it's in vogue, very modern and very "now"! I loveeeeet!!
Kathleen
Aug 30, 2017
having trouble with the right front. i would appreciate any advise or or help video. Thank you
Delphine Bryant
Aug 21, 2017
When I look over a project to determine if I will crochet the item, when the directions are all on that same page, I feel just a little more confident. I think the ruffles on this is what really makes it and I am seeing that I can alter the size to one that would fit me. Great project.
Tricia108
Apr 29, 2017
This type of sweater never goes out of style. It is so feminine looking and will look good with so many outfits. I like the fact it uses worsted weight and the size h hook. It should work up quickly. I can't wait to start. Thank you.
Lynn K
Apr 20, 2017
A very lovely cardigan even though the color they used does nothing at all for me. That small point aside (I am still deciding between charcoal or blue), the pattern very nice plus I just love the ruffly look of the edging around the sleeves and cardigan edges. Fall and winter are approaching here in the southern hemisphere so I am really looking forward to feeling cosy and gorgeous wearing this, lol!
DRYCREEK51 9777720
Apr 19, 2016
I like this sweater but I also need the measurements, bust size, length, etc., please!
msrvl0517 8107102
Jan 28, 2016
Finished Size Small through Extra large Is there a chart somewhere showing sizes in inches?
Report Inappropriate Comment
Are you sure you would like to report this comment? It will be flagged for our moderators to take action.
Thank you for taking the time to improve the content on our site.