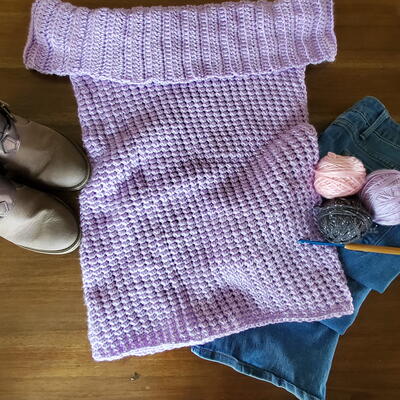
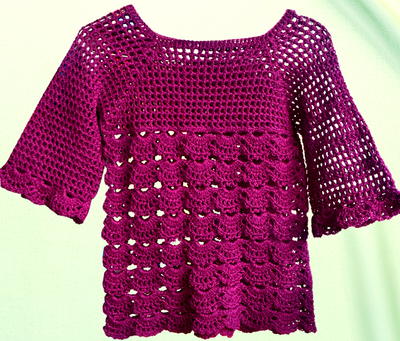
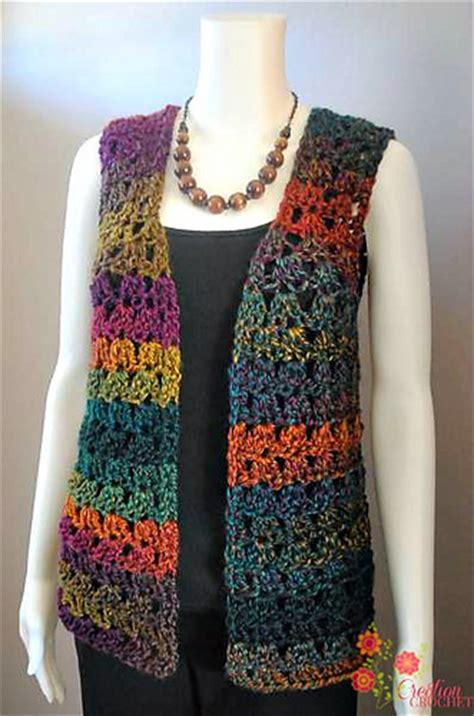
Unique Shell Vest

This lightweight and airy crochet vest is designed with the gorgeous Lion Brand Unique Yarn in Jewel. The bright changing tones give this simple design a big visual impact. This back of the Unique Shell Vest is constructed in one piece from top to bottom. The two front panels are then crocheted on in two sections and joined as you go. Once all three panels are crocheted, the sides are stitched together.

Crochet HookN/15 or 10 mm hook
Yarn Weight(5) Bulky/Chunky (12-15 stitches for 4 inches)
Crochet Gauge(measure in pattern) 4 shells (or 12sts) and 6 rows = 6” x 6”
Finished SizeFits Bust Measurement(s) 35” (39 ½”, 41”, 45 ½”)
Materials List
- 3 (4, 4, 5) skeins Lion Brand Unique yarn, Jewel
- US N15/10.00mm hook- or hook needed to obtain gauge
- Large eyed embroidery needle
Instructions
Notes
- Pattern is written in size small, changes for medium, large and extra-large, are in parenthesis.
- To make reading pattern easier you may want to print out pattern and highlight changes for your size.
Back
-
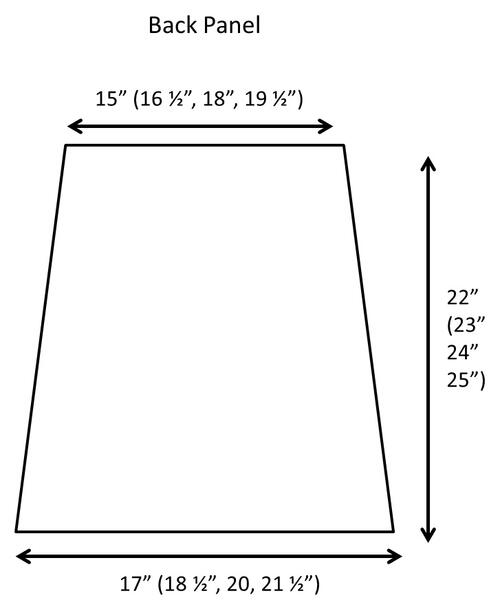
Row 1: Ch34 (37, 40, 43). 1dc in 4th ch from hook (counts as 2dc in first st). Skip 2sts. [3dc in the next st. Skip 2sts] 9x (10x, 11x, 12x). 2dc in the last ch. <31 (34, 37, 40 )> (Measures 15” (16 ½” 18”, 19 ½”)
-
Row 2: Ch3 and turn. 1dc in the first st (counts as 2dc in first st). Skip 2sts. [3dc in the next st. Skip 2sts] 9x (10x, 11x, 12x). 2dc in the Ch3. <31 (34, 37, 40 )>
-
Row 3-8 (8, 9, 9): Repeat row 2. <31 (34, 37, 40)>
-
Row 9 (9, 10, 10): Ch3 and turn. 2dc in the first st (counts as 3dc in first st). Skip 2sts. [3dc in the next st. Skip 2sts] 9x (10x, 11x, 12x). 3dc in the Ch3. <33 (36, 39, 42>
-
Row 10 (10, 11, 11): Ch3 and turn. 1dc in the first st (counts as 2dc in first st). [Skip one st. 3dc in next st.] 2x. Skip 2sts. [3dc in the next st. Skip 2sts] 8x (9x, 10x, 11x). Skip one st. 3dc in the next st. Skip one st. 2dc in the Ch3. <37 (40, 43, 46)> MARK THIS ROW
-
Row 11 (11, 12, 12): Ch3 and turn. 1dc in the first st. Skip 2sts. [3dc in the next st. Skip 2sts] 11x (12x, 13x, 14x). 2dc in the Ch3. <37 (40, 43, 46)>
-
Row 12 (12, 13, 13)- 22 (23, 24, 25): Repeat row 11 (11, 12, 12). <37 (37, 43, 43)> (Measures 17” (18 ½”, 20”, 21 ½”)
Front Right (Sides are labeled as worn)
-
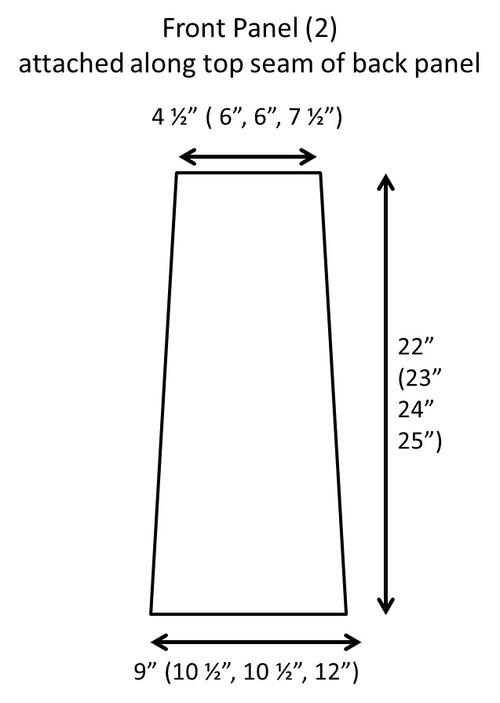
Row 1: Insert hook and attach yarn in the last chain of the beginning ch34. *Ch3 and 1dc in the same st (counts as 2dc in first st). Skip 2 chains. [3dc in the next ch. Skip 2 chains] 2x (3x, 3x, 4x]. 2dc in the next ch. <10 (13, 13, 16)> (Measures 4 ½” (6”, 6”, 7 ½”)
-
Row 2-6 (6, 7, 7): Ch3 and turn. 1dc in the first st (counts as 2dc in first st). Skip 2sts. [3dc in the next ch. Skip 2 chains] 2x (3x, 3x, 4x]. 2dc in the Ch3. <10 (13, 13, 16)>
-
Row 7 (7, 8, 18): Ch3 and turn. 1dc in the first st (counts as 2dc in first st). Skip 2sts. [3dc in the next ch. Skip 2 chains] 2x (3x, 3x, 4x]. 3dc in the Ch3. <11 (14, 14, 17)>
-
Row 8 (8, 9, 9): Ch3 and turn. 1dc in the first st (counts as 2dc in first st). [Skip one st. 3dc in next st.] 2x. Skip 2sts. [3dc in the next st. Skip 2sts] 1x (2x, 2x, 3x). 2dc in the Ch3. <13 (16, 16, 19)>
-
Row 9 (9, 10, 10): Ch3 and turn. 2dc in the first st (counts as 3dc in first st). Skip 2sts. [3dc in the next st. Skip 2sts] 3x (4x, 4x, 5x). 3dc in the Ch3. <15 (18, 18, 21)>
-
Row 10 (10, 11, 11): Ch3 and turn. 1dc in the first st (counts as 2dc in first st). [Skip one st. 3dc in next st.] 2x. Skip 2sts. [3dc in the next st. Skip 2sts] 2x (3x, 3x, 4x). Skip one st. 3dc in the next st. Skip one st. 2dc in the Ch3. <19 (22, 22, 25)> MARK THIS ROW
-
Row 11 (11, 12, 12): Ch3 and turn. 1dc in the first st (counts as 2dc in the first st). Skip 2sts. [3dc in the next st. Skip 2sts] 5x (6x, 6x, 7x). 2dc in the Ch3. <19 (22, 22, 25)>
-
Row 12 (12, 13, 13)- 22 (23, 24, 25): Repeat row 11 (11, 12, 12). <19 (22, 22, 25)> (Measures 9” (10 ½”, 10 ½”, 12”)
Front Left
-
Rows 1-22 (23, 24, 25): With finished (right side) on your left, insert hook and attach yarn in the first (beginning) chain.
-
Working towards center, repeat from * in Front Right.
Assembly
-
Fold piece in half inside out. Whip stitch both sides closed from bottom to marked row on either side.
Finishing
-
Weave in all ends.
Read NextThe Elizabeth Cardigan
Your Recently Viewed Projects
Thanks for your comment. Don't forget to share!
Lauren
Mar 01, 2019
I just started crocheting this vest. Think there's a slight error with Instructions for Back #7. Row 12. Am br /making a medium and the increases in parenthesis shouldbr /match #6 Row 11. 37(40, 43, 46). Cant be what isbr /shown - on #7 Row 12 - 37 (37, 43, 43) pattern not br /changed from Row 11!!! Please correct. Lauren
mckinsey1192 38757 88
Jan 28, 2018
I copied the pattern and made notes for the desired size and thought I had it under control until I got to left side of vest. Totally don't understand the directions. "With finished (right side) on your left, insert hook and attach yarn in the first (beginning) chain." What does that mean? I'm not new to crochet but this has me stumped. It might make sense if I'd already completed the back and right side, but hate to start and can't finish because of my confusion. Please help.
bonniestanbery 879 0953
Sep 29, 2018
Count ever how many stitches in and then attach yarn and start crocheting your rows
mulberrygalprinces s
Jan 22, 2018
This is a really pretty vest. I read the directions and it's very easy. The way it is assembled is different than most I have made but I understand the instructions and know I can do it. It should go together easily and quick. Thank you for sharing thus pretty vest.
FireFightersMoM
May 27, 2017
First off why do people leave negative comments when it is there issue and nothing to do with the pattern? I always look at feedback before I start a project. This one had negatives and I look to see what is wrong with pattern and there is nothing...the person couldn't figure out how to print ( Anyways, onto the pattern. This is so cute. I love the yarn by Lion brand. I will be making this up. I love anything sweater be it vest, cardigan etc. I will be extending the length to cover up hips. But will be very easy to do.
Sierra
Mar 12, 2017
I have been crocheting for years, but this pattern has me confused. Do I end the back after 12 rows, if I do it does not measure 22 ins. If I add the sides to it it still will not be correct. What am I doing wrong.
AFC Editor Julia
Mar 13, 2017
Hi sirjack, The pattern above is based on keeping a consistent gauge (noted above) so if you crochet with the proper amount of tension, your project should reach the desired length after the specified number of rows. I hope that helps! Julia, editor for AllFreeCrochet
mmrb3618686
Apr 24, 2017
Hi sirjack No, you need to keep crocheting the back until you reach your desired length. Row 12 basically is telling you to repeat row 11 until the desired length.
newsuz1 7756496
Nov 04, 2015
where is the printable version of Unique Shell Stitch Vest
Editor AllFreeCroc het
Nov 06, 2015
Hi newsuz1, you can find the print button directly under the title "Unique Shell Stitch Vest." I have included a picture of it in case you need help locating it. Happy crocheting! - Editor of AllFreeCrochet
Report Inappropriate Comment
Are you sure you would like to report this comment? It will be flagged for our moderators to take action.
Thank you for taking the time to improve the content on our site.