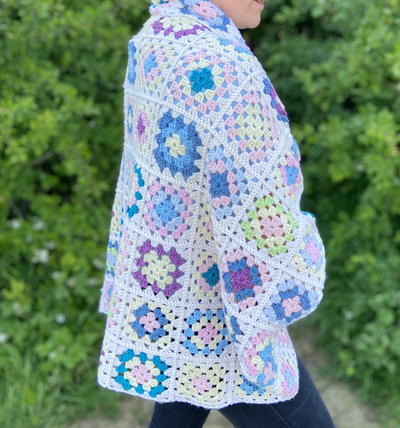
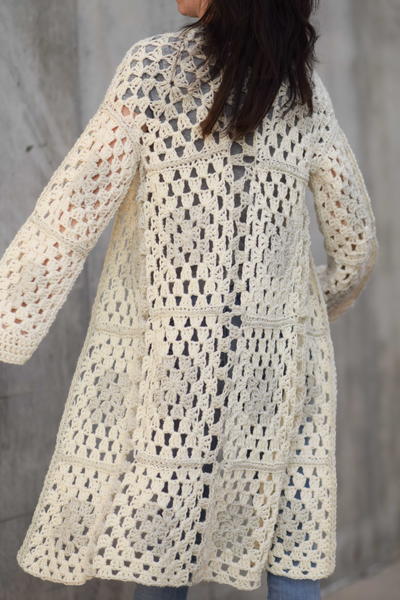
Granny Crochet Pullover
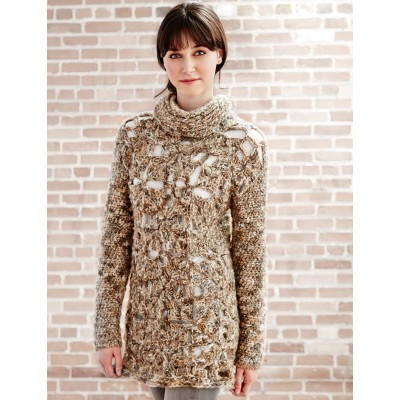
The Granny Crochet Pullover is a great way to keep warm and look stylish at the same time. The crochet sweater is a lovely brown color and features a turtleneck and a longer length, so you will have adequate coverage for those chilly fall days. The charming granny motif creates an openwork pattern, so you will be able to show off any top you choose to wear underneath. This cozy piece is very feminine and functional. You will love wearing it once the temperature starts to drop and it pairs nicely with both jeans and dress pants. The possibilities are endless when it comes to this crochet sweater pattern. Work it up today to see for yourself.

Crochet HookL/11 or 8 mm hook
Yarn Weight(5) Bulky/Chunky (12-15 stitches for 4 inches)
Crochet Gauge9 hdc and 7 rows = 4" [10 cm]. Motif = Approx 6" [16.5 cm] square.
Materials:
- Patons® MistyTM (3.5 oz/100 g; 143 yds/131 m), Fawn Fur (94005)
- Sizes XS/S = 4 balls, M = 5 balls, L = 5 balls, XL = 6 balls, 2/3XL = 7 balls, 4/5XL = 8 balls
- Size U.S. L/11 (8 mm) crochet hook or size needed to obtain gauge.
- 2 stitch markers
Sizes
To fit bust measurement
Extra-Small/Small: 28-34" [71-86.5 cm]
Medium: 36-38" [91.5-96.5 cm]
Large: 40-42" [101.5-106.5 cm]
Extra-Large: 44-46" [112-117 cm]
2/3 X-Large: 48-54" [122-137 cm]
4/5 X-Large: 56-62" [142-157.5 cm]
Finished bust
Extra-Small/Small: 38" [ 96.5 cm ]
Medium: 41" [ 104 cm ]
Large: 45" [ 114.5 cm ]
Extra-Large: 49" [ 124.5 cm ]
2/3 X-Large: 56" [ 142 cm ]
4/5 X-Large: 63" [ 160 cm ]
Instructions
The instructions are written for smallest size. If changes are necessary for larger sizes the instructions will be written thus ( ). Numbers for each size are shown in the same color throughout the pattern. When only one number is given in black, it applies to all sizes.
Basic Motif:
Ch 5. Join with sl st to first ch to form a ring. See Diagram on page 3.
1st rnd: Ch 3 (counts as dc). [3 dc. (Ch 2. 4 dc) 3 times] in ring. Ch 2. Join with sl st to top of ch 3.
2nd rnd: Ch 5 (counts as dc and ch 2). *Skip next 2 dc. 1 dc in next dc. (3 dc. Ch 2. 3 dc) in next ch-2 sp.** 1 dc in next dc. Ch 2. Rep from * twice more, then from * to ** once. Join with sl st to 3rd ch of ch 5.
3rd rnd: Sl st in each of next 2 ch and 2 dc. Ch 3 (counts as dc). 1 dc in each of next 2 dc. *(3 dc. Ch 2. 3 dc) in next ch-2 sp. 1 dc in each of next 3 dc. Ch 4. Skip next: (dc, ch 2, dc).** 1 dc in each of next 3 dc. Rep from * twice more, then from * to ** once. Join with sl st to top of ch 3. Fasten off.
Join 2 Motifs:
Work 1st and 2nd rnds as given for Basic Motif.
3rd rnd: Sl st in each of next 2 ch and 2 dc. Ch 3 (counts as dc). 1 dc in each of next 2 dc. *(3 dc. Ch 1. Sl st in corner ch-2 sp of adjoining Motif. Ch 1. 3 dc) in next ch-2 sp.* 1 dc in each of next 3 dc. Sl st in corresponding dc of adjoining Motif. Ch 4. Sl st in corresponding dc of adjoining Motif. 1 dc in each of next 3 dc. Rep from * to * once more. [1 dc in each of next 3 dc. Ch 4. 1 dc in each of next 3 dc. (3 dc. Ch 2. 3 dc) in next ch-2 sp] twice. 1 dc in each of next 3 dc. Ch 4. Join with sl st to top of ch 3. Fasten off.
Join 3 Motifs:
Work 1st and 2nd rnds as given for Basic Motif.
3rd rnd: Sl st in each of next 2 ch and 2 dc. Ch 3 (counts as dc). 1 dc in each of next 2 dc. *(3 dc. Ch 1. Sl st in corner ch-2 sp of adjoining Motif. Ch 1. 3 dc) in next ch-2 sp.** 1 dc in each of next 3 dc. Sl st in corresponding dc of adjoining Motif. Ch 4. Sl st in corresponding dc of adjoining Motif. 1 dc in each of next 3 dc. Rep from * once more, then from * to ** once. 1 dc in each of next 3 dc. Ch 4. 1 dc in each of next 3 dc. Join with sl st to top of ch 3. (3 dc. Ch 2. 3 dc) in next ch-2 sp. 1 dc in each of next 3 dc. Ch 4. Join with sl st to top of ch 3. Fasten off.
Front
Make 14 (14 -14 -14-18-18) Motifs, joining as shown in Diagram on page 4.
Back
Note: Ch 2 at beg of row does not count as st.
Ch 47 (56-65-73-74-89).
1st row: (RS). 1 hdc in 3rd ch from hook. 1 hdc in each ch to end of chain. Turn.
45 (54-63-71-72-87) sts.
2nd row: Ch 2. 1 hdc in each hdc to end of row. Turn. Rep last row until work from beg measures 19½" [49.5 cm], ending on WS row. Fasten off.
Shape armholes: 1st row: (RS). Skip first 2 (6-10-14-8-14) hdc. Join yarn with sl st to next hdc. Ch 2. 1 hdc in same sp as sl st. 1 hdc in each hdc to last 2(6-10-14-8-14) hdc. Turn. Leave rem sts unworked.
41 (42-43-43-56-59) sts.
2nd row: Ch 2. 1 hdc in each hdc to end of row. Turn.
Rep last row until armhole measures 3 (4-5-6-7-8) ” [7.5 (10-12.5-15-18-20.5) cm], ending on a WS row. Fasten off.

If you love this sweater pattern, be sure to check out our collection of 17 Free Crochet Shrug Patterns.

Sleeves
Ch 24 (24-24-24-26-27).
1st row: (RS). 1 hdc in 3rd ch from hook. 1 hdc in each ch to end of chain. Turn.
22 (22-22-22-24-25) sts.
2nd row: Ch 2. 1 hdc in each hdc to end of row. Turn.
3rd row: (Inc row). Ch 2. 2 hdc in first hdc. 1 hdc in each hdc to last hdc. 2 hdc in last hdc. Turn.
Next 3 (1-1-1-1-1) row(s): Ch 2. 1 hdc in each hdc to end of row. Turn.
Rep last 4 (2-2-2-2-2) rows 3 (0-2-2-3-6) times more. 30 (24-28-28-32-39) hdc.
Next row: (Inc row). Ch 2. 2 hdc in first hdc. 1 hdc in each hdc to last hdc. 2 hdc in last hdc. Turn.
Next 5 (3-3-3-3-3) rows: Ch 2. 1 hdc in each hdc to end of row. Turn.
Rep last 6 (4-4-4-4-4) rows 1 (5-4-5-4-2) time(s) more. 34 (36-38-40-42-45) hdc.
Next row: Ch 2. 1 hdc in each hdc to end of row. Turn.
Rep last row until work from beg measures 18 (18-18½-18½-17½-16)" [45.5(45.5-47-47-44.5-40.5) cm]. PM at each end of last row. Work further 1 (2-4-5-3-5) row(s) even.
Shape top: 1st row: Sl st in each of next 3 sts. Ch 1. 1 sc in same sp as last sl st. 1 sc in next st. 1 hdc in each hdc to last 4 sts. 1 sc in each of next 2 sts. Turn. Leave rem sts unworked.
2nd row: Sl st in each of next 3 sts. Ch 1. 1 sc in same sp as last sl st. 1 sc in next st. 1 hdc in each hdc to last 4 sts. 1 sc in each of next 2 hdc. Turn. Leave rem sts unworked. Rep last row 3 times more. Fasten off.
Finishing
Pin garment pieces to measurements. Cover with a damp cloth, leaving cloth to dry. Sew side and shoulder seams, noting Motif at each Front shoulder will fold over into each Back shoulder. Lay garment on a flat surface. Mark shoulders and sides.
Sew Sleeve seams to markers. Sew in sleeves, placing rows above markers along skipped sts of front and back to form square armholes.
Lower edging: With RS facing, join yarn with sl st to first hdc at bottom lower edge. Ch 2. Work 86 (96-106-114-128-146) hdc evenly around lower edge. Join with sl st to first hdc.
2nd rnd: Ch 2. 1 hdc in each hdc around. Join with sl st to first hdc. Fasten off.
Collar: (Worked sideways).
Ch 17.
1st row: (RS). 1 dc in 4th ch from hook (counts as 2 dc) and each ch to end of chain. Turn. 15 dc.
2nd row: Ch 2 (does not count as st). 1 hdc in first st. 1 dcbp around each dc to last dc. 1 hdc in last st. Turn.
3rd row: Ch 2. 1 hdc in first hdc. 1 dcfp around each st to last hdc. 1 hdc in last hdc. Turn.
Rep last 2 rows until Collar measures length to fit around neck edge (when slightly stretched). Fasten off.
Beg at left back seam, sew Collar around neck edge, matching WS of Collar with RS of garment. Sew Collar seam, reversing for turn back.
Abbreviations
- Approx = Approximately
- Beg = Beginning
- Ch = Chain(s)
- Dc = Double crochet
- Dcbp = Yoh and draw up a loop around post of next stitch at back of work inserting hook from right to left. (Yoh and draw through 2 loops on hook) twice.
- Dcfp = Yoh and draw up a loop around post of next stitch at front of work inserting hook from right to left. (Yoh and draw through 2 loops on hook) twice.
- Hdc = Half double crochet
- Inc = Increase(ing)
- PM = Place marker
- Rem = Remaining
- Rep = Repeat
- Rnd(s) = Round(s)
- RS = Right side
- Sl st = Slip stitch
- Sp(s) = Space(s)
- St(s) = Stitch(es)
- WS = Wrong side
- Yoh = Yarn over hoo


Read NextArlo Granny Square Cardigan
Your Recently Viewed Projects
Thanks for your comment. Don't forget to share!
MLfuncrafting
Apr 12, 2024
If you are familiar with crocheting granny squares then this will be easy for you to make. I think the only challenge for others could be interpreting the written pattern. The pullover here has really neat options, from what colors and textures of your yarn you use is entirely up to you that can match which ever season of the year that you enjoy most. This pullover i find is great for three season out of the year, autumn , winter, and spring just by changing the colors and due to there being lacey openings makes great for a solid color contrast drop in the clothing worn under neath the pullover really making the pullover stunning. You can go casual with this design or upscale classy with accessorizing with makeup, hair style and jewelry.
Morehouse17
Nov 18, 2018
This is not your granny's pullover! I see that this is made with granny square motifs and I think the use of them is really nice in this pullover. However I am concerned that this is too straight and will not be flattering on my figure.
Zeemer
Jun 11, 2018
What a beautiful pullover! I thought it was fast and easy to make but when I found out it's made of granny squares, I got turned off. Too tedious to make. But the dress is well fit and looks so good on the model. I want to do this but not the granny squares, if possible. Haha.
princess6860504
Apr 10, 2017
I am getting into making apparel more and more lately, as there have been more patterns available and more sizes available to please everyone! I don't find too many plus sized offered, but this one is an exception. Thank you for that! The pattern is posted right here on the same page, so that in itself is convenient.
Lynn K
Apr 06, 2017
Such a fun and unusual design that I just love it! Has anyone made it yet? I do not think it is going to be at all warm or cosy in chilly weather but in spring or fall I think it will provide that bit of warmth that one needs on cooler days or evenings. I am trying to come up with an idea of what color to use but have not decided yet but I am definitely saving the pattern to add to my things to make list!
Lynn K
Apr 06, 2017
Do you also love this tunic as much as I do? The pattern, shape, length, sleeves, everything is perfect for me! I have a sneaky feeling that the pattern may be a little more tricky than Intermediate but I am so drawn to actually wearing this tunic that I am going to be very happy to just dive in and address any difficulties as they come, lol!
Report Inappropriate Comment
Are you sure you would like to report this comment? It will be flagged for our moderators to take action.
Thank you for taking the time to improve the content on our site.