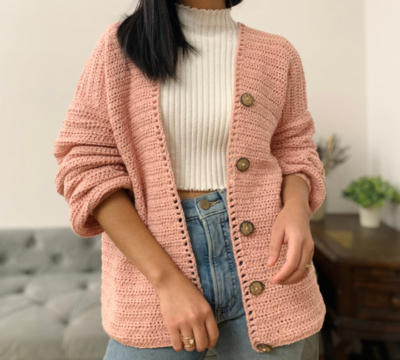
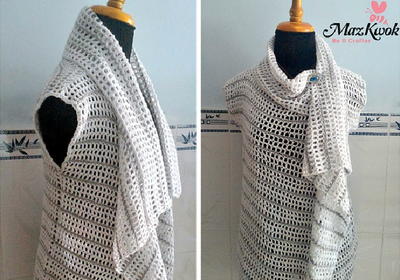
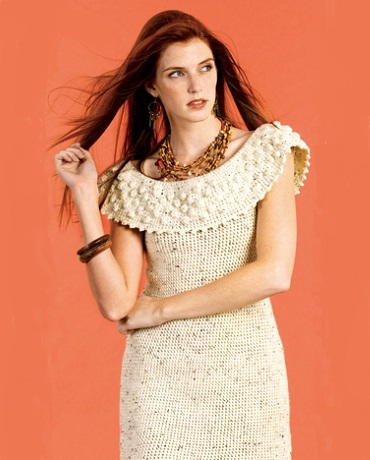
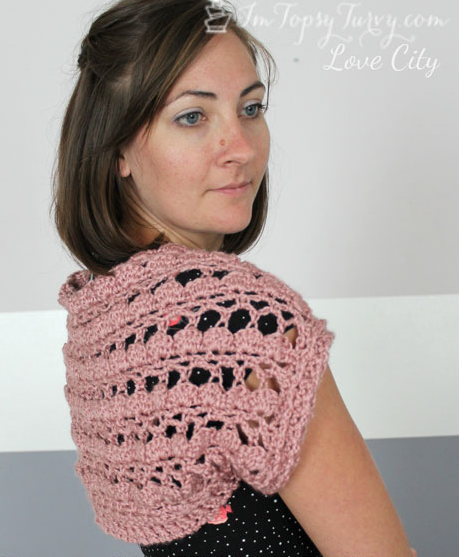
Coziest Crochet Cardigan

It's one thing to get warm and cozy while tucked under a blanket, but consider taking your comfort to the next level with the Coziest Crochet Cardigan. Warm as can be, this crochet cardigan pattern is what you'll want to wear for a day of lounging around the house or running errands this winter. The classic design also means you can wear this beautiful cardigan for years to come. Just keep in mind this crochet pattern is at the intermediate level for crocheters. In addition, this crochet pattern has instructions for multiple sizes.
NotesNOTES: The instructions are written for smallest size. If changes are necessary for larger size(s) the instructions will be written thus ( ).

Crochet HookH/8 or 5 mm hook
Yarn Weight(4) Medium Weight/Worsted Weight and Aran (16-20 stitches to 4 inches)
Crochet Gauge14 sc and 17 rows = 4" [10 cm].
Finished SizeTo fit bust measurement XS/S/M 28-38" [71-96.5 cm]; L/XL/2XL 40-48" [101.5-122 cm]; and 3/4/5 XL 54-62" [137-157.5 cm]
Materials List
-
Patons Classic Wool Worsted™(3.5 oz/100 g; 210 yds/192 m):
Contrast A Grey Mix (00224) 5 (6, 7) balls
Contrast B Natural Mix (00229) 2 (2, 3) balls
Contrast C Aran (00202) 2 (2, 3) balls
Contrast D Natural Heather (77412) 2 (2, 3) balls - Size U.S. H/8 (5 mm) crochet hook or size needed to obtain gauge.
- Assembly chart
- Abbreviatoins chart
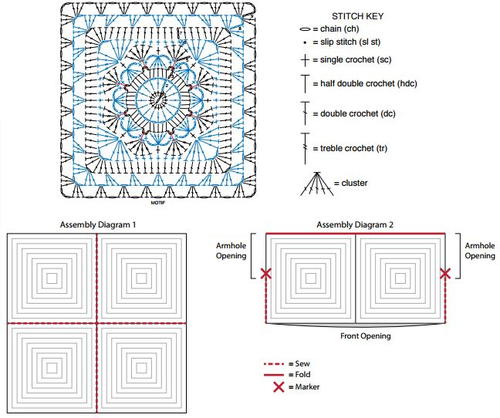
Motif (make 4)
-
With A, ch 2. See Assembly Chart above.
-
1st rnd: 16 sc in 2nd ch from hook. Join B with sl st to first sc. Break A.
-
2nd rnd: With B, ch 4 (counts as 1 dc and ch-1 sp). *1 dc in next sc. Ch 1. Rep from * around. Join C with sl st to 3rd ch of beg ch-4. Break B.
-
3rd rnd: With C, ch 5 (counts as 1 hdc and ch-3). 1 hdc in same sp as last sl st. 1 hdc in next ch-1 sp. 1 hdc in next dc. 1 hdc in next ch-1 sp. *(1 hdc. Ch 3. 1 hdc) in next dc. 1 hdc in next ch-1 sp. 1 hdc in next dc. 1 hdc in next ch-1 sp. Rep from * around. Join with sl st to 3rd ch of beg ch-5. Fasten off.
-
4th rnd: Join D with sl st to any ch-3 sp. Ch 1. (1 sc. Ch 1. 1 sc) in same sp as last sl st. Ch 3. Cluster over next 5 hdc. Ch 3. *(1 sc. Ch 1. 1 sc) in next ch-3 sp. Ch 3. Cluster over next 5 hdc. Ch 3. Rep from * around. Join with sl st to first sc. Fasten off.
-
5th rnd: Join A with sl st to any ch-3 sp of 3rd rnd. Ch 4 (counts as tr). Working around ch-1 sp of 4th rnd, 4 tr in same sp as last sl st. 1 sc in top of next Cluster. *Working around ch-1 sp of 4th rnd, 5 tr in next ch-3 sp of 3rd rnd. 1 sc in top of next Cluster. Rep from * around. Join B with sl st to top of ch-4. Break A
-
6th rnd: With B, sl st in each of first 2 tr. Ch 1. 1 sc in same sp as last sl st. 1 sc in each of next 2 tr. 1 sc in next sc. 1 sc in each of next 3 tr. Skip next 2 tr. (2 tr. 2 dc. Ch 3. 2 dc. 2 tr) in next sc. Skip next 2 tr. *1 sc in each of next 3 tr. 1 sc in next sc. 1 sc in each of next 3 tr. Skip next 2 tr. (2 tr. 2 dc. Ch 3. 2 dc. 2 tr) in next sc. Skip next 2 tr. Rep from * around. Join C with sl st to first sc. Break B
-
7th rnd: With C, ch 3 (counts as dc). *1 dc in each st to next ch-3 sp. (3 dc. Ch 1. 3 dc) in next ch-3 sp. Rep from * 3 times more. 1 dc in each st to end of rnd. Join with sl st to top of ch-3. Fasten off.
-
8th rnd: Join D with sl st to any ch-1 sp. Ch 6 (counts as 1 dc and ch-3 sp). 3 dc in same sp as last sl st. Ch 1. Skip next 2 dc. 3 dc in next dc. (Ch 1. Skip next 3 dc. 3 dc in next dc) 4 times. Ch 1. Skip next 2 dc. *(3 dc. Ch 3. 3 dc) in next ch-1 sp. Skip next 2 dc. 3 dc in next dc. (Ch 1. Skip next 3 dc. 3 dc in next dc) 4 times. Ch 1. Skip next 2 dc. Rep from * around. 2 dc in same ch-1 sp as first sl st. Join A with sl st to 3rd ch of ch-6. Break D.
-
9th rnd: With A, sl st in first ch-3 sp. Ch 6 (counts as 1 dc and ch-3). 3 dc in same sp as last sl st. Ch 1. (3 dc. Ch 1) in each ch-1 sp to next ch-3 sp. *(3 dc. Ch 3. 3 dc) in next ch-3 sp. Ch 1. (3 dc. Ch 1) in each ch-1 sp to next ch-3 sp. Rep from * around. 2 dc in same sp as first sl st. Join B with sl st to 3rd ch of ch-6. Break A.
-
Rep last rnd until Motif measures approx 18 (19-20)" [45.5 (48-51) cm] wide and cont in established color sequence; B, C, D, A.
-
Fasten off.

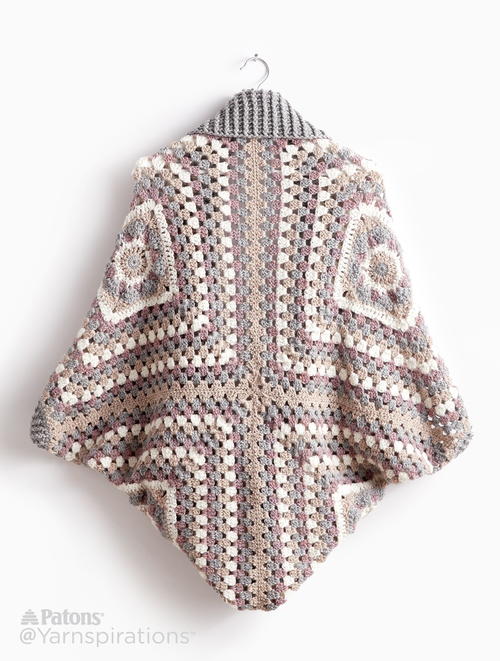
Assembly
(See Diagram 1 and 2 on Assembly Chart) Sew 4 Motifs tog using a flat seam to form a square. Fold work in half with WS facing and seam at top. Place markers 8" [20.5 cm] down from fold at each side. Sew side seams from marker to bottom using a flat seam.
Cuffs
-
With RS facing, join A with sl st to Armhole at side seam.
-
1st rnd: Ch 1. Work 56 sc evenly around entire Armhole opening. Join with sl st to first sc.
-
2nd rnd: Ch 3 (counts as dc). 1 dc in each sc around. Join with sl st to top of ch-3.
-
3rd rnd: Ch 2 (does not count as st). 1 dcfp around first dc. 1 dcbp around next dc. *1 dcfp around next dc. 1 dcbp around next dc. Rep from * around. Join with sl st to first dcfp.
-
4th rnd: Ch 2 (does not count as st). 1 dcfp around first dcfp. 1 dcbp around next dcbp. *1 dcfp around next dcfp. 1 dcbp around next dcfp. Rep from * around. Join with sl st to first dcfp.
-
Fasten off.
Ribbing
-
With RS facing, join A with sl st to Front opening at side center back seam.
-
1st rnd: Ch 1. Work 256 (266- 280) sc evenly around entire Front opening. Join with sl st to first sc.
-
2nd rnd: Ch 3 (counts as dc). 1 dc in each sc around. Join with sl st to top of ch-3.
-
3rd rnd: Ch 2 (does not count as st). 1 dcfp around first dc. 1 dcbp around next dc. *1 dcfp around next dc. 1 dcbp around next dc. Rep from * around. Join with sl st to first dcfp
-
4th rnd: Ch 2 (does not count as st). 1 dcfp around first dcfp. 1 dcbp around next dcbp. *1 dcfp around next dcfp. 1 dcbp around next dcfp. Rep from * around. Join with sl st to first dcfp
-
Rep last rnd until Ribbing measures 6" [15 cm]. Fasten off.
Project Diagrams
-
Click here to enlarge a chart of the project diagrams, or click here for bigger version.
-
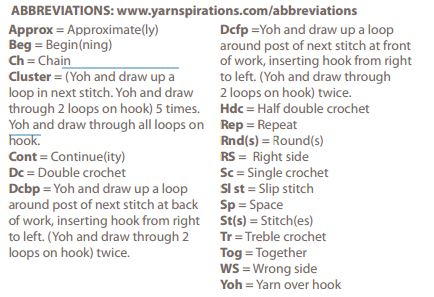
Click here to enlarge a chart of the abbreviations, or click here for the bigger version.
Read NextAlix Cardigan
Your Recently Viewed Projects

Thanks for your comment. Don't forget to share!
Delphine Bryant
Nov 14, 2018
Amazing! I love that this cardigan is made essentially with granny squares. These squares are really exquisite and I can not wait to start this pattern. The modifications are within the directions for my size and that is always a plus. Now I have to scour the internet looking for the material at a great price.
Morehouse17
Oct 29, 2018
I have seen these but not one as pretty as this one. Yarnspirations just went above and beyond all the rest with this cardigan pattern. There is a video on this site https://www.yarnspirations.com/patons-coziest-crochet-cardigan/PAC0128-001968M.html
achumley0003 31706 34
Nov 30, 2017
This is one of those extremely easy to make cocoon cardigans that are basically just a huge rectangle or square that is seamed for the armholes and then crocheted around. I like that this one uses granny squares joined together to make the big rectangle. I think this would be really comfortable and perfect for cold days that you just want to lounge around and be warm.
princess6860504
Sep 11, 2017
This is the perfect topper/sweater for those days when you just want to sit in and cozy up with a latte and the latest crochet project! But first, I would have to make this for myself. Really liking the neutrals used here. Pairing this with jeggings or jeans would look great.
AFC Editor Annalis a
Mar 17, 2017
This cardigan looks so trendy! It would be great both for a day of errands or a day of lounging around on the couch.
Report Inappropriate Comment
Are you sure you would like to report this comment? It will be flagged for our moderators to take action.
Thank you for taking the time to improve the content on our site.