This project was submitted by one of our readers, just like you.
Open Weave Crochet Summer Shawl

Open Weave Crochet Summer Shawl
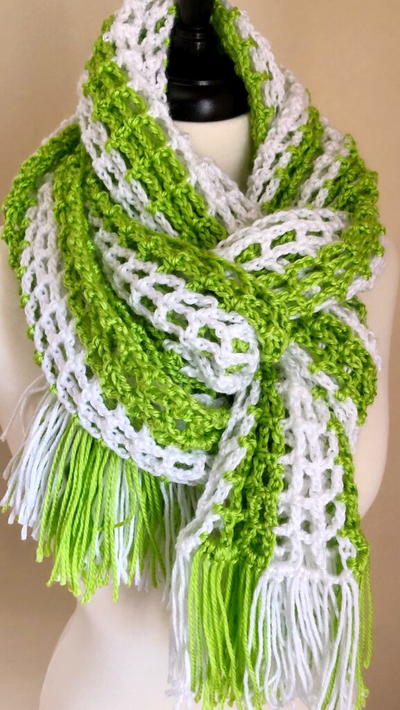
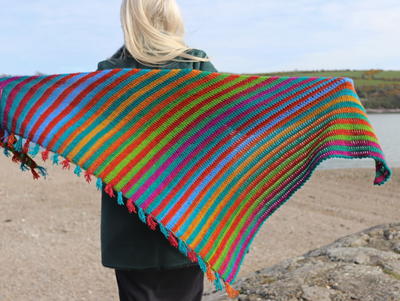
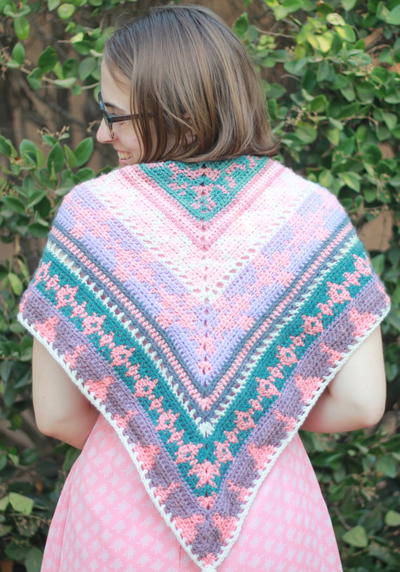
"Hot days and cool nights means it is time for a crochet open weave summer shawl. This pattern uses easy crochet stitches and two fresh yarn colors along with fun fringe to create a beautiful lacy shawl.This shawl is so pretty. It has a lovely drape and the fringe on the ends make it just feel flowy and luxurious. The color of green is so bright and fresh. Reminds me of a young lady that I was thinking of when making this pattern is easy going. She has an infectious, bright, sunny personality. "

Crochet HookJ/10 or 6 mm hook
Yarn Weight(4) Medium Weight/Worsted Weight and Aran (16-20 stitches to 4 inches)
Crochet Gauge16-20 stitches per 4 inches This crochet stitches are worked with the length of the shawl; a beginning chain of 261. To adjust the pattern length, make sure that the foundational chain is a multiple of 3 + 6. That means that the number of chains can be divided evenly by 3, then add 6.
Finished SizeThe length is approximately 66 inches long while the width is approximately 17 inches wide. Note: this is without the fringe added on.
Materials List
- White Caron Simply Soft Yarn, 1 Skein or 315 yards.
- Citrus Loops & Threads, Soft & Shiny Yarn, 1 1/2 Skeins or 460 yards.
- Size J Crochet Hook
- Yarn Needle
- Scissors
Instructions
-
Begin with a Chain of 261
-
Row 1: In the 6th CH from the hook, DC. [CH 2, SK 2, DC] Repeat between the [ ] to the end. Ending with a DC in the last ST. Turn.
-
Row 2: CH 5 (that is the CH 3 for a DC and CH 2). Skip 2 ST. DC in the top of the DC in the previous row. [CH2, SK 2, DC in the top of the DC in the previous row]. Repeat between the [ ] to the last DC. In the initial CH 6 area, complete a DC in the 2nd CH from the DC you just worked. Turn.
-
Row 3-33: CH 5 (that is the CH 3 for a DC and CH 2). Skip 2 ST. DC in the top of the DC in the previous row. [CH2, SK 2, DC in the top of the DC in the previous row]. Repeat between the [ ] to the last DC. In the initial CH 5 area, complete a DC in the 2nd CH from the DC you just worked. Turn.
Color Rows
Each color was worked for 3 rows.
- Citrus Rows 1-3
- White Rows 4-6
- Citrus Rows 7-9
- White Rows 10-12
- Citrus Rows 13-15
- White Rows 16-18
- Citrus Rows 19-21
- White Rows 22-24
- Citrus Rows 25-27
- White Rows 28-30
- Citrus Rows 31-33
Finishing: Use the yarn needle and weave in ends before adding the fringe.
Fringe
Cutting the Yarn: I wrap the yarn around something that is sturdy and 10 inches long. For me, this happens to be my Ipad. I don’t have to cut out any cardboard or make any other special template. The Ipad works perfectly. Wrap the yarn for number of times needed for the pieces of yarn needed. Note: for each wrap around, there will be two pieces once cut in half. Additionally, once the yarn is wrapped, you will need to cut the yarn on one end [making sure to hold the yarn securely]. Once one end is cut continue to hold securely and fold the yarn in half. Cut the folded end. You are now ready to begin adding the yarn to your scarf.
Each yarn piece length was approximately 5.5 inches long. (the Ipad length was 10 inches – each wrap around is 10 inches – cut in half = 5.5 inches). There are 18 Citrus squares and 15 White squares on each end of the shawl. I added 3 pieces of yarn in each square for the fringe to look flowy and full. Therefore cut the following:
Citrus: 18 squares X 2 (each end) = 36 X 3 (pieces of yarn in each square). = 108 pieces of yarn.
White: 15 squares X 2 (each end) = 30 X 3 (pieces of yarn in each square). = 90 pieces of yarn. Adding the Fringe
Take 1 pieces of yarn at a time. Align them so they are even and fold them in half. Start at the end of a row on one of the sides, insert your crochet hook in a hole in the stitches from below. Wrap the folded half of the yarn around the crochet hook and pull it through the hole in the stitches. Remove the crochet hook and use your fingers to reach through the loops of yarn that have been pulled through to grab the ends of the yarn that are still being held by your other hand. Pull those ends through the loop. Once the ends are pulled through, gently snug up the knot. Continue to work around the shawl adding the fringe.

Read NextThe Fairytale Shawl