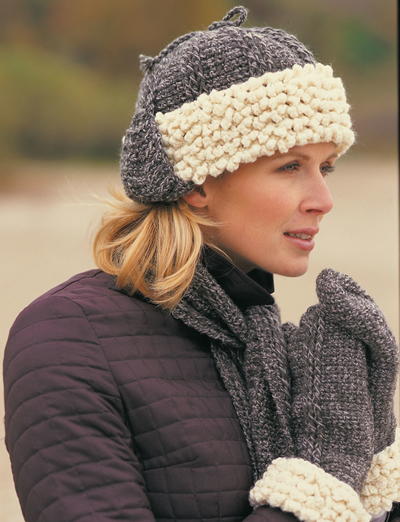
Sheepskin Winter Set

Be super comfortable and warm this season with this Sheepskin Winter Set. This project includes patterns for a hat, a scarf, and mittens all in one, meaning you can crochet all of your winter accessories in one place. Not only will they all match, but they will be the best crochet accessories you have this winter. The sheepskin pattern looks so cute and will make sure you stay warm every day, no matter how cold it is outside. Don't miss out on the perfect way to beat the cold!

Crochet Hook4.5 mm hook, I/9 or 5.5 mm hook
Yarn Weight(4) Medium Weight/Worsted Weight and Aran (16-20 stitches to 4 inches)
MATERIALS:
- Patons Classic Wool:
- MC: Aran (3 balls)
- A: Taupe (6 balls)
- Crochet Hooks (US 7 or 4.5 mm) and (I/9 or 5.5 mm)
SIZE:
Hat and Mittens: One size to fit average lady
Scarf: Approx. 71/2 ins (19 cm) wide x 50 1/2 ins (128.5 cm) long
GAUGE:
13 sc and 16 rows = 4 ins (10 cm) with 5.5 mm hook
WINTER SET
Hat
With larger hook and MC, ch 76.
1st row: (WS). 1 sc in 2nd ch from hook. 1 sc in each ch to end of ch. 75 sc. Turn.
**2nd row: Ch 1. 1 sc in first sc. *Draw up a loop in next sc. Ch 5. Yoh and draw through 2 loops on hook – picot sc made. 1 sc in next sc. Rep from * to end of row. Turn.
3rd row: Ch 1. 1 sc in first sc. *1 sc in next st. Picot sc in next st. Rep from * to last 2 sts. 1 sc in each of next 2 sts. [Note: Push picot sc to the back (RS) of work]. Turn.** Rep last 2 rows until work from beg measures 3 ins [7.5 cm] ending on a 2nd row.
Next row: Ch 1. 1 sc in each st to last 2 sts. Draw up a loop in each of next 2 sts. Yoh and draw through all 3 loops on hook – sc2tog made. 74 sc. Join A to last st. Break MC.
Reversing WS to RS for cuff turnback, proceed as follows:
1st row: (RS). 1 sc in each of first 4 sc. *[Yoh and draw up a loop around post of next st 2 rows below inserting hook from right to left. (Yoh and draw through 2 loops on hook) twice - 1 dcfp made] 3 times. 1 sc in each of next 6 sc. Rep from * to last 7 sts. (1 dcfp around next sc 2 rows below) 3 times. 1 sc in each of last 4 sts. Ch 1. Turn.
2nd row: 1 sc in each st to end of row. Ch 1. Turn.
3rd row: 1 sc in each of first 4 sc. *(1 dcfp around next dcfp 2 rows below) 3 times. 1 sc in each of next 6 sc. Rep from * to last 7 sts. (1 dcfp around next dcfp 2 rows below) 3 times. 1 sc in each of last 4 sc. Ch 1. Turn.
4th row: As 2nd row. Rep 3rd and 4th rows until work from turn-back row measures 5 ins [12.5 cm] ending with RS facing for next row.
Shape top:
1st row: 1 sc in each of first 4 sc. *(1 dcfp around next dcfp 2 rows below) 3 times. 1 sc in each of next 2 sts. Sc2tog over next 2 sts. 1 sc in each of next 2 sts. Rep from * to last 7 sts. (1 dcfp around next dcfp 2 rows below) 3 times. 1 sc in each of last 4 sts. Ch 1. Turn. 67 sts.
2nd and alt rows: 1 sc in each st to end of row. Ch 1. Turn.
3rd row: 1 sc in first st. Sc2tog over next 2 sts. 1 sc in next st. *(1 dcfp around next dcfp 2 rows below) 3 times. Sc2tog over next 2 sts. 1 sc in next st. Sc2tog over next 2 sts. Rep from * to last 7 sts. (1 dcfp around next dcfp 2 rows below) 3 times. 1 sc in next st. Sc2tog over next 2 sts. 1 sc in last st. Ch 1. Turn. 51 sts.
5th row: 1 sc in first st. Sc2tog over next 2 sts. *(1 dcfp around next dcfp 2 rows below) 3 times. 1 sc in next st. Sc2tog over next 2 sts. Rep from * to last 6 sts. (1 dcfp around next dcfp 2 rows below) 3 times. 1 sc in each of last 3 sts. Ch 1. Turn. 43 sts.
7th row: 1 sc in each of first 2 sts. *(1 dcfp around next dcfp 2 rows below) 3 times. Sc2tog over next 2 sts. Rep from * to last 6 sts. (1 dcfp around next dcfp 2 rows below) 3 times. Sc2tog over next 2 sts. 1 sc in last st. Ch 1. Turn. 35 sts.
9th row: Sc2tog over first 2 sts. *(Yoh and draw up a loop from right to left around stem of next dcfp 2 rows below. Yoh and draw through 2 loops on hook) 3 times. Yoh and draw through all loops on hook – 1 dcfp3tog made. 1 sc in next st. Rep from * to last 2 sts. Sc2tog over last 2 sts. 16 sts. Fasten off leaving a long end. Draw end through rem sts and fasten securely. Sew center back seam. Fold lower edge to RS and tack in place at seam.
Earflaps (make 2)
With A and larger hook, ch 15.
1st row: (RS). 1 sc in 2nd ch from hook. 1 sc in each ch to end of ch. 14 sc.
2nd and alt rows: Ch 1. 1 sc in each st to end of row. Turn.
3rd row: Ch 1. 1 sc in first sc. (1 dcfp around post of next st 2 rows below) 3 times. 1 sc in each of next 6 sc. (1 dcfp around post of next st 2 rows below) 3 times. 1 sc in last sc.
4th row: As 2nd row. Rep last 2 rows 3 times more.
Proceed as follows:
1st row: Ch 1. 1 sc in first st. (1 dcfp around post of next st 2 rows below) 3 times. Sc2tog over next 2 sts.1 sc in each of next 2 sts. Sc2tog over next 2 sts. (1 dcfp around post of next st 2 rows below) 3 times. 1 sc in last st. Turn. 12 sts.
2nd and alt rows: Ch 1. 1 sc in each st to end of row. Turn.
3rd row: Ch 1. 1 sc in first st. (1 dcfp around post of next st 2 rows below) 3 times. (Sc2tog over next 2 sts) twice. (1 dcfp around post of next st 2 rows below) 3 times. 1 sc in last st. Turn. 10 sts.
5th row: Ch 1. 1 sc in first st. (1 dcfp around post of next st 2 rows below) 3 times. Sc2tog over next 2 sts. (1 dcfp around post of next st 2 rows below) 3 times. 1 sc in last st. Turn. 9 sts.
7th row: Ch 1. 1 sc in first st. 1 dcfp3tog around posts of each of next 3 sts 2 rows below. Miss next st. 1 dcfp3tog around posts of each of next 3 sts 2 rows below. 1 sc in last st. Turn. 4 sts.
9th row: Ch 1. Draw up a loop in each st across. Yoh and draw through all loops on hook. Fasten off.
Sew Earflaps to Hat as illustrated.
Twisted cord: (Make 2).
Cut 2 strands of A 23 ins [33 cm] long. With both strands tog hold one end and with someone holding other end, twist strands to the right until they begin to curl. Fold the 2 ends tog and tie in a knot so they will not unravel. The strands will now twist themselves tog. Adjust length if desired. Sew one twisted cord to point of each Earflap.
Scarf
With MC and larger hook, ch 26.
1st row: (RS). 1 sc in 2nd ch from hook. 1 sc in each ch to end of ch. 25 sc. Turn. Work from ** to ** as given for Hat. Rep last 2 rows until work from beg measures 3½ ins [9 cm] ending on a 3rd row. Break MC.
Proceed as follows:
1st row: (RS). With A, ch 1. 1 sc in each st to end of row. Turn.
2nd row: Ch 1. 1 sc in each st to end of row. Turn.
3rd row: Ch 1. 1 sc in each of first 2 sc. [(1 dcfp around post of next st 2 rows below) 3 times. 1 sc in each of next 6 sc] twice. (1 dcfp around post of next st 2 rows below) 3 times. 1 sc in each of last 2 sc. Turn.
4th row: As 2nd row. Rep 3rd and 4th rows until work from beg measures 47 ins [119.5 cm], ending with RS facing for next row. Change to MC and work from ** to ** as given for Hat. Rep last 2 rows until work from beg measures 50½ ins [128.5 cm] ending on a 3rd row. Fasten off.
Mittens
Right Mitten
***With MC and smaller hook, ch 34.
1st row: (RS). 1 sc in 2nd ch from hook. 1 sc in each ch to end of ch. 33 sc. Turn. Work from ** to ** as given for Hat. Rep last 2 rows until work from beg measures 2 ins [5 cm] ending on a 2nd row.
Next row: Ch 1. Sc2tog over first 2 sts. 1 sc in each st to end of row. 32 sc. Join A to last st. Break MC.***
Reversing WS to RS for cuff turnback, proceed as follows:
1st row: With A, ch 1. 1 sc in each st to end of row. Turn.
2nd row: Ch 1. 1 sc in each st to end of row. Turn.
3rd row: Ch 1. 1 sc in each of first 6 sc. (1 dcfp around post of next st 2 rows below) 3 times. 1 sc in each of next 23 sc. Turn.
4th row: As 2nd row. Last 2 rows form ridge pat. Cont in ridge pat until Mitten above cuff measures 2½ ins [6 cm], ending with RS facing for next row.
Keeping cont of ridge pat, proceed as follows to shape thumb gusset:
1st row: Ch 1. Pat 16 sts. 2 sc in next st. 1 sc in next st. 2 sc in next st. 1 sc in each of next 13 sts. Turn.
2nd row: Ch 1. 1 sc in each of first 13 sts. 2 sc in next st. 1 sc in each of next 3 sts. 2 sc in next st. Pat 16 sts. Turn.
3rd row: Ch 1. Pat 16 sts. 2 sc in next st. 1 sc in each of next 5 sts. 2 sc in next st. 1 sc in each of next 13 sts. Turn.
4th row: Ch 1. 1 sc in each of first 13 sts. 2 sc in next st. 1 sc in each of next 7 sts. 2 sc in next st. Pat 16 sts. Turn.
5th row: Ch 1. Pat 16 sts. 2 sc in next st. 1 sc in each of next 9 sts. 2 sc in next st. 1 sc in each of next 13 sts. Turn.
6th row: Ch 1. 1 sc in each of first 13 sts. 2 sc in next st. 1 sc in each of next 11 sts. 2 sc in next st. Pat 16 sts. Turn.
7th row: Ch 1. Pat across all sts. Turn.
8th row: Ch 1. 1 sc in each of first 13 sts. Ch 1 (place marker for Thumb). Miss next 15 sts. Pat 16 sts. Turn.
9th row: Ch 1. Pat 16 sts. 1 sc in next ch 1. 1 sc in each sc to end of row. 30 sts. Turn.
Cont in ridge pat until Mitten after cuff turn-back measures 8 ins [19.5 cm], ending with RS facing for next row.
****Proceed as follows:
1st row: Ch 1. Draw up a loop in each of first 2 sts. Yoh and draw through 3 loops on hook – sc2tog made. (Pat next 12 sts. Sc2tog over next 2 sts) twice. 27 sts. Turn.
2nd and alt rows: Ch 1. Pat to end of row. Turn.
3rd row: Ch 1. Sc2tog over first 2 sts. Pat next 10 sts. (Sc2tog over next 2 sts) twice. Pat next 10 sts. Sc2tog over next 2 sts. 23 sts. Turn.
5th row: Ch 1. Sc2tog over first 2 sts. Pat next 8 sts. (Sc2tog over next 2 sts) twice. Pat next 8 sts. Sc2tog over next 2 sts. 19 sts. Turn.
7th row: Ch 1. Sc2tog over first 2 sts. Pat next 6 sts. (Sc2tog over next 2 sts) twice. Pat next 6 sts. Sc2tog over next 2 sts. 15 sts. Fasten off.
Sew top and side seam.
Thumb: With RS of work facing, join A with sl st at ch 1 marker for Thumb.
1st rnd: Ch 1. 1 sc in same sp as sl st. 1 sc in each sc around. Join with sl st to first sc. 16 sc. Rep last rnd until Thumb measures 2½ ins [6 cm].
Next rnd: Ch 1. (Sc2tog over next 2 sts) 8 times. 8 sts.
Next rnd: Ch 1. Draw up a loop in each of next 8 sts. Yoh and draw through all loops on hook. Fasten off.****
Left Mitten
Work from *** to *** as given for Right Mitten.
Reversing WS to RS for cuff turnback, proceed as follows:
1st row: With A, ch 1. 1 sc in each st to end of row. Turn.
2nd row: Ch 1. 1 sc in each st to end of row. Turn.
3rd row: Ch 1. 1 sc in each of first 23 sc. (1 dcfp around post of next st 2 rows below) 3 times. 1 sc in each of next 6 sc. Turn.
4th row: As 2nd row. Last 2 rows form ridge pat. Cont in ridge pat until Mitten above cuff measures 2½ ins [6 cm], ending with RS facing for next row.
Keeping cont of ridge pat, proceed as follows to shape thumb gusset:
1st row: Ch 1. Pat 13 sts. 2 sc in next st. 1 sc in next st. 2 sc in next st. Pat 16 sts. Turn.
2nd row: Ch 1. Pat 16 sts. 2 sc in next st. 1 sc in each of next 3 sts. 2 sc in next st. Pat 13 sts. Turn.
3rd row: Ch 1. Pat 13 sts. 2 sc in next st. 1 sc in each of next 5 sts. 2 sc in next st. Pat 16 sts. Turn.
4th row: Ch 1. Pat 16 sts. 2 sc in next st. 1 sc in each of next 7 sts. 2 sc in next st. Pat 13 sts. Turn.
5th row: Ch 1. Pat 13 sts. 2 sc in next st. 1 sc in each of next 9 sts. 2 sc in next st. Pat 16 sts. Turn.
6th row: Ch 1. Pat 16 sts. 2 sc in next st. 1 sc in each of next 11 sts. 2 sc in next st. Pat 13 sts. Turn.
7th row: Ch 1. Pat across all sts. Turn.
8th row: Ch 1. Pat 16 sts. Ch 1 (place marker for Thumb). Miss next 15 sts. Pat 13 sts. Turn.
9th row: Ch 1. Pat 13 sts. 1 sc in next ch 1. Pat to end of row. 30 sts.Turn.
Cont in ridge pat until Mitten after cuff turn-back measures 8 ins [19.5 cm], ending with RS facing for next row.
Work from **** to **** as given for Right Mitten.
Read Next24 Light and Lacy Crochet Patterns
Your Recently Viewed Projects
Thanks for your comment. Don't forget to share!
Morehouse17
Dec 30, 2017
This sheepskin winter set really looks great! I do not live in a climate that merits me making this for myself but I have a lot of family that lives up north and they all would love to have this set. I will never have enough time to make one for all of them so this may be the perfect Secret Santa gift if I pull one of their names.
JaneEK
Nov 30, 2017
I love the shearling look (I just bought a pair of half boots with a sheepskin lining), but this is another one of those projects where its almost impossible for me to slog through all this text. The pattern at the Paton site isnt much better but at least the font is formatted to make it easier to read. I was hoping there might be a YouTube video but I havent found one yet.
Cheryl Y
Oct 18, 2017
Wow this Sheepskin Winter Set is Beautiful! I have been crocheting for 30 years now and hope I'm good enough to make these. After reading the written pattern right here on this page, I think I can do these. The patterns are well written and easy to follow. I need to go back to the yarn store and buy the yarn and get started. Fingers crossed I can do this. Thank you so much for this free crochet pattern set.
Report Inappropriate Comment
Are you sure you would like to report this comment? It will be flagged for our moderators to take action.
Thank you for taking the time to improve the content on our site.