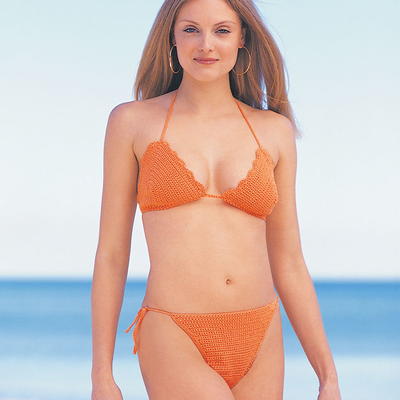
Basic Crochet Bikini

Hit the beach in style this summer! You'll definitely turn heads as you walk along the sandy shores wearing this Basic Crochet Bikini. Three different sizes are available to choose from. The basic design of this crochet pattern features a halter top and a classic cut bottom, making this a timeless bathing suit that you'll want to wear every summer. Choose your favorite color of ultra soft cotton yarn to complete this easy crochet pattern.

Crochet HookB/1 or 2.25 mm hook
Yarn Weight(3) Light/DK (21-24 stitches to 4 inches)
MATERIALS:
- Patons Grace Yarn: 3 skeins for size A, B; 4 skeins for size C
- Size 2.25 mm (U.S. B or 1) crochet hook or size needed to obtain tension.
- Invisible elastic thread for Bottom.
SIZE:
Three sizes available to fit cup size: A, B, C
GAUGE:
24 sc and 28 rows = 4 ins [10 cm].
INSTRUCTIONS:
The instructions are written for smallest size. If changes are necessary for larger sizes the instructions will be written thus ( ).
TOP
Cup (make 2).
Ch 15 (16-20).
1st row: (RS). 1 sc in 2nd ch from hook. 1 sc in each ch to last ch. 5 sc in last ch. Mark center sc. Do not turn. Working into other side of ch, work 1 sc in each rem loop of ch to end of ch. Turn. 31 (33-41) sc.
2nd row: Ch 1. 1 sc in each sc to end of row. Turn.
3rd row: Ch 1. 1 sc in each sc to center sc. 5 (5-3) sc in center sc. 1 sc in each sc to end of row. Turn.
4th row: As 2nd row.
5th row: Ch 1. 1 sc in each sc to center sc. 3 sc in center sc. 1 sc in each sc to end of row. Turn.
Rep last 4 rows 4 (5-6) times more, then 2nd row once. 61 (69-69) sc.
All sizes: Next row: (WS). 1 sc in each of next 3 (4-4) sc. *Ch 1. Miss next sc. 1 sc in each of next 2 sc. Rep from * to last 1 (2- 2) sc. 1 sc in each of last 1 (2-2) sc. Turn.
Next row: Ch 1. 1 sc in each of first 1 (2-2) sc. *5 dc in next ch-1 sp. 1 sc in next ch-1 sp. Rep from * to last 3 (4-4) sc. 1 sc in each of last 3 (4-4) sc. Fasten off.
Join Cups and Make Ties: Ch 95. With WS of work facing, work 28 (28- 30) sc evenly across bottom of first Cup. Ch 4. Work 28 (28-30) sc evenly across bottom of second Cup. Ch 96. Turn.
Next row: Sl st in 2nd ch from hook. Sl st in each of next 94 ch. 1 sc in each of next 28 (28-30) sc. 1 sc in each of next 4 ch. 1 sc in each of next 28 (28- 30) sc. Sl st in each of next 95 ch. Fasten off.
Neck Ties: With RS of work facing, join yarn with sl st to top center 5 dc group. Ch 106. Sl st in 2nd ch from hook. Sl st in each ch to end of ch. Fasten off.
Rep for Second Cup.
BOTTOM
Back: Ch 63.
1st row: 1 sc in 2nd ch from hook. 1 sc in each ch to end of ch. 62 sc. Turn.
2nd row: Ch 1. 1 sc in each sc to end of row. Turn.
Rep last row 7 times more.
Back shaping: 1st row: (RS). Draw up a loop in each of first 2 sts. Yoh and draw through all loops on hook – sc2tog made. 1 sc in each sc to last 2 sc. Sc2tog over last 2 sc. Turn.
2nd row: Ch 1. 1 sc in each st to end of row. Turn.
Rep last 2 rows until there are 14 sc, ending with RS facing for next row.
Next row: Ch 1. 1 sc in each sc to end of row. Turn.
Rep last row 19 times more.
Front shaping: Next row: Ch 1. 2 sc in first sc. 1 sc in each sc to last sc. 2 sc in last sc. Turn.
Next 2 rows: Ch 1. 1 sc in each sc to end of row. Turn.
Rep last 3 rows 13 times more. 42 sc. Fasten off.
Back Edging and Side Ties: 1st row: Ch 55. With RS of work facing, sl st in first ch of foundation ch on Back. Ch 1. 1 sc in each ch of foundation ch. Ch 56. Turn.
2nd row: Sl st in 2nd ch from hook. Sl st in each of next 54 ch. 1 sc in each sc across Back. sl st in each of next 55 ch. Fasten off.
Rep for Front Edging and Side Ties.
Leg Edging: 1st row: With RS of work facing, join yarn with sl st to Front Side edge where Tie is joined. Ch 1. Work 1 row of sc evenly along Leg Opening. Turn.
2nd row: Ch 1. 1 sc in each sc to end of row. Fasten off.
Rep for second Leg Edging, joining yarn with sl st to Back Side edge where tie is joined.
Thread invisible elastic through last sc row of Back, Front and Leg Edgings.
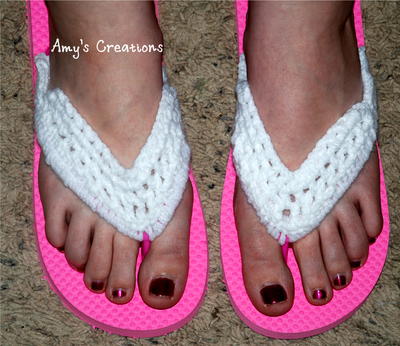
Read NextCrochet Flip Flop Cover
Your Recently Viewed Projects
Thanks for your comment. Don't forget to share!
ahookersworld 7486 272
May 30, 2014
Doh! I found the pattern on Ravelry and thanks to a very detailed image realize my error: instead of working across the foundation horizontally, I should be working around vertically. The pattern should be more clear and to allfreecrochet.com, hence the need for bigger pictures, which I've been saying all along. Hooker Leo AHooker'sWorld.com
ahookersworld 7486 272
May 30, 2014
I am restarting this pattern and decided to double check my projected stitch count before having to frog it once again. I have had a friend check my math and I am short 8 stitches for the C cup, using the center of the original 19 sc; and 6 stitches short using the center, incorporating two scs from the 5 at the end. I have searched the patons website, ravelry, and allfreecrochet trying to find errata. Neither patons or ravelry have the pattern on their website and I cannot find an errata link on allfreecrochet. I do not recommend pattern, based on above findings. Hooker Leo AHookersWorld.com
irishrose74
Mar 18, 2014
Does anyone know how I would go about adjusting this for a D cup?
olivepoetry 107241 8
Mar 20, 2014
in the past, I've done these and just added a couple of rows of edging to the outside to make the cups larger. I've also had trouble getting the bottoms to fit right, but the top alone is nice with jeans or shorts.
Report Inappropriate Comment
Are you sure you would like to report this comment? It will be flagged for our moderators to take action.
Thank you for taking the time to improve the content on our site.