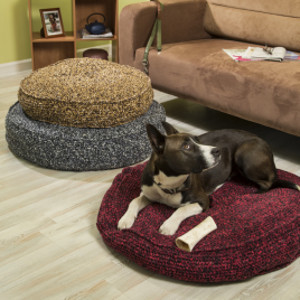
Striped Patio Pillows
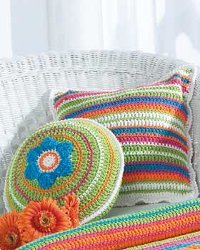
Crochet some striped patio pillows to decorate your chairs with. They'll add plenty of design and color. It's time to relax. You can also use them indoors.

Crochet HookG/6 or 4 mm hook
Yarn Weight(4) Medium Weight/Worsted Weight and Aran (16-20 stitches to 4 inches)
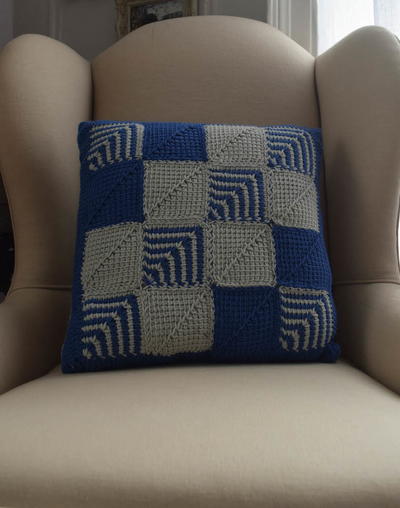
SQUARE PILLOW
Approx 14 ins [35.5 cm] square.
ROUND PILLOW
Approx 12 ins [30.5 cm] diameter.
MATERIALS
- Bernat® Handicrafter Cotton (50 g/1.75 oz)
- Size 4 mm (U.S. G or 6) crochet hook or size needed to obtain gauge.
- Pillow form 14 ins [35.5 cm] square and Pillow form 12 ins [30.5 cm] round.
SQUARE PILLOW
-
Main Color (MC)(White) 3 balls
Contrast A (Green) 2 balls
Contrast B (Orange) 2 balls
Contrast C (Pink) 2 balls
Contrast D (Blue) 2 balls
ROUND PILLOW
-
Main Color (MC) (White) 1 ball
Contrast A (Green) 3 balls
Contrast B (Orange) 1 ball
Contrast C (Pink) 1 ball
Contrast D (Blue) 1 ball
GAUGE
14 sc and 16 rows = 4 ins [10 cm].
INSTRUCTIONS
Note: When changing colors, work to last 2 loops on hook of last st, then draw new color through rem 2 loops and proceed.
SQUARE PILLOW
FRONT and BACK (make alike)
With MC, ch 51.
1st row: (RS). 1 dc in 4th ch from hook (counts as 2 dc). 1 dc in each ch across. 49 sts. Join A. Turn.
2nd row: With A, ch 1. 1 sc in each dc across. Join MC. Turn.
3rd row: With MC, ch 3 (counts as dc). 1 dc in each sc across. Join A. Turn.
4th row: As 2nd row. Join B. Turn.
5th row: With B, as 3rd row. Join C. Turn.
6th row: With C, as 2nd row. Join D. Turn.
7th row:With D, as 3rd row. Join C. Turn.
8th row: With C, as 2nd row. Join A. Turn.
9th row:With A, as 3rd row. Join MC. Turn.
10th row: With MC, as 2nd row. Join A. Turn.
11th row: As 9th row.
12th row: With MC, as 2nd row. Join C. Turn.
13th row: With C, as 3rd row. Join B. Turn.
14th row: With B, as 2nd row. Join D. Turn.
15th row: With D, as 3rd row. Join B. Turn.
16th row:With B, as 2nd row. Join MC. Turn.
17th row: With MC, as 3rd row. Join A. Turn.
Rep 2nd to 17th rows for Stripe Pat until work from beg measures approx 14 ins [35.5 cm] ending with RS facing for next row. Fasten off.
Edging: With RS facing, join MC with sl st to any corner of Front or Back and work 1 row of sc evenly around outer edge, working 3 sc in corners. Join with sl st to first sc. Fasten off.
Joining Front and Back: With WS facing each other, pin 3 sides of Front and Back tog. Join MC with sl st at any corner of Front. Ch 1. Working through both thicknesses, 1 sc in each sc along 3 sides of Pillow having 3 sc in corners. Insert pillow form.
Complete rnd of sc. Join with sl st to first sc.
2nd rnd: Ch 1. Working from left to right, instead of from right to left as usual, work 1 reverse sc in each sc around. Join with sl st to first sc. Fasten off.
ROUND PILLOW
FRONT
With MC, ch 2.
1st rnd: 6 sc in 2nd ch from hook. Join with sl st to first sc.
2nd rnd: Ch 1. 2 sc in each sc around. Join B with sl st to first sc. 12 sc.
3rd rnd: With B, ch 1. 2 sc in first sc. *1 sc in next sc. 2 sc in next sc. Rep from * to last sc. 1 sc in last sc. Join MC with sl st to first sc. 18 sc.
4th rnd: With MC, ch 1. 2 sc in first sc. *1 sc in each of next 2 sc. 2 sc in next sc. Rep from * to last 2 sc. 1 sc in each of last 2 sc. Join with sl st to first sc. 24 sc. Fasten off.
FLOWER
First Petal: 1st row: Join D with sl st to front loop only of any sc.
**Ch 1. 2 sc in same sp as sl st. 2 sc in front loops only each of next 3 sc. 8 sc for petal. Turn.
Next 7 rows: Ch 1. 1 sc in each sc of petal. Turn.
Next row: Ch 1. Draw up a loop in each of next 2 sts. Yoh and draw through all 3 loops – sc2tog made. 1 sc in each of next 4 sc. Sc2tog over last 2 sc. Turn.
Next row: Ch 1. Sc2tog over first 2 sts. 1 sc in each of next 2 sc. Sc2tog over last 2 sts. Turn.
Next row: Ch 1. (Sc2tog over next 2 sts) twice. Turn.
Next row: Ch 1. Sc2tog over first 2 sts. Fasten off.**
Second Petal: ***Rejoin D with sl st to front loop of next
unworked sc of 4th rnd. Rep from ** to ** once.***
Third to Sixth Petals: Rep from *** to *** 4 times more. 6 petals.
5th rnd: Join A with sl st to rem back loop of any sc of 4th rnd. Ch 3. 1 dc in same sp as sl st. *1 dc in next sc. 2 dc in next sc. Rep from * to last sc. 1 dc in last sc. Join MC with sl st to top of ch 3. 36 dc.
6th rnd: With MC, ch 1. 1 sc in each dc around. Join A with sl st to first sc.
7th rnd: Ch 3. 1 dc in next sc. *2 dc in next sc. 1 dc in each of next 2 sc. Rep from * to last sc. 2 dc in last sc. Join B with sl st to top of ch 3. 48 dc.
8th rnd: With B, ch 1. 1 sc in each dc around. Join A with sl st to first sc.
9th rnd: With A, ch 3. 1 dc in next sc. *2 dc in next sc. 1 dc in each of next 3 sc. Rep from * to last 2 sc. 1 dc in next sc. 2 dc in last sc. Join C with sl st to top of ch 3. 60 dc.
10th rnd: With C, ch 1. 1 sc in each dc around. Join A with sl st to first sc.
11th rnd: With A, ch 3. 1 dc in next sc. *2 dc in next sc. 1 dc in each of next 2 sc. Rep from * to last sc. 2 dc in last sc. Join MC with sl st to top of ch 3. 80 dc.
12th rnd:With MC, ch 1. 1 sc in each dc around. Join A with sl st to first sc.
13th rnd: With A, ch 3. 1 dc in next sc. *2 dc in next sc. 1 dc in each of next 4 sc. Rep from * to last 3 sc. 2 dc in next sc. 1 dc in each of last 2 sc. Join B with sl st to top of ch 3. 96 dc.
14th rnd: With B, ch 1. 1 sc in each dc around. Join A with sl st to first sc.
15th rnd: With A, ch 3. 1 dc in next sc. *2 dc in next sc. 1 dc in each of next 5 sc. Rep from * to last 4 sc. 2 dc in next sc. 1 dc in each of last 3 sc. Join MC with sl st to top of ch 3. 112 dc.
16th rnd: With MC, ch 1. 1 sc in each dc around. Fasten off.
Using yarn ends from each petal, sew around outer edges of petals.
BACK
With A, work 15 rnds as given for Front, omitting all references to color changes and Flower.
Next rnd:With MC, ch 1. 1 sc in each dc around. Fasten off.
Place Front and Back with WS facing each other. Join MC with sl st to any sc. Working through both thicknesses, ch 1. 1 sc in same sp as last sl st. Work in sc around, leaving opening for pillow form.
Insert pillow form. Complete rnd of sc. Join with sl st to first sc.
Next rnd: Ch 1. Working from left to right instead of from right to left as usual, work 1 reverse sc in each sc around. Join with sl st to first sc. Fasten off.
Read NextOff White Ruffle Rose Pillow
Your Recently Viewed Projects
Thanks for your comment. Don't forget to share!
Morehouse17
Aug 31, 2017
No matter if these pillows are used in the house or outside, if making with the material list provided you will have a big pop of color that makes you smile. These are bright and cheery. I love them and I love the cotton yarn.
Hippie Chick
Jun 22, 2017
h yay another project with Bernat cotton yarn. Love that yarn. My patio certainly can use a little face lift, but with no money in the budget this year, I can use my yarn stash and crochet these beautiful pillows and toss them on the wicker patio furniture. Its the time of the year for patio parties.
JaneEK
May 27, 2017
My patio furniture is just plain dark green or drab white, so they definitely need a little pop of color. These pillows will be just the thing to grab when Im out on my deck, book in hand, enjoying a nice summer day. Who am I kidding? Ill still be on my chaise lounge, but Ill be crocheting as usual.
Delphine Bryant
May 22, 2017
More than the pattern, I am loving the colors selected to crochet these pillows. I love color and these scream "Summer Time". I like using cotton yarn in my projects because it is easier to work with. Right now, I have no patio but I can sure use these in the house also.
3cats2love
Apr 27, 2017
These look like fun pillows to make. I like that they are made with cotton yarn so you can wash them when needed. I would probably make them into stash buster pillows and use whatever leftover yarns I happened to have, and would probably make my own pillow forms for inside.
princess6860504
Dec 21, 2016
I like these patio pillows because of the bright colored stripes and the mix of shapes. I only wonder how colorfast they would be outdoors? Obviously you would not leave them outside all the time, but I wonder if there is a fabric protectant spray you could put on there to guard against sun fading? Otherwise, these are super cute!
Daughter of Light
Mar 14, 2017
I agree, these brightly colored pillows in all these shapes are definitely winners! I don't know of a fabric protectant that would keep them sun-proof outside but I can sure see these in a multi-whites or neutral sunroom. They would sure add a non-stop splash of color!
Polanegra 1937741
Oct 03, 2013
Use some inexpensive, yet sturdy yarn. If the pillow becomes wet or dirty toss it in a net bag and wash with mild detergent on a gentle cycle. Dry on a low heat setting or dry outdoors,,, especially where there is a nice breeze,,,, keep out of the sun to deter fading.
kimklunsford 74709 97
Jun 23, 2013
These are really cute and summer looking but if they got wet outside on a patio they would be ruined.
Report Inappropriate Comment
Are you sure you would like to report this comment? It will be flagged for our moderators to take action.
Thank you for taking the time to improve the content on our site.