This project was submitted by one of our readers, just like you.
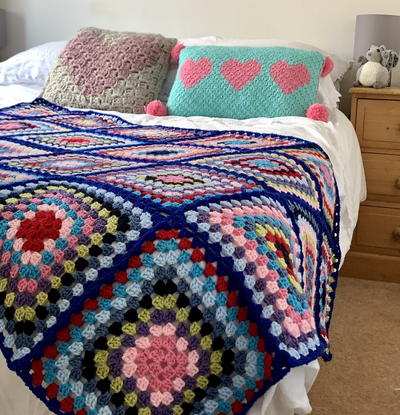
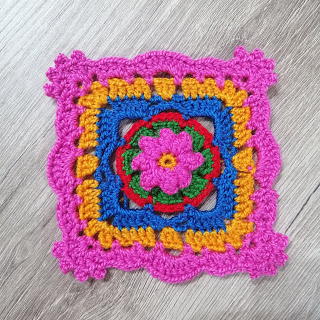
Simple Loop Granny Square Crochet Blanket

Simple Loop Granny Square Crochet Blanket
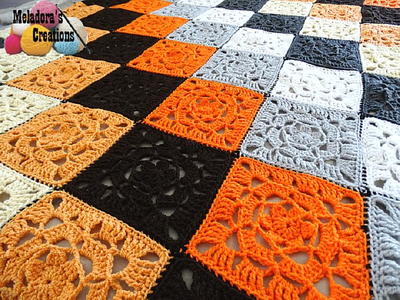
"This simple loop granny square crochet border is just one way to beautifully finish off a blanket. There is just something addicting about a granny square blanket. Once you get the hang of it, the possibilities are endless. Switch up the yarn colors, change the crochet edge, or even add in a few new styled granny squares. They are just so versatile and gorgeous. I spent most of last winter crocheting the squares. The end result was not in sight. I just kept making squares in colors that I thought worked well together. Then after joining them, it was fun to be creative the have a completely different overall look to each blanket as the edge was finished.This crochet pattern includes the directions to the crochet border, a video on how to crochet the granny square and complete the invisible join for joining the squares too."
NotesA total of 20 squares. 10 squares with four rounds of perfect pink and two rounds of charcoal grey. 10 squares with four rounds of charcoal grey and two rounds of dusty grey.
The blanket is four squares wide and five squares long.

Crochet HookH/8 or 5 mm hook
Yarn Weight(4) Medium Weight/Worsted Weight and Aran (16-20 stitches to 4 inches)
Crochet GaugeEach square is approximately 6 3/4 inches around.Six rounds.
Finished SizeSize is approximately 31 inches wide by 39 inches long.
Materials List
- Perfect Pink Red Heart. 1 Skein or 364 yards.
- Charcoal Red Heart. 3 Skeins or 1092 yards.
- Dusty Grey Red Heart. 2 Skeins or 728 yards.
- Size H crochet hook
- Scissors
- Yarn Needle
Instructions
Begin by making a Magic Circle.
-
Round 1: For this round, you will be working inside the magic circle. chain 3 and count this chain 3 as your first DC of this round and throughout the entire pattern. Continuing working in the ring, work 2 DC. Then chain 3. 3 DC, CH 3, 3DC, CH3, 3DC, CH3 and join into the top of the beginning chain. This join completes the first shell of the first round. (note, you should have 4 clusters of 3 DC with 4 areas of CH 3 between)
-
Round 2: Make 4 CH, this will count as your first DC plus a 1 CH. Then in the first CH 3 space, work *3 DC, 3 CH, 3 DC and CH 1*. Continue the stitch pattern between the * until the last 3-ch space. In the last CH 3 SP, work the 3 DC, 3 CH, then work only 2 DC and join with a SL into the 3rd chain of the beginning CH. This join will complete the last shell of the round. You should have 8 shells and 8 chain 3 spaces.
-
Round 3: Make 3 CH, then Insert the hook into the CH 1 SP from the previous row, (should be right where the previous row ended). YO and work a DC, Insert hook again, YO and DC. (This completes your first 3 DC in the round). CH 1. In the corner CH 3 SP work *3 DC, 3 CH, 3 DC. and 1 ch. In the next 1-ch space work 3 DC and 1 CH. Repeat from * until all 4 sides are complete. After the last DC in the CH 3 space CH 1 and SL ST into the top ST of the first DC of this round. You should have 12 shells and 12 spaces after the completion of this round.
-
Round 4-6: Repeat rounds 2 and 3.
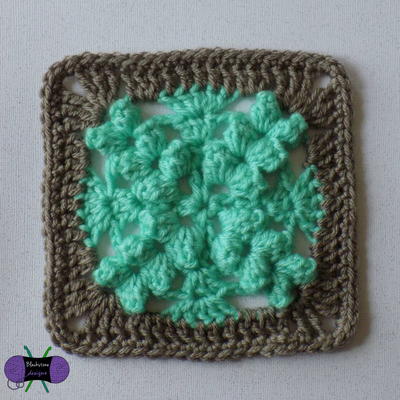
Granny Square Color
Granny Square Color
Remember, in this granny square, the pink is done for the first 4 rounds, then rounds 5 and 6 it is the charcoal.
For the grey square, it is 4 rounds of the charcoal and 2 rounds of the dusty grey.
I made 10 of each square.
Finishing Each Square: Pull the yarn through the last ST. Using the yarn needle, weave the yarn back and forth through the crochet stitches until a bit snug. cut off excess.
Invisible Join Written Directions
Step-by-Step Joining Directions
Starting in the horizontal thread inside the chain in the corner stitch, insert the yarn needle and pull the yarn through. (don’t snug up the yarn just yet).
In the opposite square and insert the yarn needle into the next horizontal yarn piece in the next stitch.
Come back to the first square and insert the yarn needle into the next horizontal yarn piece in the next stitch.
Continue for 2 or 3 more horizontal yarn stitches.
Then holding the starting yarn stitch in the corner, pull the yarn snug.
Your granny squares will be snug and invisibly joined for the stitches that you have worked. Continue moving back and forth between the two squares and weaving the yarn through the horizontal stitches.
Every 3 or 4 stitches, pull the yarn snug.
Align the Corners
Insert the yarn needle in all the corner stitches of the squares being joined together, and pull through the yarn. Then continue weaving back and forth through the horizontal stitches.
Every 3 or 4 stitches, pulling the yarn snug.
Weave in the Yarn Ends
Before working on the border, I took the time to weave in all the yarn pieces using the yarn needle.
Crochet Border Directions
-
Round 1: Join Dusty Grey in a previous row CH 1 SP. CH 3 (counts as a DC), 2 DC. CH 1, in the next CH 1 SP, complete 3 DC. [CH 1 SK 3 DC. and complete 3 DC in previous CH 1 SP] Repeat between [ ] to corner. CH 1 and in the corner complete 3 DC, CH 3, 3 DC. After corner, continue on the side with [CH 1 SK 3 DC. and complete 3 DC in previous CH 1 SP]. Repeat between [ ] to the second corner. CH 1 and in the corner complete 3 DC, CH 3, 3 DC. After corner, continue on the side with [CH 1 SK 3 DC. and complete 3 DC in previous CH 1 SP]. Repeat between [ ] to the third corner. CH 1 and in the corner complete 3 DC, CH 3, 3 DC. After corner, continue on the side with [CH 1 SK 3 DC. and complete 3 DC in previous CH 1 SP]. Repeat between [ ] to the fourth corner. CH 1 and in the corner complete 3 DC, CH 3, 3 DC. After corner, continue on the side with [CH 1 SK 3 DC. and complete 3 DC in previous CH 1 SP]. Repeat between [ ] to the beginning CH 3. end with a CH 1 and SL ST into the top CH of the initial CH 3.
-
Round 2: Join Charcoal yarn in a previous row CH 1 SP. Complete SC. CH 3, SK 3 DC, SC in previous row CH 1 SP. [CH 3 SK 3 DC, SC in previous row CH 1 SP]. Repeat between [ ] until the corner. In the corner complete CH 3, SK 3 DC, SC in previous row CH 3 SP. CH 3, and complete SC in CH 3 SP again. CH 3, SK 3 DC SC in previous row CH 1 SP. Continue onto the second side [CH 3, SK 3 DC, SC in previous row CH 1 SP]. Repeat between [ ] until the corner. Repeat the side and corner stitches until all 4 corners are complete and the sides are complete. Join with a SL ST into the first SC.
-
Round 3: In this row, you will be working inside of the previous row CH 3 SP.
Join Dusty Grey yarn in a previous row CH 3 SP. CH 3 (counts at first DC), 2 DC, CH 1, [in CH 3 SP, complete 3 DC, CH 1] Repeat between [ ] until the corner. When you get to each corner complete 3 DC, CH 3, 3 DC. Continue working on each wide the 3 DC, CH 1 in each CH 3 SP. Join with a SL ST into the top CH 3 SP of the beginning CH 3. -
Round 4: Join Charcoal yarn in a previous row CH 1 SP. Complete SC. CH 3, SK 3 DC, SC in previous row CH 1 SP. [CH 3 SK 3 DC, SC in previous row CH 1 SP]. Repeat between [ ] until the corner. In the corner complete CH 3, SK 3 DC, SC in previous row CH 3 SP. CH 3, and complete SC in CH 3 SP again. CH 3, SK 3 DC SC in previous row CH 1 SP. Continue onto the second side [CH 3, SK 3 DC, SC in previous row CH 1 SP]. Repeat between [ ] until the corner. Repeat the side and corner stitches until all 4 corners are complete and the sides are complete. Join with a SL ST into the first SC.
-
Round 5: Keep using the Charcoal yarn and [CH 5, SL ST into the previous row SC SP]. Repeat around until the last ST and end with a SL ST into the first ST area.
-
Finishing: Weave in all the ends and cut off excess yarn.