Which Witchie Doll
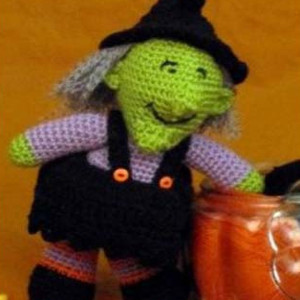
Let this cute little crochet doll bewitch you. Perfect for decorating your mantel, bookshelves, or other spots that need a little Halloween spirit, the Which Witchie Doll has a homemade charm that can't be ignored! This classic green witch, made with an amigurumi pattern, will add some scary cute decor to your home. Expand your crochet collection with an adorable decoration that will cast a spell on all your visitors. There's no trick to this Halloween crochet pattern: just a treat when it's all done!

Crochet HookG/6 or 4 mm hook
Yarn Weight(4) Medium Weight/Worsted Weight and Aran (16-20 stitches to 4 inches)
MATERIALS:
-
Premier Yarns Deborah Norville Everyday Soft Worsted Solids: ED100-16 Kiwi (A) – 1 ball, ED100-20 Orchid (B) – 1 ball, ED100-22 Bittersweet (C) – 1 ball, ED100-24 Steel (D) – 1 ball, ED100-12 Black (E) – 1 ball
-
G/6 or 4 mm hook
SIZE:
Approximately 13” tall.
GAUGE:
4 sc and 4 rnds = 1” in sc. Use any size hook necessary to obtain the specified gauge.
HEAD
Head
With A,ch 2.
Rnd 1: 6 sc in second ch from hook – 6 sc
Rnd 2: 2 sc in each sc around – 12 sc.
Rnd 3: * Sc in next sc, 2 sc in next sc; rep from *around – 18 sc.
Rnd 4:* Sc in each of next 2 sc, 2 sc in next sc; rep from *around – 24 sc.
Rnd 5: * Sc in each of next 3 sc, 2 sc in next sc; rep from *around–30 sc.
Rnd 6: Sc in each sc around.
Rnd 7:* Sc in eac of next 4 sc, 2 sc in next sc; rep from *around –36 sc.
Rnd 8:* Sc in each of next 5 sc, 2 sc in next sc; rep from *around–42 sc.
Rnds 9 and 10: Sc in each sc around.
Rnd 11: Sc in each of next 20 sc, 2 hdc in each of next 2sc, sc in rem 20 sc – 44 sts.
Rnd 12: Sc in each of next 20 sc, hdc in n ext hdc, 2 hdc in each of next 2 hdc, hdc in next hdc, sc in rem 20 sc – 46 sts.
Rnd 13: Sc in each of next 20 sc, hdc in each of next 6 hdc, sc in rem 20 sc.
Rnd 14: Sc in each of next 20 sc, sk next 6 hdc for nose, sc in rem 20 sc – 40 sc.
Rnds 15 and 16: Sc in each sc around.
Rnd 17: Sc in each of next 14 sc, sc2tog 6 times, sc in rem 14 sc – 34 sc.
Rnd 18: Sc2tog 3 times, sc in each of next 9 sc, 2 hdc in each of next 4 sc, sc in each of next 9 sc,sc2tog 3 times –32 sts.
Rnd 19: Sc2tog 3 times, sc in each of next 6 sts, hdc in each of next 2 sts, 2 hdc in each of next 4 sts, hdc in each of next 2 sts, sc in
each of next 6 sts, sc2tog 3 times – 30 sts.
Rnd 20: Sc2tog 3 times, sc in each of next 18 sts, sc2tog 3 times– 24 sts.
Rnd 21: Sc in each of next 7 sc, sk next 10 sc, sc in each of next 7 sc – 14 sc.
Rnd 22: Sc in each sc around; fasten off. Sew seams under nose and under chin. Stuff head. With E, embroider face: Tack a large straight stitch down in the center for mouth, place a French knot mole next to nose, satin st small eyes close tog above nose, and then pull yarn on inside to gather face and make eyes close together tack medium straight stitches down in center above eyes for eyebrows.
Ear (Make 2):
With A, ch 3, work 7 hdc in third ch from hook; fasten off. Sew ear in place on each side of head.
Hair:
Wrap D 50 times around 6” piece of cardboard. Cut yarn at one end of cardboard, forming fifty 12” strands.
Fold two strands in half. Use crochet hook at attach strands around head with lark’s head knots from just above one ear on Rnd 7, around head to just above other ear. Unravel strands of yarn and trim to desired length. Hat will be attached over Rnd 7 to cover top of head.
Hat:
With E, ch 37.
Row 1: Sc in second ch from hook and in each ch across; turn.
Row 2: Ch 1, *sc in each of next 4 sc, sc2tog; rep from *across; turn – 30 sc.
Row 3: Ch 1, sc in each sc across; turn.
Row 4: Ch 1, * sc in each of next 3 sc, sc2tog; rep from * across; turn – 24 sc.
Row 5: Ch 1, sc in each sc across ; turn.
Row 6: Ch 1, * sc in each of next 2 sc, sc2tog; rep from *across ; turn – 18 sc.
Rows 7 and 8: Ch 1, sc in each sc across; turn.
Row 9: Ch 1, *sc in next sc, sc2tog; rep from *across; turn – 12 sc.
Rows 10-13: Ch 1, sc in each sc across; turn.
Row 14: Ch 1, sc2tog across; turn – 6sc.
Rows 15-17: Ch 1, sc in each sc across; turn.
Row 18: Ch 1, sc2tog across; fasten off – 3 sc.
Brim:
Working in rem lps of foundation ch of hat, join E with a sl st in any ch, ch 3, dc in same ch as joining, 2 dc in each rem ch across; fasten off, leaving a 24” end. Sew back seam with end and sew hat to head, covering area of head with no hair. Do not stuff the hat. Push it down in various places to form wrinkles.
Body: Beg at neck edge with B, ch 2.
Rnd 1: 6 sc in second ch from hook – 6 sc.
Rnd 2: 2 sc in each sc around – 12 sc.
Rnd 3: Sc in each sc around.
Rnd 4:* Sc in next sc, 2 sc in next sc; rep from * around – 8 sc.
Rnd 5: Sc in each sc around.
Rnd 6: * Sc in each of next 2 sc, 2 sc in next sc; rep from* around – 24 sc.
Rnd 7: Sc in each sc around.
Rnd 8: * Sc in each of next 3 sc, 2 sc in next sc; rep from *around – 30 sc.
Rnd 9: Sc in each sc around.
Rnd 10: * Sc in each of next 4 sc, 2 sc in next sc; rep from* around – 36 sc.
Rnds 11 and 12: Sc in each sc around, changing to E in last st of Rnd 12.
Rnd 13: With E, sc in each sc around.
Rnd 14: Sc in each of next 1 4 sc, 2 sc in each of next 8 sc (back of body), sc in each remsc around – 44 sc.
Rnds 15 -20: Sc in each sc around.
Rnd 21: Sc in next 14 sc, sc2tog 8 times, sc in rem 14 sc – 36 sc.
Rnd 22: * Sc in each of next 4 sc, sc2tog; rep from * around – 30 sc.
Rnd 23: * Sc in each of next 3 sc, sc2tog; rep from *around – 24 sc. Begin stuffing body.
Rnd 24: * Sc in each of next 2 sc, sc2tog; rep from *around – 18 sc.
Rnd 25: * Sc in next sc, sc2tog; rep from *around – 12 sc.
Rnd 26: SC2tog around; fasten off, leaving a 12” end. Finish stuffing. Thread end through yarn needle and weave through rem sts of last rnd; pull to draw opening closed. Carefully sew head firmly in place on top of body.
Foot and Leg (Make 2):
Beg at bottom of foot with E, ch 2.
Rnd 1:6 sc in second
ch from hook – 6 sc.
Rnd 2: 2 sc in each sc around – 12 sc.
Rnd 3: * Sc in each of next 3 sc, 2 hdc in each of next 6 sc, sc in each of rem 3 sc – 18 sts.
Rnd 4: * Sc in each of next 2 sts, 2 sc in next st; rep from *around – 24 sc.
Rnd 5: Working in back lps for this rnd only, sc in each sc around.
Rnd 6: Sc in each sc around.
Rnd 7:* Sc in each of next 6 sc, (dec over next 2 sc) 6 times, sc in rem 3 sc, changing to C in last st – 18 sc.
Rnd 8: Working in back lps for this rnd only, sc in each sc around.
Rnd 9: Sc in each sc around, changing to B in last st.
Rnds 10 and 11: Sc in each sc around, changing to C in last st of Rnd 11.
Rnds 12 and 13: Sc in each sc around, changing to B in last st of Rnd 13.
Rnds 14 and 15: Rep Rnds 10 and 11 changing to C in last sc of Rnd 15.
Rnds 16 and 17: Rep Rnds 12 and 13; fasten off at end of Rnd 17, leaving a 12” end. Stuff foot and leg and sew in place on bottom of body.
Arm (Make 2):
With A, ch 2.
Rnd 1: 6 sc in second ch from hook – 6 sc.
Rnd 2: 2 sc in each sc around – 12 sc.
Rnds 3 and 4: Sc in each sc around, changing to B in last sc of Rnd 4.
Rnds 5-16: Sc in each sc around; fasten off at end of Rnd 16, leaving a 24” end. Stuff arm, pinch Rnd 16 flat, then sew arm in placeto top of body.
Skirt:
With E, ch 37.
Row 1: Sc in second ch from hook and each ch across; turn – 36 sc.
Row 2: Ch 3 (counts as a dec here and throughout), dc in first sc, 2 dc in each sc across ; turn –72 dc.
Rows 3-5: Ch 3, sk first dc, dc in each dc across; turn.
Row 6: Ch 3, 3 dc in first dc, *sk 3 dc, sc in next dc, h 3, 3 dc in next dc, rep from * across, ending with sc in top of turning ch; fasten off. Sew back seam , and then sew skirt around waist.
Strap (Make 2):
With E, ch 9.
Row 1: Sc in second ch from hook and in each ch across; turn – 36 sc.
Row 2: Ch 1, sc in each sc across; fasten off. Sew a button to end of each strap. Sew end of straps with button to front of skirt, cross straps in back to form suspenders and sew ends to top of skirt.
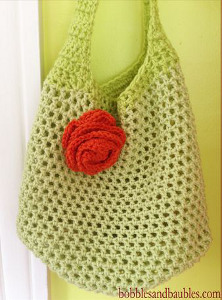
Read NextStriped Duffle Bag
Your Recently Viewed Projects
Thanks for your comment. Don't forget to share!
JaneEK
Oct 10, 2017
This adorable doll is part of the Deborah Norville Collection on the Premier Yarn site and is available as a free download. Its a fairly standard amigurumi pattern (no unusual stitches) but there arent any photos included in the download either. The project has a lot of parts to work up and assemble, so photos would have been greatly appreciated.
jobers77
Jul 02, 2016
I love all the details on this pattern, from the gray frizzy hair to the striped leggings. This will be a great project for this fall. Is it 13" tall with or without the peaked hat? I think that is with the hat because her body looks a little stout. Cute size for kids!
Report Inappropriate Comment
Are you sure you would like to report this comment? It will be flagged for our moderators to take action.
Thank you for taking the time to improve the content on our site.