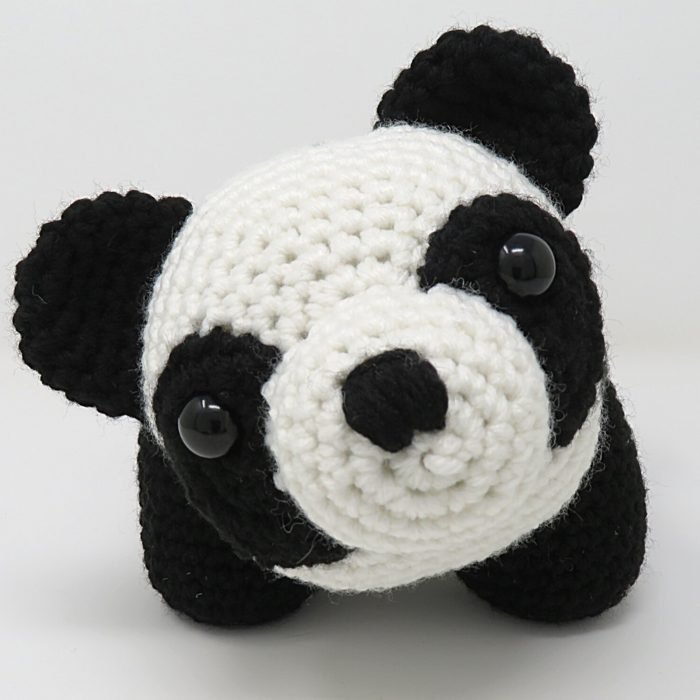
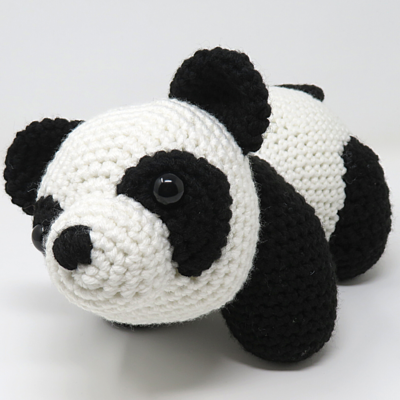
Ying the Panda Amigurumi

Stitch up your new BFF with the adorable Ying the Panda Amigurumi pattern. Giant pandas are an endangered species native to China, but are beloved throughout the world due to their characteristic fluffy black and white fur, their penchant for bamboo, and their gentle and shy temperament.
This intermediate-level crochet pattern is the perfect way to express your love of panda bears through your crochet hobby. Ying the Panda was named for the Mandarin Chinese word for Shadow, and is a fun project for crocheters with some amigurumi experience.

Crochet HookG/6 or 4 mm hook
Yarn Weight(4) Medium Weight/Worsted Weight and Aran (16-20 stitches to 4 inches)
Crochet Gauge8 sts x 8 rows in sc = 2” x 2”
Finished Size11.5 inches long x 7 inches tall
Materials List
- Red Heart With Love yarn, 100% acrylic, worsted weight, 370 yds/7 oz/198 g, Black (BLK), 1 ball; White (WHT), 1 ball.
- G (4.00 mm) hook
- Two 15 mm solid black safety eyes
- Polyfil stuffing
- Tapestry needle
- Straight pins
Instructions
Pattern Notes
- Work in continuous rounds. Do not slip stitch unless otherwise specified by the pattern.
- For best results, assemble parts in order as directed.
- Weave in attachment ends at very end of project in case pieces require repositioning.
- Rows labeled “WS” or “wrong side” are worked with the stitches facing the inside of the piece; rows labeled “RS” or “right side” are worked with the stitches facing the outside of the piece as normal. This is to help you keep track of your rows while working short rows.
- Rounds labeled “Short rnd” are worked back and forth and will end before the round is complete, leaving stitches deliberately unworked to be worked in later rounds as instructed.
You may sell products made by this pattern, but please do not copy this pattern for distribution or sale. That’s not nice (and slightly illegal).
Pattern is written in English, in US terms, using Craft Yarn Council abbreviations.
Intermediate Skill Level. Knowledge needed of chains (ch), single crochet (sc), Right side (RS), Wrong side (WS), increases and decreases. Knowledge of amigurumi part attachment is recommended. Pattern uses short rounds for shaping.
Front Legs
(One piece, worked from feet up)
-
Foot One
With BLK, ch 2. -
Rnd 1: 6 sc in second ch from hook. (6)
-
Rnd 2: Inc in each st around. (12)
-
Rnd 3: [Sc, inc] 6 times. (18)
-
Rnd 4: [2 sc, inc] 6 times. (24)
-
Rnds 5-7: Sc evenly around.
Bind off and set aside. -
Foot Two
With BLK, ch 2. -
Rnd 1: 6 sc in second ch from hook. (6)
-
Rnd 2: Inc in each st around. (12)
-
Rnd 3: [Sc, inc] 6 times. (18)
-
Rnd 4: [2 sc, inc] 6 times. (24)
-
Rnds 5-7: Sc evenly around.
-
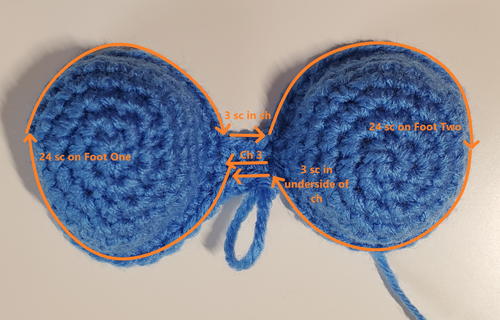
Rnd 8: Do not break yarn, ch 3, 24 sc on Foot One, 3 sc on ch between feet, 24 sc around Foot Two, 3 sc on underside of ch. (54)
*Sample below in done in a different color for clarity. Feet should be done in black, as noted above.
[Editor's Note: Click on image below to enlarge.] -
Rnds 9-16: Sc evenly around.
Stuff feet. -
Rnd 17: [7 sc, dec] 6 times. (48)
-
Rnd 18: [6 sc, dec] 6 times. (42)
-
Rnd 19: [5 sc, dec] 6 times. (36)
-
Rnd 20: [4 sc, dec] 6 times. (30)
-
Rnd 21: [3 sc, dec] 6 times. (24)
-
Rnd 22: [2 sc, dec] 6 times. (18)
Finish stuffing. -
Rnd 23: [Sc, dec] 6 times. (12)
-
Rnd 24: Dec 6 times. (6)
-
Cut yarn. Thread needle through front loops of remaining 6 stitches. Pull tight to close. Weave in ends.
Body
-
With WHT, ch 2.
-
Rnd 1: 6 sc in second ch from hook. (6)
-
Rnd 2: Inc in each st around. (12)
-
Rnd 3: [Sc, inc] 6 times. (18)
-
Rnd 4: [2 sc, inc] 6 times. (24)
-
Rnd 5: [3 sc, inc] 6 times. (30)
-
Rnd 6: [4 sc, inc] 6 times. (36)
-
Rnd 7: [5 sc, inc] 6 times. (42)
-
Rnd 8: [6 sc, inc] 6 times. (48)
-
Rnds 9-16: Sc evenly around.
-
Rnd 17: [6 sc, dec] 6 times. (42)
-
Rnds 18-22: Sc evenly around.
-
Bind off leaving long tail for sewing.
Stuff. -
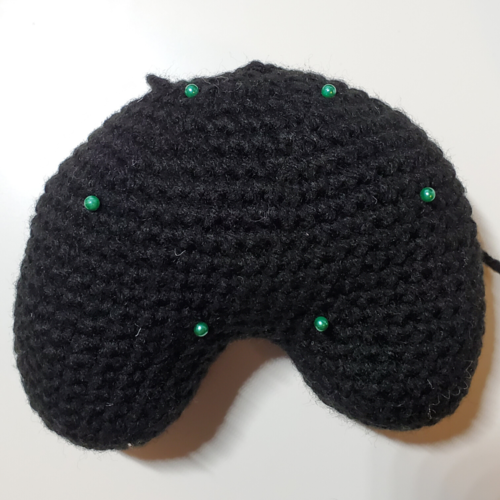
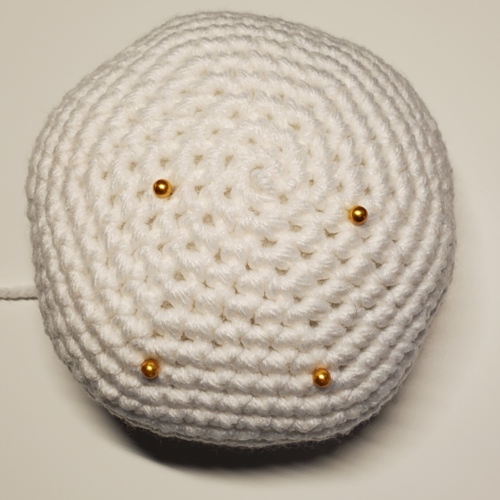
Mark a hexagon (6 sides) with pins on one side of the front legs. Each “side” will be 7 stitches or rows long.
[Editor's Note: Click image below to enlarge.] -
Using pinned hexagon as a guide, sew open end of body to front legs. Add extra stuffing to body before completing attachment.
Hind Legs (Make 2)
-
With BLK, ch 2.
-
Rnd 1: 6 sc in second ch from hook. (6)
-
Rnd 2: Inc in each st around. (12)
-
Rnd 3: [Sc, inc] 6 times. (18)
-
Rnd 4: [2 sc, inc] 6 times. (24)
-
Rnd 5: Sc evenly around.
-
Rnd 6: Sc evenly around, turn.
-
Rnd 7: (WS) (Short Rnd) 12 sc, leave remaining 12 sc unworked, turn. (12)
-
Rnd 8: (RS) (Short Rnd) 11 sc, leave remaining st unworked, turn. (11)
-
Rnd 9: (WS) (Short Rnd) 10 sc, leave remaining st unworked, turn. (10)
-
Rnd 10: (RS) (Short Rnd) 9 sc, leave remaining st unworked, turn. (9)
-
Rnd 11: (WS) (Short Rnd) 8 sc, leave remaining st unworked, turn. (8)
-
Rnd 12: (RS) (Short Rnd) 7 sc, leave remaining st unworked, turn. (7)
-
Rnd 13: (WS) (Short Rnd) 6 sc, leave remaining st unworked, turn. (6)
-
Rnd 14: (RS) (Short Rnd) 5 sc, leave remaining st unworked, turn. (5)
-
Rnd 15: (WS) (Short Rnd) 4 sc, leave remaining st unworked, turn. (4)
-
Rnd 16: (RS) Short Rnd) 4 sc.
-
Rnd 17: (RS) Working on unworked sts from previous rnds, 4 inc, 12 sc, 5 inc, 3 sc. (33)
-
Bind off leaving long tail for sewing.
-
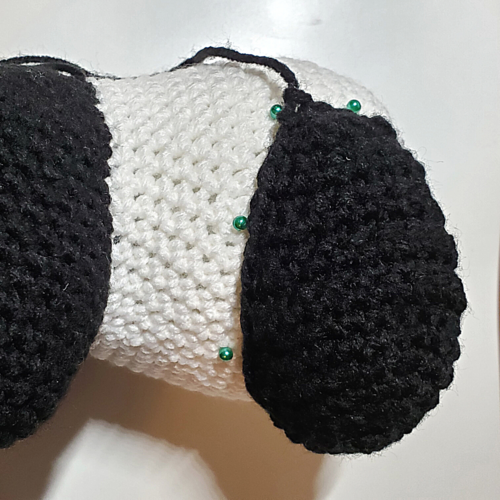
Pin on body at Rnd 10 in line with the inside edges of the front legs. Using this pin as a guide, align hind leg to body so the front and hind legs are in line with each other and the long edge of the hind leg is flush with the body. Pin where the leg touches the body.
[Editor's Note: Click images below to enlarge.] -
Using the pins as a guide, sew hind legs to body. Stuff hind legs before completing attachment.
Head
-
With WHT, ch 2.
-
Rnd 1: 6 sc in second ch from hook. (6)
-
Rnd 2: Inc in each st around. (12)
-
Rnd 3: [Sc, inc] 6 times. (18)
-
Rnd 4: [2 sc, inc] 6 times. (24)
-
Rnd 5: [3 sc, inc] 6 times. (30)
-
Rnd 6: [4 sc, inc] 6 times. (36)
-
Rnd 7: [5 sc, inc] 6 times. (42)
-
Rnd 8: [6 sc, inc] 6 times. (48)
-
Rnd 9: [7 sc, inc] 6 times. (54)
-
Rnds 10-14: Sc evenly around.
-
Rnd 15: [7 sc, dec] 6 times. (48)
-
Rnd 16: [6 sc, dec] 6 times. (42)
-
Rnd 17: [5 sc, dec] 6 times. (36)
-
Rnd 18: [4 sc, dec] 6 times. (30)
-
Rnd 19: [3 sc, dec] 6 times. (24)
-
Rnd 20: [2 sc, dec] 6 times. (18)
-
Stuff.
-
Rnd 21: [Sc, dec] 6 times. (12)
-
Rnd 22: Dec 6 times. (6)
-
Cut yarn. Thread needle through front loops of remaining 6 stitches. Pull tight to close. Leave long tail for sewing.
-
Thread long tail through body and out any st of Rnd 17 for future use.
Snout
-
With WHT, ch 2.
-
Rnd 1: 6 sc in second ch from hook. (6)
-
Rnd 2: Inc in each st around. (12)
-
Rnd 3: [Sc, inc] 6 times. (18)
-
Rnd 4: [2 sc, inc] 6 times. (24)
-
Rnds 5-6: Sc evenly around.
-
Bind off, leaving long tail for sewing.
-
Using pins, mark a 6 x 6 square on the head with the top “side” of the square crossing the center point of the head. Use the pins as a guide to sew the snout to the head. Stuff snout before completing attachment.
[Editor's Note: Click images below to enlarge.]
Eye Patches (Make 2)
-
With BLK, ch 2.
-
Row 1: 4 sc in second ch from hook, turn. (4)
-
Row 2: Ch 1, inc in each st across, turn. (8)
-
Row 3: Ch 1, [Sc, inc] 4 times, turn. (12)
-
Row 4: Ch 1, [2 sc, inc] 4 times. (16)
-
Bind off leaving long tail for sewing.
-
Lay eye patches on a flat surface, curved edges on the outside, mirroring one another. Insert safety eyes in top half of each eye patch, near the shirt edge. Secure washers.
[Editor's Note: Click on any image below to enlarge.]

Nose
With a long strand of BLK, use a needle to sew a nose on the top side of the snout, evenly spaced between the eyes. Sew in vertical lines, two rows tall, from two sts on Rnd 2 to three sts on Rnd 4. Repeat stitches until nose is as thick as desired.
Ears (Make 2)
-
With BLK, ch 2.
-
Rnd 1: 6 sc in second ch from hook. (6)
-
Rnd 2: Inc in each st around. (12)
-
Rnd 3: [Sc, inc] 6 times. (18)
-
Rnds 4-6: Sc evenly around.
-
Bind off leaving long tail for sewing.
-
Press flat. Ears will curve inward slightly.
-
Mark straight line for ear attachment 9 sts long, along Rnd 13. Inside edge of ears should be even with the inside edge of the eye patches, 8 sts apart. Sewing through both layers of the last rnd of the ears, attach ears. Bend so curves are facing forward.
Head Attachment
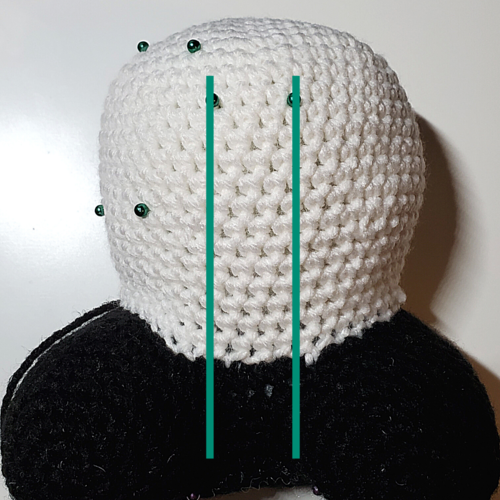
On front legs, use pins to mark a hexagon directly opposite body attachment. Each “side” will be 6 sts long. Mark a hexagon on the head around Rnd 17, also 6 sts on each “side.” Align head with desired tilt to front legs. Using long tail left on head and the pins as a guide, sew head to front legs.
Tail
-
With BLK, ch 2.
-
Rnd 1: 6 sc in second ch from hook. (6)
-
Rnd 2: Inc in each st around. (12)
-
Rnds 3-5: Sc evenly around.
-
Bind off leaving long tail for sewing.
-
Press flat. Sewing through both layers of last rnd, attach tail to Rnd 7 of body, evenly spaced between hind legs.
-
Weave in all attachment ends when parts are positioned as desired.
-
When you finish your pattern, please post pictures to social media tagging me @hookedbykati or using the hashtag #hookedbykati. I love seeing your pictures!
All my patterns come with unlimited help from me. If you run into a snag, email me at hookedbykati@gmail.com. I respond quickly and will help any way I can to clarify any confusion or challenging stitches.
Like this pattern? Leave a review!
Review in the Hooked by Kati Shop by clicking the “Reviews” tab on the pattern listing.
Hooked By Kati Etsy
Hooked By Kati Ravelry
Up Next:
19 Cute Beginner Amigurumi Patterns


![61 Mini Crochet Animals [Free Patterns]](http://irepo.primecp.com/2021/02/484381/Mini-Crochet-Animals-square_Large400_ID-4198042.png?v=4198042)