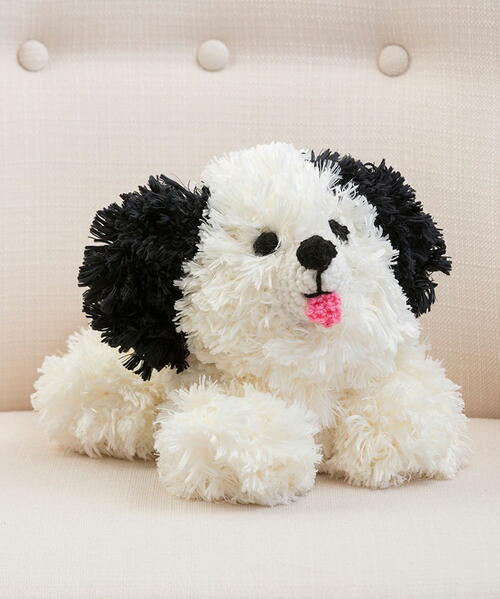
Irresistible Crochet Puppy

How cute is this little dog? Featuring a unique texture and adorable design, the Irresistible Crochet Puppy is a crochet pattern you'll want to make for everyone in your family. Soft and cuddly, this design will appeal to anyone who loves holding a stuffed animal.
This crochet pattern is easy to make, so you just might want to make duplicates to give to others. The crochet amigurumi is soft, cuddly, and can likely fit inside a diaper bag or purse. Consider using yarn in different colors when crocheting this pattern, especially if you plan to make multiples of this design.
NotesNotes:
1. Body, head, legs, ears, tail, and spot are worked with larger hook and Fur yarn.
2. Snout, nose, tongue, and eyes are worked with smaller hook and Super Saver.
3. All pieces are sewn together with yarn needle and Super Saver.

Crochet HookG/6 or 4 mm hook, Q or 16mm hook
Yarn Weight(5) Bulky/Chunky (12-15 stitches for 4 inches)
Crochet GaugeGauge is not critical for this project.
Finished SizePuppy measures about 13” [33 cm] long (from end of nose to tip of tail).
Materials List
- RED HEART Boutique Fur: 3 balls 9100 Polar A, 1 ball 9012 Slate B
- RED HEART Super Saver: 1 skein each of 312 Black C, 706 Perfect Pink D, and 316 Soft White E (Note: Only small amounts of C, D, and E are needed)
- Susan Bates Crochet Hooks: 16mm [US Q] and 4mm [US G-6]
- Polyester fiberfill for stuffing
- Removable stitch marker (optional)
- Yarn needle
Special Stitch
-
sc2tog (single crochet 2 stitches together) = [Insert hook in next stitch, yarn over and pull up a loop] twice, yarn over and draw through all 3 loops on hook.
Body
-
Beginning at front end of body, with larger hook and A, ch 4.
-
Row 1: Work 2 sc in 2nd ch from hook, 2 sc in each of next 2 ch—6 sc.
-
Row 2: Ch 1, turn, sc in each st across.
-
Row 3: Ch 1, turn, [sc in next st, 2 sc in next st] 3 times—9 sc.
-
Row 4: Ch 1, turn, sc in each st across.
-
Row 5: Ch 1, turn, [sc in next 2 sts, 2 sc in next st] 3 times—12 sc.
-
Rows 6 and 7: Ch 1, turn, sc in each st across.
-
Row 8: Ch 1, turn, [sc in next 2 sts, sc2tog] 3 times—9 sc.
-
Fasten off.
-
Finishing the Body: Fold last row (Row 8) in half. With E, beginning at fold, sew halves of Row 8 together for back end of body, then sew side edges of piece together for bottom seam, stuffing as you go. Weave E through base of stitches of first row, pull tight to gather. Weave in end securely.
Head
-
With larger hook and A, ch 4.
-
Row 1: Work 2 sc in 2nd ch from hook, 2 sc in each of next 2 ch—6 sc.
-
Row 2: Ch 1, turn, sc in each st across.
-
Row 3: Ch 1, turn, [sc in next st, 2 sc in next st] 3 times—9 sc.
-
Row 4: Ch 1, turn, sc in each st across.
-
Row 5: Ch 1, turn, [sc2tog] 4 times, sc in last st—5 sc.
-
Fasten off.
-
Finishing the Head: Weave E through stitches of last row (Row 5) and pull to gather, then sew side edges of piece together, stuffing as you go. Weave E through base of stitches of first row, pull tight to gather. Weave in end securely.
Legs (make 4)
-
With larger hook and A, ch 5.
-
Row 1: Sc in 2nd ch from hook and in next 3 ch—4 sc.
-
Rows 2 and 3: Ch 1, turn, sc in each st across.
-
Fasten off.
-
Finishing the Leg: Fold last row (Row 3) in half. With E, beginning at fold, sew halves of Row 3 together, then sew side edges of piece together for inside seam, stuffing as you go, then sew opening at end closed. Weave in end securely.
Tail
-
With larger hook and A, ch 4.
-
Row 1: Sc in 2nd ch from hook and in next 2 ch—3 sc.
-
Fasten off.
Ear (make 2)
-
With larger hook and B, ch 4.
-
Row 1: Sc in 2nd ch from hook and in next 2 ch—3 sc.
-
Fasten off.
Spot
-
With larger hook and B, ch 3.
-
Row 1: Sc in 2nd ch from hook and next ch—2 sc.
-
Fasten off.
Snout
-
Beginning at tip of snout, with smaller hook and E, ch 2.
-
Round 1: Work 6 sc in 2nd ch from hook; do not join, work in continuous rounds (spiral)—6 sc. Note: If desired, place a marker in last stitch worked to indicate end of round. Move marker up as each round is completed.
-
Round 2: Work 2 sc in each st around—12 sc.
-
Round 3: Sc in each st around.
-
Round 4: [Sc in next st, 2 sc in next st] 6 times—18 sc.
-
Round 5: Sc in each st around.
-
Fasten off, leaving a long tail for sewing.
-
Stuff and sew in place on front of head.
Nose
-
With smaller hook and C, ch 2.
-
Round 1: Work 6 sc in 2nd ch from hook; do not join, work in continuous rounds (spiral)—6 sc. Note: If desired, place a marker in last stitch worked to indicate end of round. Move marker up as each round is completed.
-
Round 2: Work 2 sc in each st around—12 sc.
-
Round 3: Sc in each st around.
-
Fasten off, leaving a long tail for sewing.
-
Weave tail through stitches of last round and pull to gather slightly (leaving a small opening). Stuff nose lightly. Sew in place on tip of snout. With C, using photograph as a guide, embroider straight stitches for mouth, below nose.
Tongue
-
With smaller hook and D, ch 2.
-
Row 1: Work 3 sc in 2nd ch from hook—3 sc.
-
Rows 2 and 3: Ch 1, turn, sc in each st across
-
Fasten off, leaving a long tail for sewing.
-
Sew tongue to snout at embroidered mouth.
Eye (make 2)
-
With smaller hook and C, ch 2.
-
Round 1: Work 6 sc in 2nd ch from hook
-
Round 2: Work 2 sc in each st around; slip st in first sc—12 sc
-
Fasten off, leaving a long tail.
-
Thread tail onto yarn needle and weave tail in and out of outer edge, pull to gather. Sew eyes to front of head above snout. To help eyes show up, trim a little of the fur around eyes, if desired.
Finishing
-
Assembly: Refer to photograph for placement of all pieces. With E, sew head to top of front end of body, sewing around head a couple of times and making sure that you sew through the stitches (not just the outer layer of fur). Sew front legs forward as if puppy is lying down, sewing firmly in place. Sew back legs along side the front legs, sewing firmly in place. Sew tail to back end of body. With yarn needle and C, sew ears to top of head. Sew spot to one side of body.
-
Weave in any remaining ends.
Abbreviations
- A, B, C
- Color A, Color B, Color C etc
- ch
- chain
- sc
- single crochet
- st(s)
- stitch(es)
- [ ]
- work directions in brackets the number of times specified
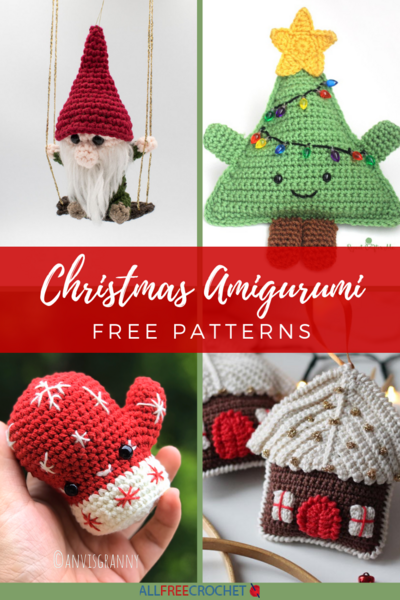
Up Next:
Free Dog Crochet Patterns
Read NextCuddly Rudolph Amigurumi
Your Recently Viewed Projects
Thanks for your comment. Don't forget to share!
JaneEK
Apr 01, 2017
This is just such a cute pattern that its a shame there arent more photos, especially for the assembly section. The written instructions are clear enough, but the only photo is so small that its hard to see the details. This is especially true since the puppy is so fluffy to begin with. Can photos be added, or something else to help with the assembly?
AFC Editor Annalis a
Mar 17, 2017
This is so adorable! It looks just like something I made at Build a Bear as a kid, but this is a much more budget-friendly option.
Report Inappropriate Comment
Are you sure you would like to report this comment? It will be flagged for our moderators to take action.
Thank you for taking the time to improve the content on our site.