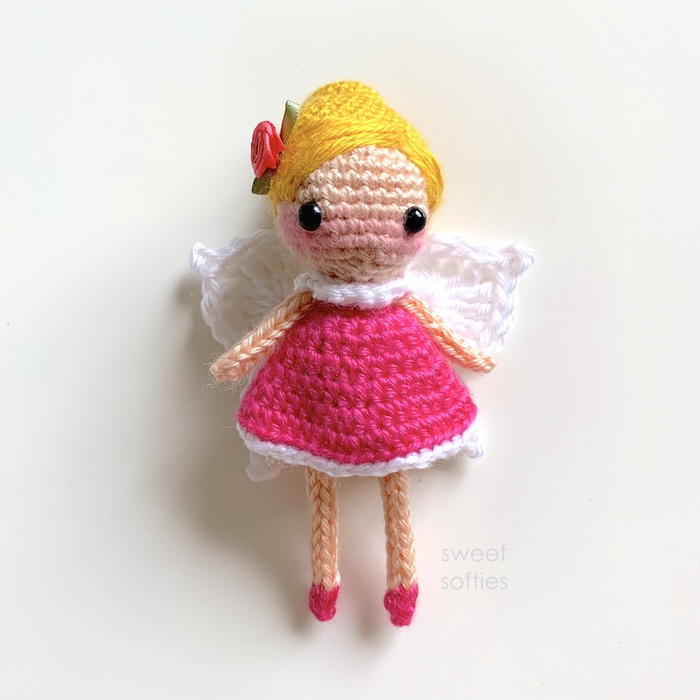
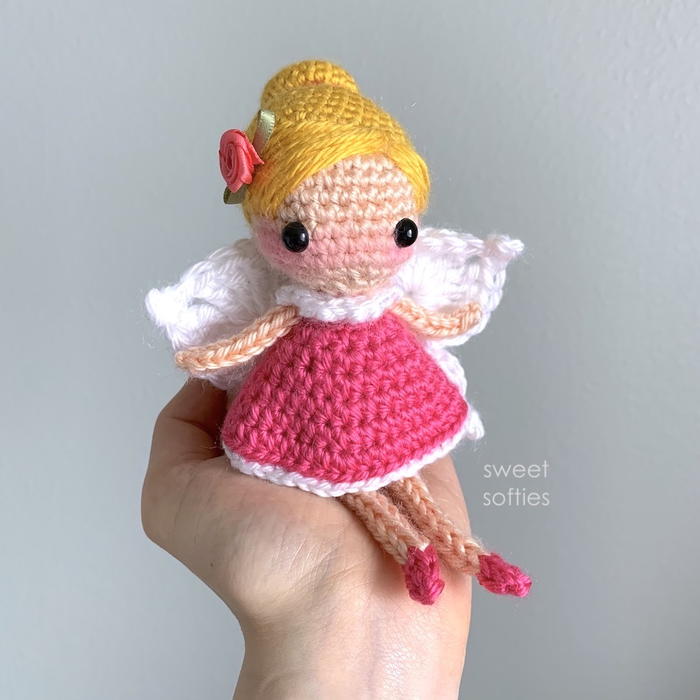
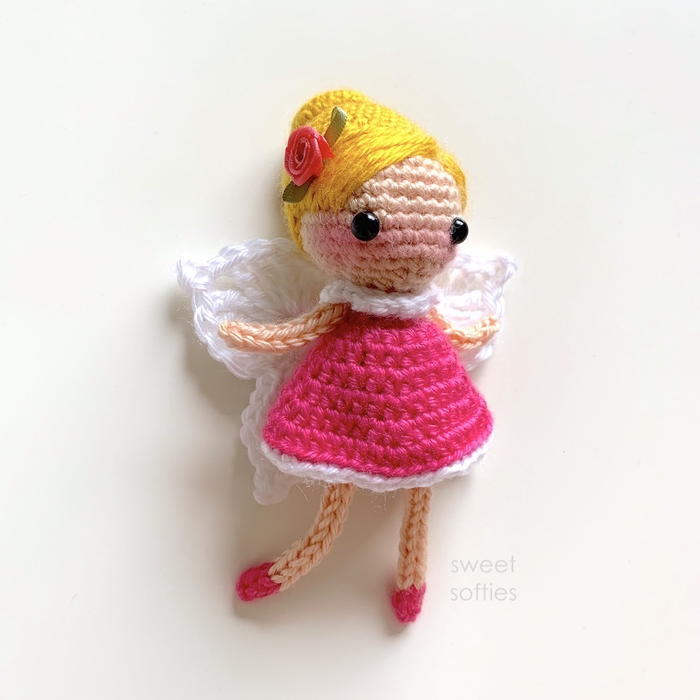
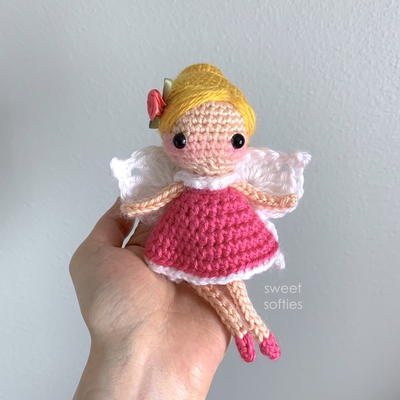
Summer Flower Fairy Amigurumi

The Summer Flower Fairy Amigurumi pattern is an adorable little pixie that is quick and easy to crochet. This sweet fae wears her hair up in a bun, has a cute dress with lace frills, and a set of pretty wings. She makes a lovely gift for little girls or children who adore mythical, fantasy, and fairytale creatures with a touch of magic! Adults with a penchant for faeries and folklore will also love this whimsical design. This easy pattern is perfect for advanced beginners looking to give amigurumi a try.

Crochet Hook1 or 2.75 mm hook (steel), H/8 or 5 mm hook
Yarn Weight(4) Medium Weight/Worsted Weight and Aran (16-20 stitches to 4 inches)
Finished SizeHeight: 6 inches (15 centimeters)
Materials List
- Medium weight (4) yarn (I used Caron Simply Soft Yarn in the colors: peach, pink, white, yellow)
- 2.75 mm crochet hook
- 5.00 mm crochet hook (for wings only)
- 7mm plastic safety eyes
- Mini ribbon rose (or other flower applique)
- Blush powder
- Q-tip
- Fiberfill stuffing
- Yarn needle
- Scissors
Instructions
Notes (Read Before Beginning!)
- Use a 2.75mm crochet hook for all parts of this pattern, except for the wings. The wings are made using the 5.00mm crochet hook.
- The arms and legs are crocheted using the i-cord method. A video tutorial is available and linked in that section.
- A video tutorial is available for the wings and linked in that section.
Head
Use skin-colored yarn (peach).
-
Round 1: In Magic Ring, sc 6. (6 sts)
-
Round 2: Inc around. (12 sts)
-
Round 3: (Sc, inc) x 6. (18 sts)
-
Round 4: (Sc 2, inc) x 6. (24 sts)
-
Round 5: (Sc 3, inc) x 6. (30 sts)
-
Round 6-Round 12: Sc around. (30 sts)
-
Round 13: (Sc 3, dec) x 6. (24 sts)
-
Insert 7mm plastic safety eyes between Round 10-Round 11, 6 sts apart.
-
Round 14: (Sc 2, dec) x 6. (18 sts)
-
Round 15: (Sc, dec) x 6. (12 sts)
-
FO and weave in the ends.
Hair Cap
Use hair-colored yarn (yellow).
-
Repeat Round 1-Round 10 instructions from the ‘Head’ section.
-
FO with a long tail for sewing later.
Hair Bun
Use hair-colored yarn (yellow).
-
Round 1: In MR, sc 6. (6 sts)
-
Round 2: Inc around. (12 sts)
-
Round 3: (Sc, inc) x 6. (18 sts)
-
Round 4-Round 5: Sc around. (18 sts)
-
Switch to hair tie-colored yarn (pink).
-
Round 6: (Sc, dec) x 6. (12 sts)
FO with a tail for sewing later.
Body
Use underwear-colored yarn (white).
-
Round 1: In Magic Ring, sc 6. (6 sts)
-
Round 2: Inc around. (12 sts)
-
Round 3: (Sc, inc) x 6. (18 sts)
-
Round 4-Round 8: Sc around. (18 sts)
-
Round 9: (Sc 4, dec) x 3. (15 sts)
-
Switch to dress-colored yarn (pink).
-
Round 10: Sc around. (15 sts)
-
Round 11: In BLO, (sc 3, dec) x 3. (12 sts)
-
Round 12: Sc around. (12 sts)
-
FO with a long tail for sewing later.
Dress Skirt
Start with dress-colored yarn (pink).
Attach yarn to the back loops created in Round 11 of the body.
-
Round 1: Ch 2, hdc around in those back loops. *Join with a sl st to the first hdc. (15 sts)
-
Round 2: Ch 2, (hdc 2, inc) x 5. *Join. (20 sts)
-
Round 3: Ch 2, (hdc 3, inc) x 5. *Join. (25 sts)
-
Round 4: Ch 2, (hdc 4, inc) x 5. *Join. (30 sts)
-
Round 5: Ch 2, (hdc 5, inc) x 5. *Join. (35 sts)
-
Round 6: Ch 2, (hdc 6, inc) x 6. *Join. (40 sts)
Switch to frill-colored yarn (white). -
Round 7: In BLO, (sc 2, sl st) around. Sc in last st. *Join.
-
FO and weave in the ends.
Dress Collar
Use collar-colored yarn (white).
-
Ch 16. Start your first st in 2nd ch from hook. (Inc, sl st 2) around.
-
FO with a tail for sewing later.
Arms (Make 2)
Note: Both arms and legs are done using the i-cord technique. I-cord video tutorial available here.
Use skin-colored yarn (peach).
-
Set up the i-cord: Ch 3. Insert hook into 2nd ch from hook, YO, pull up a loop, insert hook into next ch, YO, and pull up a loop. (3 loops on hook)
-
Round 1: Drop 2 loops from hook, but hold onto them tightly with your non-hook hand so that they do not come undone. YO, pull through loop on hook. Insert hook into first dropped loop, YO, pull through. (2 loops on hook.) Insert hook into second dropped loop, YO, and pull through. (3 loops on hook)
-
Round 2-Round 8: Repeat Round 1.
-
To finish, YO and pull through all 3 loops on hook.
-
FO with a long tail for sewing later.
Legs (Make 2)
Start with shoe-colored yarn (pink).
Set up the i-cord the same way as you did for the Arms (above).
-
Round 1: Repeat R1 instructions from the ‘Arms’ section.
Switch to skin-colored yarn (peach). -
Round 2-Round 12: Repeat Round 1 instructions from the ‘Arms’ section.
-
FO with a long tail for sewing later.
Wings
Notes:
- Use the 5mm hook for this section.
- Picot: ch 4, sl st in first ch.
- A video tutorial for the fairy wings is available here.
Use wing-colored yarn (blue).
-
- In Magic Ring: ch 3 (counts as first dc), insert 2 dc. (ch 4, dc 3) x 4. Join with a sl st to the top of the starting ch-3.
- Ch 1. In 1st ch-4 gap: (dc, tr 4, picot, tr 4, dc). Sk a dc and sc in the next dc. Sk next dc.
In 2nd ch-4 gap: (hdc 2, dc 3, picot, dc 3, hdc 2). Sk a dc and sl st in next dc. Sk next dc.
In 3rd ch-4 gap: (hdc 2, dc 3, picot, dc 3, hdc 2). Sk a dc and sc in next dc. Sk next dc.
In 4th ch-4 gap: (dc, tr 4, picot, tr 4, dc). Sk a dc and sl st in next dc.
-
FO with a tail for sewing to the fairy.
Finishing Instructions
-
Sew hair bun to cap using a yarn needle.
-
Sew the hair cap to the head. If desired, sew bangs to your doll’s head.
-
Sew the head to the body.
-
Position the dress collar around the doll’s neck and sew the open ends together on the back of her neck.
-
Add blush to the cheeks using blush powder and a q-tip. Written and video tutorial on adding blush here.
-
Sew the wings to the fairy's back.
-
Lastly, sew or glue a flower applique to her hair.
-
Congratulations on finishing your Summer Flower Fairy!


![61 Mini Crochet Animals [Free Patterns]](http://irepo.primecp.com/2021/02/484381/Mini-Crochet-Animals-square_Large400_ID-4198042.png?v=4198042)