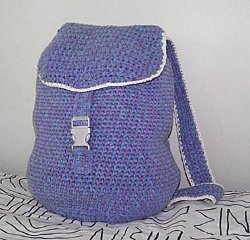
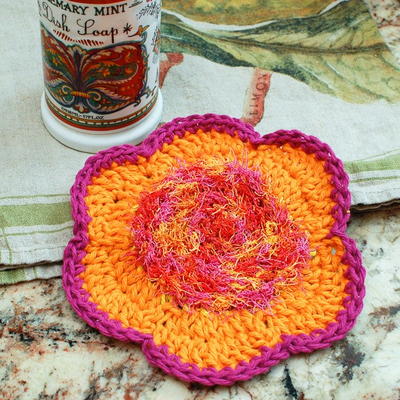
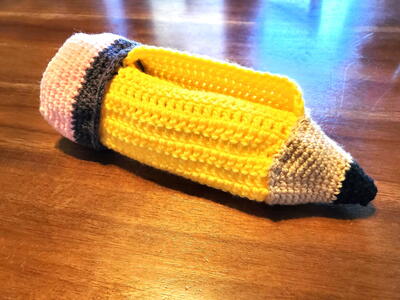
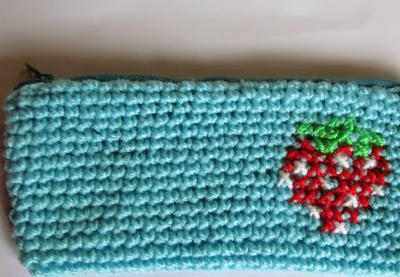
College Chic Tote

When she has ten minutes to get from her dorm room to class, your college kid will be so thankful you made her this College Chic Tote. It's the perfect size for everything she needs: her tablet, notebooks, school books and essentials. She can grab it on her way out the door. The over-the-shoulder strap is comfortable and cute. In fact, this crochet tote bag pattern functions more like an over sized purse. The cute southwestern-inspired design is totally trending, so her college friends will compliment this crochet tote bag. Give your college girl the bag of her dreams!

Crochet HookG/6 or 4 mm hook
Yarn Weight(4) Medium Weight/Worsted Weight and Aran (16-20 stitches to 4 inches)
MATERIALS:
- Lily Sugar 'n Cream: Contrast A Tangerine (01699) 2, Contrast B Robins Egg (01215) 2, Contrast C Warm Brown (01130) 2, Contrast D Soft Ecru (01004) 1, Contrast E Hot Green (01712) 1
- Size 4 mm (U.S. G/6) crochet hook or size needed to obtain gauge. 1 toggle.
SIZE:
Approx 18" [45.5 cm] wide x 18" [45.5 cm] high (excluding strap).
GAUGE:
15 sc and 16 rows = 4" [10 cm].
INSTRUCTIONS
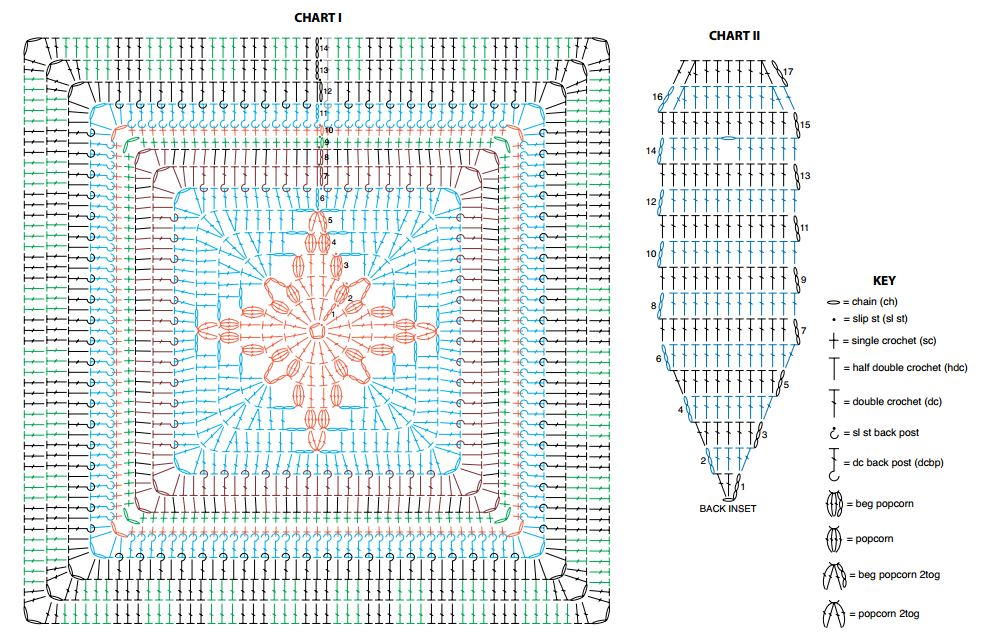
Motif (make 3)
(See Chart I)
Note: Ch 3 at beg of rnd counts as dc throughout.
To change colors, work to last 2 loops on hook of first color. Yoh with new color and draw through rem 2 loops and proceed.
With A, ch 4. Join with sl st to first ch to form a ring.
1st rnd: Ch 3. 15 dc in ring. Join with sl st in top of ch 3. 16 dc.
2nd rnd: Ch 3. 3 dc in same sp as last sl st. Drop loop from hook. Insert hook in top of ch 3 and draw dropped loop through. Ch 1 to close st – beg popcorn made. *2 dc in each of next 2 dc. 4 dc in next dc. Drop loop from hook. Insert hook in first of 4 dc and draw dropped loop through. Ch 1 to close st – popcorn made. Ch 5. Popcorn in next dc. Rep from * to last 3 dc. 2 dc in each of next 2 dc. Popcorn in last dc. Ch 5. Join with sl st to top of beg popcorn.
3rd rnd: Sl st in next dc. Beg popcorn in same sp as sl st. 1 dc in each of next 2 dc. Popcorn in next dc. *Break A. Join B. Ch 2. 5 dc in next ch-5 sp. Ch 2.** Break B. Join A. Miss next popcorn. Popcorn in next dc. 1 dc in each of next 2 dc. Popcorn in next dc. Rep from * twice more, then rep from * to ** once. Join with sl st to top of beg popcorn. Fasten off.
4th rnd: Join A with sl st to next dc. Beg popcorn in same sp as sl st. Popcorn in next dc. *Break A. Join B. Ch 2. 1 dc in next ch-2 sp. 1 dc in next dc. 2 dc in next dc. 3 dc in next dc. 2 dc in next dc. 1 dc in next dc. 1 dc in next ch-2 sp. Ch 2.** Break B. Join A. Miss next popcorn. (Popcorn in next dc) twice. Rep from * twice more, then rep from * to ** once. Join with sl st to top of beg popcorn. Fasten off.
5th rnd: Join A with sl st to top of first beg popcorn. Ch 3. 1 dc in same sp as last sl st. 2 dc in top of next 4 dc. Drop loop from hook. Insert hook in top of ch 3 and draw
dropped loop through. Ch 1 to close st –beg popcorn 2tog made. *Break A. Join B.Ch 2. 1 dc in next ch-2 sp. 1 dc in eachof next 4 dc. 2 dc in next dc. 3 dc in nextdc. 2 dc in next dc. 1 dc in each of next 4 dc. 1 dc in next ch-2 sp. Ch 2.** Break B. Join A. (2 dc in top of next popcorn) twice. Drop loop from hook. Insert hook in first dc and draw dropped loop through. Ch 1 to close st – popcorn 2tog made. Rep from * twice more, then rep from * to ** once. Join B with sl st to top of beg popcorn 2tog.
6th rnd: With B, ch 3. *2 dc in next ch-2 sp. 1 dc in each of next 8 dc. (2 dc. Ch 2. 2 dc) in next dc. 1 dc in each of next 8 dc. 2 dc in next ch-2 sp.** 1 dc in top of popcorn 2tog. Rep from * twice more, then rep from * to ** once. Break B. Join C with sl st to top of ch 3.
7th rnd: With C, ch 2 (does not count as st). 1 hdc in same sp as last sl st. (Dcbp around post of next dc. 1 hdc in next dc) 6 times. *(2 hdc. Ch 2. 2 hdc) in next ch-2 sp. (1 hdc in next dc. Dcbp around post of next dc) 12 times. 1 hdc in next dc. Rep from * twice more. (2 hdc. Ch 2. 2 hdc) in next ch-2 sp. (1 hdc in next dc. Dcbp around post of next dc) 6 times. Join with sl st to first hdc.
Note: Carry color when not in use in next rnd loosely across top of previous rnd and work sts around it to avoid stranding.
8th rnd: With C, ch 2 (does not count as hdc). 1 hdc in same sp as last sl st. (Join D. With D, 1 hdc in each of next 2 sts. Join C. With C, 1 hdc in each of next 2 sts) 3 times. Join D. With D, 1 hdc in each of next 2 sts. *Join C. With C, (2 hdc. Ch 2. 2 hdc) in next ch-2 sp. Join D. With D, 1 hdc in next st. (Join C. With C, 1 hdc in each of next 2 sts. Join D. With D, 1 hdc in each of next 2 sts) 7 times. Rep from * twice more. Join C. With C, (2 hdc. Ch 2. 2 hdc) in next ch-2 sp. Join D. With D, 1 hdc in next st. (Join C. With C, 1 hdc in each of next 2 sts. Join D. With D, 1 hdc in each of next 2 sts) 3 times. Join C. With C, 1 hdc in last st. Join E with sl st to first hdc. Break C and D.
9th rnd: With E, ch 1. 1 sc in same sp as last sl st. 1 sc in each of next 16 hdc. *(1 sc. Ch 2. 1 sc) in next ch-2 sp. 1 sc in each of next 33 hdc. Rep from * twice more. (1 sc. Ch 2. 1 sc) in next ch-2 sp. 1 sc in each of last 16 hdc. Join A with sl st to first sc. Break E.
10th rnd: With A, ch 1. 1 sc in same sp as last sl st. 1 sc in each of next 17 sc. *(1 sc. Ch 2. 1 sc) in next ch-2 sp. 1 sc in each of next 35 sc. Rep from * twice more. (1 sc. Ch 2. 1 sc) in next ch-2 sp. 1 sc in each of last 17 sc. Join with sl st to first sc. Fasten off.
11th rnd: Join B with sl st from back to front around post of same sc as last sl st. Ch 3. Dcbp around post of next 18 sc. *(2 hdc. Ch 2. 2 hdc) in next ch-2 sp. Dcbp around post of next 37 sc. Rep from * twice more. (2 hdc. Ch 2. 2 hdc) in next ch-2 sp. Dcbp around post of next 18 sc. Join C with sl st in top of ch 3. Break B.
12th rnd: With C, ch 2 (does not count as st). 1 hdc in same sp as last sl st. (Dcbp around post of next st. 1 hdc in next st) 10 times. *(2 hdc. Ch 2. 2 hdc) in next ch-2 sp. (1 hdc in next st. Dcbp around post of next st) 20 times. 1 hdc in next st. Rep from * twice more. (1 hdc. Ch 2. 1 hdc) in next ch-2 sp. (1 hdc in next st. Dcbp around post of next st) 10 times. Join D with sl st to first hdc. Break C.
Note: Carry color when not in use in 13th and 14th rnds loosely across top of previous rnd and work sts around it to avoid stranding.
13th rnd: With D, ch 3. 1 dc in next st. (Join E. With E, 1 dc in each of next 3 sts. Join D. With D, 1 dc in each of next 3 sts) 3 times. Join E. With E, 1 dc in each of next 3 sts. *Join D. With D, (2 dc. Ch 2. 2 dc) in next ch-2 sp. ** (Join E. With E, 1 dc in each of next 3 sts. Join D. With D, 1 dc in each of next 3 sts) 7 times. Join E. With E, 1 dc in each of next 3 sts. Rep from * twice more, then rep from * to ** once. (Join E. With E, 1 dc in each of next 3 sts. Join D. With D, 1 dc in each of next 3 sts) 3 times. Join E. With E, 1 dc in each of next 3 sts. Join D. With D, 1 dc in last st. Join with sl st in top of ch 3.
14th rnd: With D, ch 3. 1 dc in next st. (Join E. With E, 1 dc in each of next 3 sts. Join D. With D, 1 dc in each of next 3 sts) 3 times. Join E. With E, 1 dc in each of next 5 sts. *Join D. With D, (2 dc. Ch 2. 2 dc) in next ch-2 sp. Join E. With E, 1 dc in each of next 5 sts.** (Join D. With D, 1 dc in each of next 3 sts. Join E. With E, 1 dc in each of next 3 sts) 7 times. With E, 1 dc in each of next 2 sts. Rep from * twice more, then rep from * to ** once. (Join D. With D, 1 dc in each of next 3 sts. Join E. With E, 1 dc in each of next 3 sts) 3 times. Join D. With D, 1 dc in last st. Join with sl st in top of ch 3. Join with sl st in top of ch 3. Fasten off.
FINISHING:
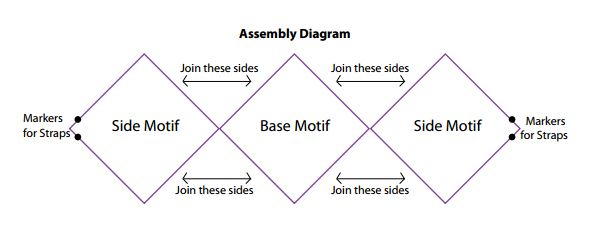
Join Motifs: Join all sides of Base Motif to other 2 Side Motifs.
(See Assembly Diagram below)
To join sides: Place RS of Motifs facing each other, having Base Motif on top of work and pin sides in position. Working through both thicknesses, join D with sl st in any corner ch-2 sp. Ch 1. (Work 1 row of sc to next corner ch-2 sp. 3 sc in corner) 4 times. Join with sl st to first sc. Fasten off. With WS of work facing, steam press lightly along seams to flatten.
Back Inset
(See Chart II on page 4).
Note: Ch 3 at beg of row counts as dc throughout.
**With A, ch 4.
1st row: (RS). 2 dc in 4th ch from hook (counts as 3 dc). Turn.
2nd row: Ch 3. 1 dc in first dc. 1 dc in next dc. 2 dc in top of turning ch. Turn. 5 dc.
3rd row: Ch 3. 1 dc in first dc. 1 dc in each dc to turning ch. 2 dc in top of turning ch.
4th to 6th rows: As 3rd row. 13 dc at end of 6th row.**
Place markers at each end of last row.
7th to 13th rows: Ch 3. 1 dc in each dc to end of row, ending with 1 dc in top of turning ch. Turn.
14th row: Ch 3. 1 dc in each of next 5 dc. Ch 1. Miss next dc for toggle hole. 1 dc in each of next 5 dc. 1 dc in top of turning ch. Turn.
15th row: Ch 3. 1 dc in each of next 5 dc. 1 dc in next ch-1 sp. 1 dc in each of next 5 dc. 1 dc in top of turning ch. Turn.
16th row: Ch 3. Dc2tog. 1 dc in each st to last 3 sts. Dc2tog. 1 dc in top of turning ch. Turn.
17th row: As 16th row. 9 sts. Fasten off.
Front Inset
Work from ** to ** as given for Back Inset.
7th row: Ch 3. 1 dc in each dc to end of row, ending with 1 dc in top of turning ch.
Fasten off.
Sew sides of Front Inset in position as shown in assembly diagram below. Sew sides of Back Inset to markers into same position on opposite side of Bag. Sew toggle in position to Front Inset.
Strap: Place markers on top corners of 2 Side Motifs on 5th dc on each side of ch-2 sp.
First Half: 1st row: (RS). Join A with sl st in first marker of either Side Motif. Ch 3. 1 dc in next dc. 1 hdc in each of next 2 dc.1 sc in next dc. 1 sc in next ch-2 sp. 1 sc in
next dc. 1 hdc in each of next 2 dc. 1 dc in each of next 2 dc. Turn. 11 sts.
2nd row: Ch 2 (does not count as st). Hdc2tog. 1 hdc in each of next 7 sts. Hdc2tog. Turn. 9 sts.
3rd row: Ch 2 (does not count as st). 1 hdc in each st to end of row. Turn. Rep last row until Strap measures 11" [28 cm] when slightly stretched. Fasten off.
Second Half: Work as for First Half in marked corner of rem Side Motif. Do not fasten off.
Join Halves: Place RS of Halves tog with Second Half on top of work. Working through both thicknesses, ch 1. Work 1 row of sc to end of row. Fasten off.
Images and charts:
Read NextDorm Organizer Square Baskets
Your Recently Viewed Projects
Thanks for your comment. Don't forget to share!
Delphine Bryant
Aug 02, 2018
I love bags, purses, totes and sacs so much that I am known as the bag lady. This will be a great addition to the collection. I have several crocheted items and a lot that I purchased in the store. I am beginning to like the ones I have made better.
Morehouse17
Jul 28, 2018
This is just adorable. I would agree whole heartily that this is a chic tote but not necessarily for those in route to college. It is amazing that this is made with essentially three granny "up-graded" granny squares. I may have to tone down the number of colors but this is a cool bag.
JaneEK
Apr 28, 2018
Based on three huge Granny Squares, this tote is for Experienced crafters. I hate trying to scroll through long patterns, so I set off to find this on the Yarnspiration website. Since its a Lily project, it didnt take long at all. Its called The Trifold Tote and its available here http//www.yarnspirations.com/lily-sugarn-cream-tri == -fold-tote/SCC0103-007477M.html The download is free.
lcarr
Apr 27, 2017
This is so cute. I like it so much that I know what I am doing when I wake up tomorrow - stash diving and making this bag! I have so many uses and ideas for this. I love how trendy it looks. I am going to add a row of sc, then sl sts along the sides of the strap to strengthen it and keep it from stretching out. I am not seeing any lining instructions, but it should be easy with this pattern.
jezuiderveen 28330 61
May 22, 2016
Under Motifs, it says- "(See Chart I)" Under Finishing - join motifs, it says - "(See Assembly Diagram on page 3)" Neither of these first two are on the pattern Under the Back Inset where it says "(See Chart II on page 4)", Is this the one at the very end of the pattern? There are no page numbers visible in the pattern. Where can I find these charts, diagrams...
Report Inappropriate Comment
Are you sure you would like to report this comment? It will be flagged for our moderators to take action.
Thank you for taking the time to improve the content on our site.