Retro Rainbow Baby Blanket
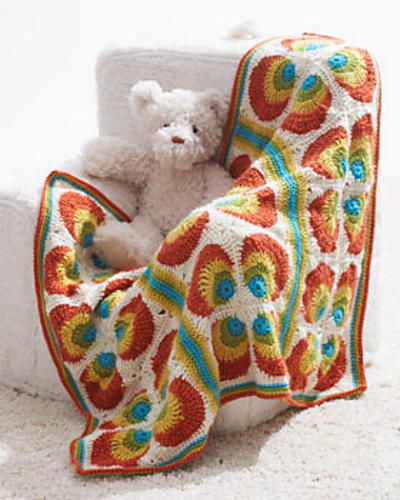
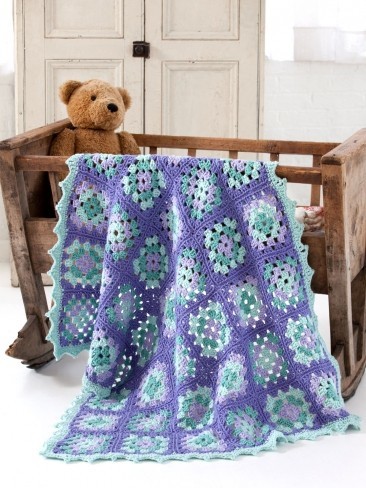
This Retro Rainbow Baby Blanket is perfect for baby boys and girls alike. The bright rainbow motifs will look great in any nursery. This is an advanced crochet afghan pattern for ambitious crocheters to complete. Sheep(ish) by Vickie Howell yarn is used. It's a great pattern to make for any mother-to-be, including yourself! This crochet afghan measures approximately 42 inches by 48 inches when complete.

Crochet HookH/8 or 5 mm hook
Yarn Weight(4) Medium Weight/Worsted Weight and Aran (16-20 stitches to 4 inches)
MATERIALS
- Sheep(ish)™ by Vickie Howell (85 g/ 3 oz, 153 m/167 yds)
Main Color (MC) White(ish) (00004) 3 balls
Contrast A Turquoise(ish) (00017) 1 ball
Contrast C Yellow(ish) (00012) 2 balls
Contrast B Chartreuse(ish) (00020) 2 balls
Contrast D Coral(ish) (00014) 3 balls - Size 5 mm (U.S. H/8) crochet hook or size needed to obtain gauge.
- Stitch marker
- Assembly Diagram
MEASUREMENTS
Approx 42" x 48" [106.5 x 122 cm]
GAUGE
1 Block= 5½" [14 cm] square.
INSTRUCTIONS
Block (make 36) See diagram on page 3.
With A, ch 4. Join with sl st to first ch to form a ring.
1st rnd: Ch 2 (does not count as st). (2 hdc. 3 dc. 2 tr. 3 dc. 2 hdc) into ring. Join with sl st to top of first hdc. Fasten off. 12 sts.
2nd row: Miss first hdc. Join B with sl st in next hdc. Ch 1. Miss same hdc where sl st was made. 2 sc in next dc. (2 hdc. 1 dc) in next dc. (2 dc. 1 tr) in next dc. 3 tr in next tr. (1 tr. 2 dc) in next tr. (1 dc. 2 hdc) in next dc. 2 sc in next dc. Ch 1. Sl st in next hdc. Fasten off. 21 sts, including ch-1 sps.
3rd row: Miss first 2 sc of 2nd row. Join C with sl st in next hdc. Ch 1. Miss same hdc where sl st was made. 1 sc in next hdc. 1 hdc in next dc. 1 dc in next dc. 2 tr in next dc. 2 tr in next tr. (1 tr. 1 dtr) in next tr. 3 dtr in next tr. (1 dtr. 1 tr) in next tr. 2 tr in next tr. 2 tr in next dc. 1 dc in next dc. 1 hdc in next dc. 1 sc in next dc. Ch 1. Sl st in next hdc. Fasten off. 23 sts, including ch-1 sps.
4th row: Join D with sl st in first hdc of 3rd row. Ch 1. Miss same hdc where sl st was made. 1 sc in next st. 1 hdc in next st. 1 dc in next st. (1 dc. 1 tr) in next st. (1 tr. 2 dtr) in next st. Stitch Combo 1. Stitch Combo 2. Stitch Combo 3. Stitch Combo 4. Stitch Combo 5. Stitch Combo 6. Stitch Combo 7. (2 dtr. 1 tr) in next st. (1 tr. 1 dc) in next st. 1 dc in next st. 1 hdc in next st. 1 sc in next st. Ch 1. Sl st in next st. Fasten off.
Note: When working 5th rnd, ch-1 sp counts as st. Sl st does not count as st.
5th rnd: Join MC with sl st in marked st. Ch 6 (counts as tr and ch 2). 2 tr in same sp as sl st, *1 tr in next st. 1 dc in next st. 1 hdc in each of next 3 sts. 1 sc in each of next 2 sts. 1 hdc in each of next 3 sts. 1 dc in next st. 1 tr in next st.** (2 tr. Ch 2. 2 tr) in next st. Rep from * twice more, then from * to ** once. 1 tr in same sp as first sl st. Join with sl st to 4th ch of ch 6. Fasten off.
FINISHING
Using flat seam, join 4 Blocks into Flower Square. Sew Flower Squares into 3 Strips, having 3 Flower Squares in each Strip.
Side Strip Edging: **1st row: (RS). Join C with sl st in corner ch-2 sp of Strip. Ch 3 (counts as dc). Working across long edge of Strip, 1 dc in each st to end of Strip, working 1 dc in each ch-2 sp. Fasten off.
2nd row: (RS). Join B with sl st to top of ch 3. Ch 2 (does not count as st). 1 hdc in each dc to end of row. Fasten off.
3rd row: (RS). Join A with sl st to top of ch 2. Ch 1. 1 sc in each hdc to end of row. Fasten off.**
Rep for Second Strip.
Middle Strip Edgings
Work from ** to ** as given for Side Strip Edging. Rep on opposite side of same Strip.
With A, sew Strips tog into Blanket as shown in diagram.
Blanket edging: **1st rnd: (RS). Join MC with sl st to top right ch-2 sp corner of Blanket. Ch 1. *1 sc in each st to next corner, working 1 sc in each ch-2 sp. (1 sc. Ch 2. 1 sc) in next corner ch-2 sp. Rep from * twice more. 1 sc in each st to end of rnd. (1 sc. Ch 2) in first ch-2 sp. Join A with sl st to first sc. Break MC.
2nd rnd: With A, ch 1. 1 sc in each sc around, working (1 sc. Ch 2. 1 sc) in corner ch-2 sps. Join B with sl st to first sc. Break A.
3rd to 5th rnds: Rep 2nd rnd, changing colors in the following sequence: B, C, and D. Fasten off at end of last rnd.
ABBREVIATIONS
Stitch Combo 1: Yoh and draw up a loop in 2nd horizontal bar of stitch just made. Yoh and draw up a loop in next st of 3rd row. (Yoh and draw through 2 loops on hook) 4 times - 1 loop rem on hook. 1 dc in 2nd horizontal bar of last st made. Yoh and draw up a loop in same sp as last dc. Draw up a loop in 3rd horizontal bar of last long st made. Draw up a loop in same st of Row 3 - (5 loops on hook). Yoh and draw through 1 loop on hook. (Yoh and draw through 2 loops on hook) 4 times - (1 loop left on hook).
Stitch Combo 2: Yoh and draw up a loop in 2nd horizontal bar of stitch just made. Draw up a loop in 3rd horizontal bar of last long st made. Draw up a loop in next st of 3rd row. Yoh and draw through 1 loop on hook. (Yoh and draw through 2 loops on hook) 4 times - (1 loop left on hook). 1 dc in 2nd horizontal bar of stitch just made. Yoh and draw up a loop in same sp as last dc. Draw up a loop in 3rd horizontal bar of last long st made. Yoh and draw up a loop in same st of Row 3. (Yoh and draw through 2 loops on hook) 5 times - (1 loop left on hook).
Stitch Combo 3: Yoh and draw up a loop in 2nd horizontal bar of stitch just made. Yoh and draw up a loop in 3rd horizontal bar of last long st made. Yoh and draw up a loop in next st of Row 3. (Yoh and draw through 2 loops on hook) 6 times - (1 loop left on hook). 1 dc in 2nd horizontal bar of last st made. Yoh and draw up a loop in same sp as last dc. Yoh and draw up a loop in 4th horizontal bar of last long st made. Draw up a loop in same st of Row 3. (Yoh and draw through 2 loops on hook) 5 times - (1 loop left on hook).
Stitch Combo 4: Yoh and draw up a loop in 2nd horizontal bar of stitch just made. Yoh and draw up a loop in 3rd horizontal bar of last long st made. Draw up a loop in 4th horizontal bar of last long st made. Draw up a loop in next st of Row 3. Yoh and draw through 1 loop on hook. (Yoh and draw through 2 loops on hook) 6 times - (1 loop left on hook). Yoh and draw up a loop in 2nd horizontal bar of stitch just made. Yoh and draw up a loop in 4th horizontal bar of last long st made. (Yoh and draw through 2 loops on hook) 4 times - (1 loop left on hook, place marker on this stitch). Yoh and draw up a loop in 2nd horizontal bar of stitch just made. Yoh and draw up a loop in 4th horizontal bar of last long st made. Draw up a loop in 5th horizontal bar of last long st made. Draw up a loop in same st of Row 3. Yoh and draw through 1 loop on hook. (Yoh and draw through 2 loops on hook) 6 times - (1 loop left on hook).
Stitch Combo 5: Yoh and draw up a loop in 2nd horizontal bar of stitch just made. Yoh and draw up a loop in 4th horizontal bar of last long st made. Draw up a loop in 5th horizontal bar of last long st made. Draw up a loop in next st of Row 3. (Yoh and draw through 2 loops on hook) 6 times - (1 loop left on hook). 1 dc in 2nd horizontal bar of stitch just made. Yoh and draw up a loop in same sp as last dc. Draw up a loop in 4th horizontal bar of last long st made. Yoh and draw up a loop in same st of Row 3. (Yoh and draw through 2 loops on hook) 5 times - (1 loop left on hook).
Stitch Combo 6: Yoh and draw up a loop in 2nd horizontal bar of stitch just made. Draw up a loop in 3rd horizontal bar of stitch just made. Yoh and draw up a loop in next st of Row 3. (Yoh and draw through 2 loops on hook) 5 times - (1 loop left on hook). 1 dc in 2nd horizontal bar of stitch just made. Yoh and draw up a loop in same sp as last dc. Draw up a loop in 3rd horizontal bar of last long st made. Yoh and draw up a loop in same st of Row 3. Yoh and draw through 1 loop on hook. (Yoh and draw through 2 loops on hook) 5 times - (1 loop left on hook).
Stitch Combo 7: Yoh and draw up a loop in 2nd horizontal bar of stitch just made. Yoh and draw up a loop in next st of Row 3. (Yoh and draw through 2 loops on hook) 4 times - (1 loop left on hook). 1 dc in 2nd horizontal bar of stitch just made. Yoh and draw up a loop in same sp as last dc. Yoh and draw up a loop in same st of Row 3. Yoh and draw through 1 loop on hook. (Yoh and draw through 2 loops on hook) 4 times - (1 loop left on hook).
Approx = Approximately
Ch = Chain(s)
Dc = Double crochet
Dtr = (Yoh) 3 times. Draw up a loop in next stitch. (Yoh and draw through 2 loops on hook) 4 times - Double treble crochet made.
Hdc = Half double crochet
Rem = Remaining
Rnd(s) = Round(s)
Sc = Single crochet
Sl st = Slip stitch
Sp(s) = Space(s)
Tog = Together
Tr = (Yoh) twice. Draw up a loop in next stitch. (Yoh and draw through 2 loops on hook) 3 times.
Yoh = Yarn over hook
Visit Bernat's company profile for more great patterns!
Read NextJunebug Stitch Sampler Baby Blanket
Your Recently Viewed Projects
JaneEK
Aug 06, 2018
I really love this eye catching design, and since its ad Advanced project, I decided to head on over to the Yarnspirations site to see if I could find a free download. I must have spent close to 30 minutes looking through the Bernat section but just could not find it. Looks like it will be Copy and Paste for this one!
lynnepelizzon 1553 462
Feb 07, 2017
Please can you do a newsletter on vintage and retro baby matinee jackets, bootees, blankets etc
nby 1218418
Mar 04, 2016
This pattern is so adaptable by color. The blanket I am working on will be the colors of peacock feathers and I will assemble the blocks NOT in the flower pattern, but just in a left line and right line row pattern. GREAT pattern and is actually very easy to work up. I think this would be a good pattern for those wanting to try crocheting with change of colors and a pattern!
JennyBee1
Jul 18, 2014
Hi everyone, Thanks for your comments! We've updated this full pattern to include the assembly diagram (please refer to the Materials list), as well as a Print button. I hope this helps. Enjoy! -editors of AllFreeCrochet
janepocket 3799937
Jun 19, 2014
The name of the pattern is Mod Baby Blanket by Vickie Howell. I went to Yarninspirtions and it is at the very last of the patterns listed.
tiffanie401 725532 7
Jun 19, 2014
The link did not work for me. Try this one http://www.yarnspirations.com/assets/files/pattern == -files/pdf/Bernat_Sheepish_web82_cr_blanket.en_US. == pdf
TheAyseBalci
Jun 20, 2013
I liked it a lot! I really want to try it. But I had the same problem as everyone. I went to Bernat's own website. Printable version is there. Here is the link; http://www.bernat.com/data/pattern/pdf/Bernat_Sheepish_web82_cr_blanket.en_US.pdf Have fun everyone :))
loverson 57
Jun 20, 2013
I've looked all over the internet for this pattern WITH the diagram and cannot find. Can it be added to this pattern?
rebeccastroud 6383 930
Jun 20, 2013
Looks fun. However, like everyone else I do not find the diagram. And yes, you should have a printer friendly option on all of your patterns.
shelleykrueger 261 6226
Jun 19, 2013
Thanks for the pattern. A diagram is indicated on page 3, but does not appear to be there. How can I get this, for it really aids in understanding the pattern. Thank you.
loverson 57
Jun 19, 2013
Sure would be nice if you would add a "Printer Friendly" version on all your patterns!!!!
Report Inappropriate Comment
Are you sure you would like to report this comment? It will be flagged for our moderators to take action.
Thank you for taking the time to improve the content on our site.

