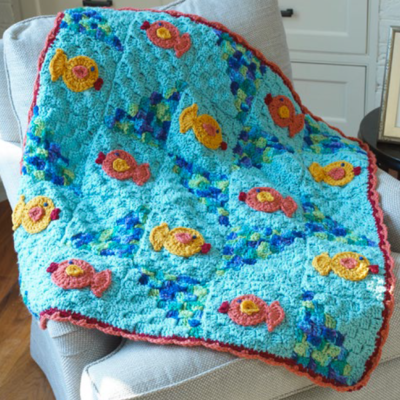
Comforting Kitty Afghan

If there's a cat in your house, then you're going to love this Comforting Kitty Afghan (and so will your cat!) The cute goldfish motif of this free crochet afghan pattern will match your feline friend's favorite hobby. This blanket can be used as a throw on the couch, or even placed in your kitty's bed or favorite spot on the sofa. It would also be great to take on picnics or trips to the beach.

Crochet HookH/8 or 5 mm hook
Yarn Weight(4) Medium Weight/Worsted Weight and Aran (16-20 stitches to 4 inches)
MATERIALS:
-
RED HEART® Super Saver®:
2 skeins each: 505 Aruba Sea A and 3955 Wildflower B
1 skein each: 321 Gold C, 726 Coral D, 376 Burgundy E and 385 Royal F - Susan Bates® Crochet Hook: 5mm [US H-8]
- Yarn needle
- Assembly Diagram
Size: Throw measures 31½” (80cm) square.
Gauge/Tension:
GAUGE: Square = 6” (15cm). CHECK YOUR GAUGE. Use any size hook to obtain the gauge.
INSTRUCTIONS:
SQUARES
(make 12 in A and 13 in half B/half A)
Note: For A squares, begin with A and use throughout.
Row 1 (half B/half A square): With B, ch 3, 3 dc in 3rd ch from hook (one shell made) ch 3, turn.
Row 2: 3 dc in 3rd ch from hook, slip st in ch-3 space of first shell, ch 3, 3 dc in same ch-3 space, ch 3, turn—2 shells.
Row 3: 3 dc in 3rd ch from hook, *slip st in ch-3 space of next shell, ch 3, 3 dc in same ch-3 space; repeat from * across, ch 3, turn—3 shells.
Rows 4-7: Repeat Row 3. At end of Row 7, do not ch 3, turn, slip st in each st across shell, slip st into ch-3 space of shell, fasten off B—7 shells.
Row 8: With A, slip st in ch-3 space of same shell, ch 3, 3 dc in same ch-3 space, *slip st in ch-3 of next shell, ch 3, 3 dc in same ch-3 space; repeat from * across to last shell, end with slip st in last ch-3 space, turn, slip st in each st across shell.
Rows 9-13: Repeat Row 8 until 1 shell remains, fasten off.
FISH (make 6 in C and 6 in D)
Round 1: Ch 4 (counts as dc), 10 dc in 4th ch from hook, join with slip st to first ch—11 dc.
Round 2: Ch 3, dc in same st as joining, 2 dc in each dc around, join, do not fasten off—22 dc.
Tail: Ch 4, 8 dc in same space as joining, ch 3, turn, slip st in first dc, slip st in each dc across tail, ch 3, slip st in same dc, fasten off.
Mouth: Join E in 11th dc of body with slip st, (ch 4, slip st, ch 4, slip st) in same st, fasten off.
Eye: With a length of F and yarn needle, bring yarn up through from back in area where eye will be placed, wrap yarn 3 times around needle, bring needle down through to back where yarn first came through and very slowly pull through the yarn wrapped on needle to form a French knot, making sure knot is snug against front of fish, tie yarn in knot on back, trim ends.
Note: Make sure that eye is placed properly so that fish in D are facing to the left and fish in C are facing to the right.
Fin: Ch 3, slip st in 2nd ch from hook, 5 hdc in last ch, working down other side of foundation ch, slip st in next ch, slip st in first st, join, fasten off.
ASSEMBLY
With yarn needle using running stitch, sew fin to center of body using opposite color fin as body color and point of fin facing to the back.
Sew fish to center of each solid color square.
Assemble squares rows 5 across and 5 down using sc to join rows on wrong side of throw as follows:
Rows 1, 3, 5: Half A/B square with B triangle to lower left, solid square, half A/B square with B triangle to upper right, solid square, half A/B square with B triangle to lower left.
Note: The fish for these rows will be D facing to the left.
Rows 2, 4: Solid square, half A/B square with B triangle to lower right, solid square, half A/B square with B triangle to upper left, solid square.
Note: The fish for these rows will be C facing to the right.
See assembly diagram (above, materials list)
BORDER
Round 1: With E, sc evenly around, working 3 sc in each corner, join with slip st to first sc, fasten off.
Round 2: With D, join with slip st to center sc of any corner 3-sc group, ch 3, dc in same sc, *ch 2, skip next 2 sc, slip st in next sc, ch 2, skip next 2 sc, 2 dc in next sc; repeat from * around, adjusting stitches as necessary, fasten off.
Visit Red Heart's company profile for more great patterns!
Read Next"Long Live the Queen" Throw
Thanks for your comment. Don't forget to share!
elocin1104 2800379
Nov 26, 2018
This comforting kitty afghan looks really beautiful. I have to agree with everyone here that this is not an appropriate title for this afghan. It would definitely be more likely to provoke any of my cats, especially if they actually paid any attention to the goldfish on the blanket. This would definitely be a beautiful gift for a new baby though.
princess6860504
May 30, 2018
I am going to have to agree with everyone else here and say that this is not what I would think of when I read the words "Comforting Kitty" afghan. I do LOVE the colors, though. I am seeing this more as a blankie in your baby's nursery, you know? I think the bright colors would stimulate baby effectively.
Zeemer
Mar 21, 2018
This comforting Kitty Afghan is so beautiful, too beautiful in fact for a kitty that urinates and poos a lot. I think I want a dark colored mat for my kitty which is easy to wash and maintain.
Hippie Chick
May 22, 2017
Love this fish blanket. Dont really think this would comfort a kitty. I think it would more likely be to provoke kitty into scratching and clawing at the blanket to eat the fish and destroy all of my beautiful work. Yikes. I find the blue coloring very calming and feel it more represents an ocean theme.
3cats2love
Mar 29, 2017
When I saw the title of Comforting Kitty afghan I thought it had cats on it. I couldn't tell looking at the photo. Reading the instructions I saw that it is fish on it, not cats. It's a cute afghan anyway but if I made it I would make cats instead lol.
babyblujeans40 788 5286
Aug 27, 2013
To me it looks like fish, But I could be wrong. If you push the Ctrl key on your keyboard and roll the wheel on your mouse you can make the picture bigger or smaller.
oldyooper
Aug 11, 2013
If you go directly to Red Heart website http://www.redheart.com/free-patterns/comfort-your-kitty-throw and click on "download printable instructions" you will get a clearer picture of the afghan. Hope that helps.
britmericalane
Aug 11, 2013
Try making a square to see what it would look like :) I wish there was a zoom on the patterns to enable a closer look - also a link to print!
sixpackoffatcats 3 072097
Aug 11, 2013
I might be more tempted to make this if I knew what the hell it looked like! That is a terrible photograph of the afghan. I won't be saving or making this pattern.
Report Inappropriate Comment
Are you sure you would like to report this comment? It will be flagged for our moderators to take action.
Thank you for taking the time to improve the content on our site.