Autumn Tones Table Runner
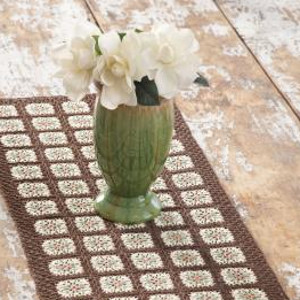
Give your dining room table a lovely fall look with this Autumn Tones Table Runner. This free crochet pattern for a table runner is understated and classy, but it will give your table an unmistakably autumn accent. Decorate your Thanksgiving table setting with this simple table runner pattern, which you'll love to reuse year after year. Take your DIY home decor up a notch when you design your own table theme around this simple crochet table runner. The geometric look will never go out of style.

Crochet HookH/8 or 5 mm hook
Yarn Weight(0) Lace (33-40 stitches to 4 inches). Includes crochet thread.
MATERIALS:
- Aunt Lydia's Classic Crochet Thread, Size 10: 1 ball each of 310 Copper Mist A, 661 Frosty Green B and 420 Cream C; 2 balls 131 Fudge Brown D
- Susan Bates Steel Crochet Hook: 1.7 mm [US 5]
- Yarn needle, heavy spray starch (optional)
GAUGE:
GAUGE: Motifs measure 2¼ x 2¼” (5.5 X 5.5 cm), CHECK YOUR GAUGE. Use any size hook to obtain the gauge given.
SIZE:
Table Runner measures 14¼ x 36¾” (36 x 93.5 cm)
SPECIAL STITCHES:
FPtr (Front post treble crochet): ,Yarn over, (twice), insert hook from front to back to front again around the post of next st, yarn over, mdraw yarn through st, [yarn over, draw yarn through 2 loops on hook] 3 times.
Note
Runner is made up of 75 motifs worked in 5 strips of 15 motifs each and joined together while completing last round of each motif.
RUNNER
First Strip
Motif #1
With A, ch 6; join with a slip st in first ch to mform a ring.
Round 1: Ch 3, 2 dc in ring, [ch 3, 3 dc in ring] 3 times, ch 3; join with a slip stitch to top of beginning ch-3. Fasten off A.
Round 2: With right side facing, join B in any ch-3 space, ch 3, (2 dc, ch 3, 3 dc) in same space, ch 1, FPtr around the post of center dc of next 3-dc group, ch 1, *(3 dc, ch 3, 3 dc) in corner space, ch 1, FPtr around the post of center dc of next 3-dc group, ch 1; repeat from * twice; join with slip st to top of beginning ch-3. Fasten off B.
Round 3: With right side facing, join C min any corner ch-3 space, ch 3, (2 dc, ch 3, 3 dc) in same space, *ch 1, FPtr around the post of center dc of next 3-dc group, ch 1, 3 dc in next FPtr, ch 1, FPtr around the post of center dc of next 3-dc group, ch 1**, (3 dc, ch 3, 3 dc) in next corner space; repeat from * around, mending last repeat at **; join with slip st to top mof beginning ch-3. Fasten off C.
Round 4:
With right side facing, join D ,in any corner ch-3 space, ch 3, (2 dc, ch 3, 3 dc) in same space, *[ch 1, FPtr around the post of center dc of next 3-dc group, ch 1, 3 dc in ,next FPtr] twice, ch 1, FPtr around the post of ,center dc of next 3-dc group, ch 1**, (3 dc, ch ,3, 3 dc) in next corner space; repeat from * ,around, ending last repeat at **; join with slip ,st to top of beginning ch-3. Fasten off D.
Motif #2 (joined on one side)
Repeat rounds 1-3 of Motif #1.
Round 4: With right side facing, join D ,in any ,corner ch-3 space, ch 3, 2 dc in same space, ch 1, holding wrong sides of motifs together to join them, slip st in corner ch-3 space of previous motif, ch 1, 3 dc same corner space ,of current motif, [ch 1, FPtr around the post of ,center dc of next 3-dc group holding back last ,2 loops, draw up a loop in FPtr on previous motif, draw through all loops on hook, ch 1, 3 dc in next FPtr] twice, ch 1, FPtr around the post of center dc of next 3-dc group holding back last 2 loops, draw up a loop in FPtr on previous motif, draw through all loops on hook, ch 1, 3 dc in next corner space, ch 1, slip stitch in next ch-3 corner space on mprevious motif, ch 1, 3 dc in same corner space on current motif, *[ch 1, FPtr around the mpost of center dc of next 3-dc group, ch 1, 3 dc in next FPtr] twice, ch 1, FPtr around the mpost of center dc of next 3-dc group, ch 1**, (3 dc, ch 3, 3 dc) in next corner ch-3 space; repeat from * once; repeat from * to ** once; mjoin with slip st to top of beginning ch-3. Fasten off D.
Motifs #3-15
Work same as Motif #2, joining to previous motif on opposite side, forming a strip of 15 motifs.
Motif #16
Work same as Motif #2, joining to bottom edge of Motif #1.
Motif #17 (joined on 2 sides)
Repeat rounds 1-3 of Motif #1.
Round 4: With right side facing, join D in any corner ch-3 space, ch 3, 2 dc in same space, ch 1, holding wrong sides of motifs together to join them, slip st in corresponding corner ch-3 space of previous motif, ch 1, 3 dc same corner space of current motif, *[ch 1, FPtr around the post of center dc of next 3-dc group holding back last 2 loops, draw up a loop in FPtr on previous motif, draw through all loops on hook, ch 1, 3 dc in next FPtr] twice, ch 1, FPtr around the post of center dc of next 3-dc group holding back last 2 loops, draw up a loop in FPtr on previous motif, draw through all loops on hook, ch 1, 3 dc in next corner space, ch 1, slip stitch in next ch-3 corner space on previous motif, ch 1, 3 dc in same corner space on current motif; repeat mfrom * once, **[ch 1, FPtr around the post of mcenter dc of next 3-dc group, ch 1, 3 dc in mnext FPtr] twice, ch 1, FPtr around the post of mcenter dc of next 3-dc group, ch 1**, (3 dc, ch 3, 3 dc) in next corner ch-3 space; repeat from ** to ** once; join with slip st to top of mbeginning ch-3. Fasten off D.
Motifs #18-30
Work same as Motif #17.
Third through Fifth Strip
Repeat Second Strip, joining to previous strip while completing last round of each motif.
BORDER
Round 1:
With right side facing, join D with slip s tin any corner ch-3 space, ch 3, (2 dc, ch 3, 3 dc) in same space, *[ch 1, FPtr around the post of center dc of next 3-dc group, ch 1, 3 dc in next FPtr], 3 times, ch 1, FPtr around the post of center dc of next 3-dc group, ch 1**, 3 dc in slip stitch where motifs are joined;repeat from * across to next corner ch-3 space, ending last repeat at **, (3 dc, ch 3, 3 dc) in next corner ch-3 space; repeat from * around, ending last repeat at **; join with slip st to top of beginning ch-3.
Round 2: Slip st to next corner ch-3 space, ch 3, (2 dc, ch 3, 3 dc) in same space, *ch 1, FPtr around the post of center dc of next 3-dc group, ch 1, 3 dc in next FPtr; repeat from * across to next corner ch-3 space**, (3 dc, ch 3, 3 dc) in corner space; repeat from * around, ending last repeat at **; join with slip st to top of beginning ch-3.
Round 3: Repeat Round 2. Fasten off. Weave in ends. Block and starch as desired.
ABBREVIATIONS
ch = chain; dc= double crochet; mm = millimeters; sc = single crochet; s t(s) = stitch(es); tr = treble crochet; [ ] = work directions in brackets the number of times specified; ( ) = work directions in parentheses into specified st or sp; * or ** = repeat whatever follows the * or ** as indicated.
Read NextCrochet Acorn Centerpiece
Your Recently Viewed Projects
JaneEK
Oct 16, 2017
So often holiday themed table items are either cutesy or kitchee. This one is a genuine exception. Do get this pattern directly from the Red Heart site as the download contains more photos than the above post. You cant see it in the project photo on here, but the border looks like it is some sort of basketweave pattern. I love the muted autumn colors, but this would look just as nice with Spring colors and straw colored border.
mulberrygalprinces s
Sep 07, 2017
This is perfect. Not only can I make a table runner, and I love table runners instead of a tablecloth. I want to make matching place mats and maybe coasters. It would make a wonderful gift too. I am adding this to my Christmas box in the closet. I love to ave a bunch of gifts made ahead.
Delphine Bryant
Aug 21, 2017
I love to work projects that consist of motifs. I call them my take along projects. I also adore that this autumn tones table runner has been worked with Aunt Lydia's Classic Crochet Thread, my favorite medium to work with.
Report Inappropriate Comment
Are you sure you would like to report this comment? It will be flagged for our moderators to take action.
Thank you for taking the time to improve the content on our site.

