Colors of the Rainbow Crochet Sweater
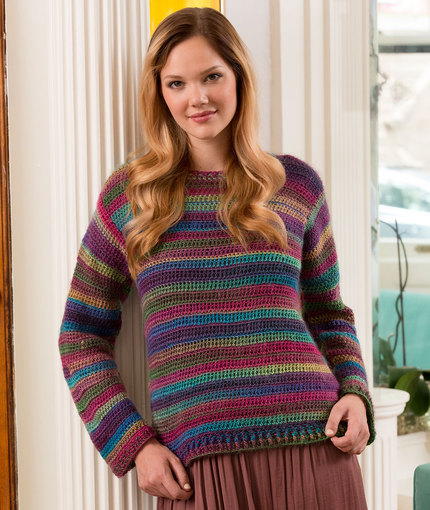
This colorful and comfortable Colors of the Rainbow Crochet Sweater is a great addition to your wardrobe. It can be worn with a variety of different outfits and the yarn is extremely soft to the touch. The interesting shadings in this yarn make the crochet pattern a joy to work up. The versatile sweater can be worn in many different ways. You can dress it up with a skirt or dress it down with your favorite pair of jeans. You will love to wear this easy crochet sweater and the eye-catching colors are sure to garner a lot of compliments from those you know and those you don't know.

Crochet HookJ/10 or 6 mm hook
Yarn Weight(4) Medium Weight/Worsted Weight and Aran (16-20 stitches to 4 inches)
Crochet Gauge15 dc = 4 (10 cm); 12 rows = 4 (10 cm) in single crochet and double crochet pattern. CHECK YOUR GAUGE. Use any size hook to obtain the gauge.
Materials:
- Red Heart® Boutique Unforgettable®: 5 (6, 7, 8, 8, 9) balls 3943 Stained Glass
- Susan Bates® Crochet Hook: 6mm [US J-10]
- Yarn needle, stitch markers
Directions are for size Small. Changes for sizes Medium, Large, 1X, 2X, 3X are in parentheses.
Finished Bust: 36 (40, 44, 48, 52, 56)” [91.5 (101.5, 112, 122, 132, 142) cm]
Finished Length: 21 (22, 23, 24, 25, 26)” [53.5 (56, 58.5, 61, 63.5, 66) cm]
Notes
- Sweater is made with front, back, and two sleeves sewn together and allows for 4” (10 cm) of ease.
- Placing a stitch marker to indicate the right side of the work is helpful.
Special Stitches
Bpdc (back post double crochet) = Yarn over, insert hook from back side of work to front and to back again around the post of indicated stitch; yarn over and pull up a loop (3 loops on hook), yarn over and draw through 2 loops (2 loops on hook), yarn over and draw through 2 loops (1 loop on hook). Skip the stitch “in front of ” the Bpdc.
dc2tog = [Yarn over, insert hook in next stitch, yarn over and pull up loop, yarn over, draw through 2 loops] 2 times, yarn over, draw through all 3 loops on hook.
Fpdc (Front post double crochet) = Yarn over, insert hook from front side of work to back and to front again around post of indicated stitch; yarn over and pull up a loop (3 loops on hook), yarn over and draw through 2 loops (2 loops on hook), yarn over and draw through 2 loops (1 loop on hook).
sc2tog = [Insert hook in next stitch, yarn over and pull up a loop] twice, yarn over and draw through all 3 loops on hook
Pattern Stitches
Body Pattern
Row 1 (right side): Ch 1, sc in each st across, turn.
Row 2 (wrong side): Ch 1, dc in each st across, turn.
Repeat Rows 1 and 2 for Body Pattern.
Sc Increase Row: Ch 1, 2 sc in first st, sc in each st across to last sts, 2 sc in last st—2 sts increased.
Dc Increase Row: Ch 1, 2 dc in first st, dc in each st across to last sts, 2 dc in last st—2 sts increased.
Sweater
Back
Ribbing
Ch 70 (77, 85, 92, 100, 107).
Sizes Small, 1X, and 2X only:
Row 1 (right side): Dc in 3rd ch from hook (beginning ch count as first dc) and in each ch across, turn—68 (90, 98) dc.
Rows 2–4: Ch 1, Fpdc around first st, Bpdc around next st, *Fpdc around next st, Bpdc around next st; repeat from * across to last 2 sts, Fpdc around next st, dc in last st, turn.
Sizes Medium, Large, and 3X only:
Row 1 (right side): Dc in 3rd ch from hook (beginning ch count as first dc) and in each ch across, turn—77 (85, 107) dc.
Row 2: Ch 1, Fpdc around first st, *Bpdc around next st, Fpdc around next st; repeat from * across to last 2 sts, Bpdc around next st, dc in last st, turn.
Row 3: Ch 1, Bpdc around first st, *Fpdc around next st, Bpdc around next st; repeat from * across to last 2 sts, Fpdc around next st, dc in last st, turn.
Row 4: Repeat Row 2.
Body
All sizes:
Work even in Body Pattern until back measures 14 (14½, 15, 16, 16½, 17)” [35.5 (37, 38, 40.5, 42, 43) cm] from lower edge ending with a Row 2. Place markers on each end of last row.
Armhole Shaping
Row 1 (right side): Slip st in first 4 (5, 6, 6, 6, 7) sts, ch 1, sc in each st across to last 4 (5, 6, 6, 6, 7) sts; leave last sts unworked, turn—60 (65, 71, 78, 86, 91) sts.
Row 2 (wrong side): Ch 1, dc2tog, dc in each st across to last 2 sts, dc2tog, turn—58 (63, 69, 76, 84, 89) sts.
Sizes Small and Large only:
Row 3: Ch 1, sc in each st across, turn.
Rows 4 and 5 (4–9): Repeat Rows 2 and 3 one (three) time(s)—56 (63) sts.
Size Medium only:
Row 3: Ch 1, sc2tog, sc in each st across to last 2 sts, sc2tog, turn—61 sts.
Row 4: Ch 1, skip first st, dc2tog, dc in each st across, turn—60 sts.
Sizes 1X only:
Row 3: Ch 1, sc2tog, sc in each st across to last 2 sts, sc2tog, turn—74 sts.
Rows 4–6: Repeat Rows 2 and 3, then repeat Row 2 again—68 sts.
Sizes 2X only:
Row 3: Ch 1, sc2tog, sc in each st across to last 2 sts, sc2tog, turn—82 sts. Repeat Rows 2 and 3, then repeat Row 2 again—76 sts.
Next Row: Ch 1, dc2tog, dc in each remaining st across, turn—75 sts.
Sizes 3X only:
Row 3: Ch 1, sc2tog, sc in each st across to last 2 sts, sc2tog, turn—87 sts.
Rows 4 and 5: Repeat Rows 2 and 3—83 sts.
All sizes: Work even in Body Pattern until armhole measures 6½ (7, 7½, 7½, 8, 8½)” [15.5 (18, 19, 19, 20.5, 21.5) cm] ending on a Row 1.
Left Neck Shaping
Row 1 (wrong side): Ch 1, dc in first 15 (17, 18, 19, 22, 24) sts, dc2tog; leave remaining sts unworked, turn—16 (18, 19, 20, 23, 25) sts.
Row 2: Ch 1, sc in each st across. Fasten off.
Right Neck Shaping
Row 1 (wrong side): With wrong side facing, skip next 22 (22, 23, 26, 27, 31) unworked sts, join yarn in next st, ch 1, dc2tog in same st as join and next st, dc in each remaining st, turn—16 (18, 19, 20, 23, 25) sts.
Row 2: Ch 1, sc in each st across. Fasten off.
Front
Work same as back until armhole measures 4½, (5, 5½, 5½, 6, 6½)” [11.5 (12.5, 14, 14, 15, 16.5) cm] ending on a Row 1.
Right Neck Shaping
Row 1 (wrong side): Ch 1, dc in next 19 (21, 22, 23, 27, 29) sts, dc2tog, turn—20 (22, 23, 24, 28, 30) sts.
Row 2: Ch 1, sc2tog, sc in each remaining st across, turn—19 (21, 22, 23, 27, 29) sts.
Row 3: Ch 1, dc in each st across to last 2 sts, dc2tog, turn—18 (20, 21, 22, 26, 28) sts.
Rows 4 and 5: Repeat Rows 2 and 3—16 (18, 19, 20, 24, 26) sts.
Sizes Small, Medium, Large, and 1X only:
Rows 6–8: Ch 1, sc in each st across, turn.
Row 7: Ch 1, dc in each st across, turn.
Row 8: Ch 1, sc in each st across, turn.
Fasten off.
Sizes 2X and 3X only:
Row 6: Repeat Row 2—23 (25) sts.
Row 7: Ch 1, dc in each st across, turn.
Row 8: Ch 1, sc in each st across, turn.
Fasten off.
Left Neck Shaping
Row 1 (wrong side): With wrong side facing, skip next 14 (14, 15, 18, 17, 21) unworked sts, join yarn in next st, ch 1, dc2tog in same st as join and next st, dc in each remaining st, turn—20 (22, 23, 24, 28, 30) sts.
Row 2: Ch 1, sc in each st across to last 2 sts, sc2tog, turn—19 (21, 22, 23, 27, 29) sts.
Row 3: Ch 1, dc2tog, dc in each remaining st across, turn—18 (20, 21, 22, 26, 28) sts.
Rows 4 and 5: Repeat Rows 2 and 3—16 (18, 19, 20, 24, 26) sts.
Rows 6–8: Repeat Rows 6–8 of right neck shaping.

If you love making crochet sweaters, then be sure to check out our collection of 19 Easy Breezy Cardigan Crochet Patterns.
Sleeve (make 2)
Ribbing
Ch 44 (48, 50, 54, 56, 58).
Row 1 (right side): Dc in 3rd ch from hook (beginning ch count as first dc) and in each ch across, turn—42 (46, 48, 52, 54, 56) sts.
Row 2: Ch 1, Fpdc around first st, Bpdc around next st, *Fpdc around next st, Bpdc around next st; repeat from * across to last 2 sts, Fpdc around next st, dc in last st, turn.
Body
Row 1: Ch 1, sc in each st across, turn.
Row 2: Ch 1, dc in each st across, turn.
Row 3: Repeat Row 1.
Size Small and 1X only:
Rows 4 and 5: Work even in Body Pattern.
Row 6: Work Dc Increase Row—44 (54) sts.
Rows 7–42 (36): Repeat Rows 1–6 six (five) times—56 (64) sts.
Size Medium only:
Row 4: Repeat Row 2.
Row 5: Work Sc Increase Row—48 sts.
Rows 6–9: Work even in Body Pattern.
Row 10: Work Dc Increase Row—50 sts.
Rows 11–14: Work even in Body Pattern.
Row 15: Repeat Sc Increase Row—52 sts.
Row 16–20: Work even in Body Pattern.
Row 21: Repeat Sc Increase Row—54 sts.
Rows 22–36: Repeat Rows 16–21 three times—60 sts.
Size Large only:
Row 4: Work Dc Increase Row—50 sts.
Rows 5–16: Repeat Rows 1–4 three times—56 sts.
Rows 17–20: Work even in Body Pattern.
Row 21: Work Sc Increase Row—58 sts.
Row 22–25: Work even in Body Pattern.
Row 26: Repeat Dc Increase Row—60 sts.
Rows 27–36: Repeat Rows 17–26 once—64 sts
Size 2X only:
Row 4: Work Dc Increase Row—56 sts.
Rows 5–8: Repeat Rows 1–4—58 sts.
Rows 9–12: Work even in Body Pattern.
Row 13: Work Sc Increase Row—60 sts.
Rows 14–17: Work even in Body Pattern.
Row 18: Repeat Dc Increase Row—62 sts.
Rows 19–28: Repeat Rows 9–18¬—66 sts.
Rows 29–33: Repeat Rows 9–13—68 sts.
Size 3X only:
Row 4: Work Dc Increase Row—58 sts.
Rows 5–28: Repeat Rows 1–4 six times—70 sts.
Rows 29–32: Work even in Body Pattern.
Row 33: Work Sc Increase Row—72 sts.
All sizes: Work even in Body Pattern as needed until sleeve measures 15 (14, 13, 13, 12, 12)” [38 (35.5, 33, 33, 30.5, 30.5) cm] from lower edge. Place markers on each end of last row. Continue in Body Pattern until sleeve measures 16 (15¼, 14½, 14½, 13¾, 14)” [40.5 (38.5, 37, 37, 35, 35.5) cm] from lower edge ending with a Row 1.
Sleeve Cap Shaping
Next Row (wrong side): Ch 1, dc2tog, dc in each st across to last 2 sts, dc2tog, turn—54 (58, 62) sts.
Next Row (right side): Ch 1, sc in each st across, turn.
Repeat last 2 rows 1 (2, 3, 2, 2, 2) time(s), then repeat wrong side row 0 (0, 0, 1, 1, 1) time(s)—52 (54, 56, 56, 60, 64) sts.
Fasten off.
Finishing
Sew shoulder seams.
Neckband
Round 1 (right side): With right side facing and evenly spacing sts around, join yarn with slip st in left shoulder seam, ch 1, 12 dc across left front neck, 14 (14, 15, 18, 17, 20) dc across center of front, 12 dc across right front neck, 30 (30, 31, 34, 35, 38) dc across back; join with slip st in first dc—68 (68, 70, 76, 76, 82) dc.
Round 2: Ch 1, Fpdc around first st, Bpdc around next st, *Fpdc around next st, Bpdc around next st; repeat from * around; join with slip st in first Fpdc. Fasten off. Fold sleeve in half and place marker on fold line at top of sleeve. Align top marker with shoulder seam, match sleeve markers with markers on ends of rows of bodies, and pin in place. Sew sleeve to back and front. Sew side and sleeve seams. Weave in ends.
Abbreviations
ch = chain(s)
dc = double crochet
sc = single crochet
st(s) = stitch(es)
[ ] = work directions in brackets the number of times specified
* = repeat whatever follows the * as indicated

Up Next
Up Next:
More Sweater Patterns
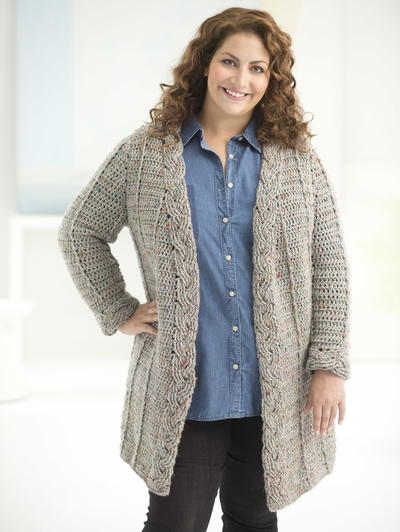
Read NextCurvy Girl Cable Crochet Cardigan
Your Recently Viewed Projects
Thanks for your comment. Don't forget to share!
Sharon M
Nov 24, 2018
Am I the only one finding this pattern confusing? I wish sweater crochet patterns had tutorials on you tube with a good teacher crocheting it to show those of us who have never crochet sweaters how to do it, including the shaping, creating arm holes, making sleeves, and sewing sleeves to the body of the sweater.
Morehouse17
Nov 18, 2018
It can really be confusing when making an article of clothing that includes directions for multiple sizes. Here is a hint that I use. Print out the pattern and highlight all of the directions that will apply to your size. Make sure you read it from top to bottom so that you get all of the directions. IF there is no option to purchase your size, this is the next best option. Happy crocheting.
Daughter of Light
Feb 28, 2018
I am delighted to have found this Color of the Rainbow Crochet Sweater pattern!!! It is rated "easy" and they have remembered us larger folks by including our sizes! It will probably be the first article of clothing, other than a scarf and hat, that I try to crochet. I had the same thought as princess6860504 in that I could wear a long sleeve collared shirt underneath that coordinated with the colors in the yarn I choose and leave the tails hanging out. How versatile is that?!?
KLC
Jan 25, 2018
Oh, I love this so much. It reminds me of my mom when we were kids. She has a lot of rainbow and colorful sweaters.
princess6860504
Aug 29, 2017
I can see wearing a white collar shirt underneath this, with the shirt tails hanging out. The stripes are quite unexpected and would make a boring office job fun again...yes, clothing has the power to change our moods! Everything we need to make this sweater is featured directly on this page without having to click a link to another page.
Cheryl Y
May 11, 2017
Wow this is a beautiful Colors of the Rainbow Crochet Sweater. I love it and so want to make one. I like that the pattern is right here on this page and it's easy to follow and understand. I'm happy to see the chart to make sure I have the right shape and measurements. I'm going to buy the yarn and give this one a try. Fingers crossed that it works out as pictured. Has anyone made this one and did it turn out or were there problems I need to know about? Please post.. Thank you so much for this free crochet pattern.
Lynn K
Apr 05, 2017
For some odd reason I hardly ever wear crocheted clothes, besides scarves, shawls, cowls and the like. This sweater, though, is really lovely and I would love to have it made in time for Fall which is just about here in South Africa. It will be my first ever sweater that I have crocheted! I have quite a few bamboo yarn leftovers in colors similar to the pattern photo so am going to use those and it is going to be lovely!
Hippie Chick
Feb 09, 2017
Very nice classic cardigan sweater. I have worked with Red Heart Boutique Unforgettable in the past as I made an afghan out of it. It is very easy yarn to work with. The only problem that I ran in to with it was when joining a new skein and the colors did not match up and wound up with a big patch of the same color instead of a striping effect.
Linda
Feb 06, 2017
I'm willing to learn to crochet this rainbow colored sweater for myself. If I like it I'll introduce it to friends.
sstio 3964115
Oct 07, 2016
I just finished this and it was very easy, clear directions---except---you can't see it in the photo but the sleeves are belled at the cuff and hang down quite a bit. I ripped it out and started the sleeve without the cuff to the measurement of my wrist and worked up to the shoulder evenly increasing the # of stitches required. Then I made the cuff seperately and sewed it on--it was much better.
Zeemer
Apr 30, 2016
Crocheters, you will have an easy time. Pattern is already on the front page. Thanks to the author. Love the color combo of this sweater. But you can change colors depending on your preference and taste and maybe the season.
Report Inappropriate Comment
Are you sure you would like to report this comment? It will be flagged for our moderators to take action.
Thank you for taking the time to improve the content on our site.