This project was submitted by one of our readers, just like you.
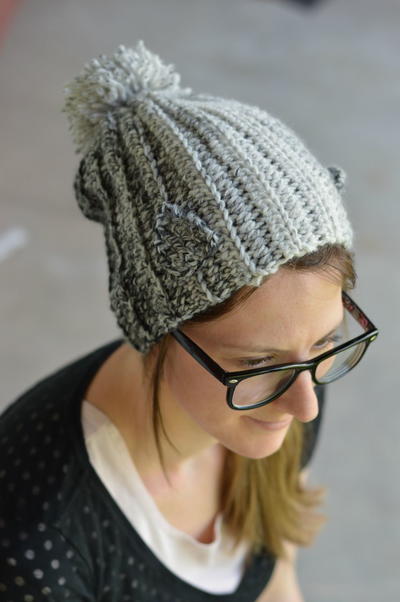
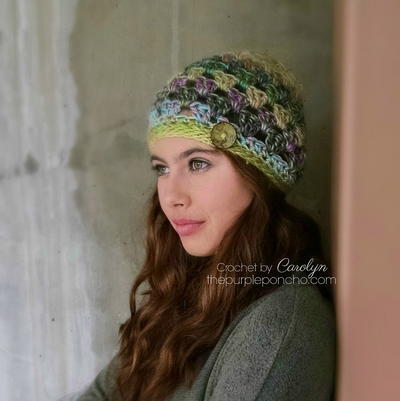
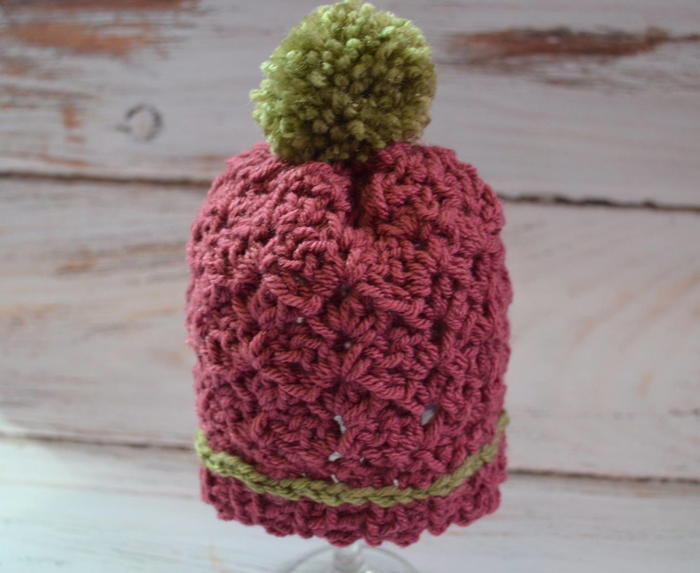
Berry Delight Free Crochet Beanie Pattern

Berry Delight Free Crochet Beanie Pattern
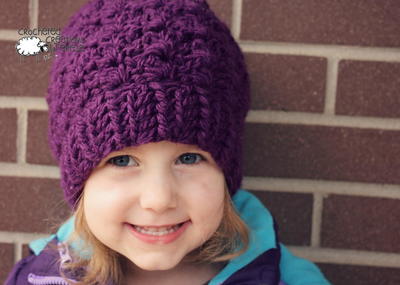
The Berry Delight Beanie is a crochet hat pattern that is worked up with bulky yarn, so it's fast to make. This crochet beanie features an easy stitch pattern that is fun to crochet and lends a nice texture to the finished fabric. Stay cozy this winter with this easy pattern and crochet one for every member of your family. This pattern is written to include sizes preemie through large adult, so no one will be left out. The hat is worked from the brim up to the top of the hat, and then the ribbing is worked separately and then seamed at the end.
Notes-Hat is worked from the brim up; the brim (ribbing) is worked in rows and seamed together at the end
-Starting chain does not count as a stitch unless directed otherwise
-Each round is started in the same stitch as your starting chain
-The end of each round is joined by slip stitching in the first stitch of the round unless directed otherwise

Crochet HookJ/10 or 6 mm hook
Yarn Weight(5) Bulky/Chunky (12-15 stitches for 4 inches)
Crochet GaugeGauge in HDC: 11 stitches and 9 rows = 4" (10 cm)
Finished SizeNewborn to Large Adult
Materials List
- 1 – 2 skeins of bulky weight #5 yarn such as Knit Picks Brava Bulky
- 6.0 mm (J-10) crochet hook
- yarn needle for weaving in ends
Pattern
Preemie
Head Circumference = 10" - 12" • Hat Circumference = 10" • Hat Height = 4.5"
For preemie only, use Worsted Weight yarn and a 5 mm (H-8) hook • HDC Gauge: 14 sts and 11 rows = 4" (10 cm)
-
Ribbing - leave a lengthy starting tail for seaming the ends of the brim together.
-
Row 1: Ch 5, hdc in 2nd chain and in each chain to end, turn (4)
-
Row 2: Ch 1, working in FRONT LOOPS only - hdc in each stitch across, turn (4)
-
Row 3 - 23: Repeat Row 2
-
Hat Body - Turn your work so you are working in the ends of the Rows.
-
Round 1: Ch 1, *make 1 sc in the end of the first row, make 2 sc in the next row* repeat between * to end, make 2 sc into the foundation chain after the last row, bring the ends together and sl st to join in the first sc (36)
-
Round 2: Ch 2 (counts as first stitch throughout), in same stich make [dc, ch 2, sc], *skip 2 stitches, in next stitch make [2 dc, ch 2, sc]*, repeat between * to end, sl st to join in top of chain 2, turn (36 sts, 12 ch-2 spaces)
-
Round 3: Sl st into first ch-2 space, ch 2, in same space make [dc, ch 2, sc], *in next ch-2 space make [2 dc, ch 2, sc]*, repeat between * to end, join in top of chain 2, turn (36 sts, 12 ch-2 spaces)
-
Round 4: Repeat Round 3
-
Round 5: Sl st into first ch-2 space, ch 2, in same space make [dc, ch 1, sc], *in next ch-2 space make [2 dc, ch 1, sc]*, repeat between * to end, join in top of chain 2, turn (36 sts, 12 ch-1 spaces)
-
Round 6: Sl st into first ch-1 space, ch 2, in same space make [dc, sc], *in next ch-1 space make [2 dc, sc]*, repeat between * to end, join in top of chain 2, turn (36)
-
Round 7: Ch 1, in first stitch *make 1 hdc, hdc2tog*, repeat between * to end, join in first hdc - do not turn (24)
-
Round 8: Ch 1, *hdc2tog* 12 times, join in first hdc (12)
-
Leave a lengthy tail. With a yarn needle, weave the tail through the front loop of each stitch and pull gently to close the hole, secure the end and fasten off. On the brim, use the starting tail to seam the ends together. Weave in all ends. Attach a mini pompom if desired.
Newborn
Head Circumference = 13" - 15" • Hat Circumference = 13" • Height hat = 5.25"
-
Ribbing - leave a lengthy starting tail for seaming the ends of the brim together.
-
Row 1: Ch 5, hdc in 2nd chain and in each chain to end, turn (4)
-
Row 2: Ch 1, working in FRONT LOOPS only - hdc in each stitch across, turn (4)
-
Row 3 - 23: Repeat Row 2
-
Hat Body - Turn your work so you are working in the ends of the Rows.
-
Round 1: Ch 1, *make 1 sc in the end of the first row, make 2 sc in the next row* repeat between * to end, make 2 sc into the foundation chain after the last row, bring the ends together and sl st to join in the first sc (36)
-
Round 2: Ch 2 (counts as first stitch throughout), in same stich make [dc, ch 2, sc], *skip 2 stitches, in next stitch make [2 dc, ch 2, sc]*, repeat between * to end, sl st to join in top of chain 2, turn (36 sts, 12 ch-2 spaces)
-
Round 3: Sl st into first ch-2 space, ch 2, in same space make [dc, ch 2, sc], *in next ch-2 space make [2 dc, ch 2, sc]*, repeat between * to end, join in top of chain 2, turn (36 sts, 12 ch-2 spaces)
-
Round 4: Repeat Round 3
-
Round 5: Sl st into first ch-2 space, ch 2, in same space make [dc, ch 1, sc], *in next ch-2 space make [2 dc, ch 1, sc]*, repeat between * to end, join in top of chain 2, turn (36 sts, 12 ch-1 spaces)
-
Round 6: Sl st into first ch-1 space, ch 2, in same space make [dc, sc], *in next ch-1 space make [2 dc, sc]*, repeat between * to end, join in top of chain 2, turn (36)
-
Round 7: Ch 1, in first stitch *make 1 hdc, hdc2tog*, repeat between * to end, join in first hdc - do not turn (24)
-
Round 8: Ch 1, *hdc2tog* 12 times, join in first hdc (12)
-
Leave a lengthy tail. With a yarn needle, weave the tail through the front loop of each stitch and pull gently to close the hole, secure the end and fasten off. On the brim, use the starting tail to seam the ends together. Weave in all ends. Attach a pompom if desired.
0 - 3 Months
Head Circumference = 14" - 16" • Hat Circumference = 14" • Height hat = 5.75"
-
Ribbing - leave a lengthy starting tail for seaming the ends of the brim together.
-
Row 1: Ch 5, hdc in 2nd chain and in each chain to end, turn (4)
-
Row 2: Ch 1, working in FRONT LOOPS only - hdc in each stitch across, turn (4)
-
Row 3 - 25: Repeat Row 2
-
Hat Body - Turn your work so you are working in the ends of the Rows.
-
Round 1: Ch 1, *make 1 sc in the end of the first row, make 2 sc in the next row* repeat between * to end, make 2 sc into the foundation chain after the last row, bring the ends together and sl st to join in the first sc (39)
-
Round 2: Ch 2 (counts as first stitch throughout), in same stich make [dc, ch 2, sc], *skip 2 stitches, in next stitch make [2 dc, ch 2, sc]*, repeat between * to end, sl st to join in top of chain 2, turn (39 sts, 13 ch-2 spaces)
-
Round 3: Sl st into first ch-2 space, ch 2, in same space make [dc, ch 2, sc], *in next ch-2 space make [2 dc, ch 2, sc]*, repeat between * to end, join in top of chain 2, turn (39 sts, 13 ch-2 spaces)
-
Round 4 - 5: Repeat Round 3
-
Round 6: Sl st into first ch-2 space, ch 2, in same space make [dc, ch 1, sc], *in next ch-2 space make [2 dc, ch 1, sc]*, repeat between * to end, join in top of chain 2, turn (39 sts, 13 ch-1 spaces)
-
Round 7: Sl st into first ch-1 space, ch 2, in same space make [dc, sc], *in next ch-1 space make [2 dc, sc]*, repeat between * to end, join in top of chain 2, turn (39)
-
Round 8: Ch 1, in first stitch *make 1 hdc, hdc2tog*, repeat between * to end, join in first hdc - do not turn (26)
-
Round 9: Ch 1, *hdc2tog* 13 times, join in first hdc (13)
-
Leave a lengthy tail. With a yarn needle, weave the tail through the front loop of each stitch and pull gently to close the hole, secure the end and fasten off. On the brim, use the starting tail to seam the ends together. Weave in all ends. Attach a pompom if desired.
3 - 6 Months
Head Circumference = 15" - 17" • Hat Circumference = 15" • Height hat = 6.25"
-
Ribbing - leave a lengthy starting tail for seaming the ends of the brim together.
-
Row 1: Ch 5, hdc in 2nd chain and in each chain to end, turn (4)
-
Row 2: Ch 1, working in FRONT LOOPS only - hdc in each stitch across, turn (4)
-
Row 3 - 27: Repeat Row 2
-
Hat Body - Turn your work so you are working in the ends of the Rows.
-
Round 1: Ch 1, *make 1 sc in the end of the first row, make 2 sc in the next row* repeat between * to end, make 2 sc into the foundation chain after the last row, bring the ends together and sl st to join in the first sc (42)
-
Round 2: Ch 2 (counts as first stitch throughout), in same stich make [dc, ch 2, sc], *skip 2 stitches, in next stitch make [2 dc, ch 2, sc]*, repeat between * to end, sl st to join in top of chain 2, turn (42 sts, 14 ch-2 spaces)
-
Round 3: Sl st into first ch-2 space, ch 2, in same space make [dc, ch 2, sc], *in next ch-2 space make [2 dc, ch 2, sc]*, repeat between * to end, join in top of chain 2, turn (42 sts, 14 ch-2 spaces)
-
Round 4 - 6: Repeat Round 3
-
Round 7: Sl st into first ch-2 space, ch 2, in same space make [dc, ch 1, sc], *in next ch-2 space make [2 dc, ch 1, sc]*, repeat between * to end, join in top of chain 2, turn (42 sts, 14 ch-1 spaces)
-
Round 8: Sl st into first ch-1 space, ch 2, in same space make [dc, sc], *in next ch-1 space make [2 dc, sc]*, repeat between * to end, join in top of chain 2, turn (42)
-
Round 9: Ch 1, in first stitch *make 1 hdc, hdc2tog*, repeat between * to end, join in first hdc - do not turn (28)
-
Round 10: Ch 1, *hdc2tog* 14 times, join in first hdc (14)
-
Leave a lengthy tail. With a yarn needle, weave the tail through the front loop of each stitch and pull gently to close the hole, secure the end and fasten off. On the brim, use the starting tail to seam the ends together. Weave in all ends. Attach a pompom if desired.
6 - 12 Months
Head Circumference = 16" - 18" • Hat Circumference = 16" • Height hat = 6.75"
-
Ribbing - leave a lengthy starting tail for seaming the ends of the brim together.
-
Row 1: Ch 6, hdc in 2nd chain and in each chain to end, turn (5)
-
Row 2: Ch 1, working in FRONT LOOPS only - hdc in each stitch across, turn (5)
-
Row 3 - 29: Repeat Row 2
-
Hat Body - Turn your work so you are working in the ends of the Rows.
-
Round 1: Ch 1, *make 1 sc in the end of the first row, make 2 sc in the next row* repeat between * to end, make 2 sc into the foundation chain after the last row, bring the ends together and sl st to join in the first sc (45)
-
Round 2: Ch 2 (counts as first stitch throughout), in same stich make [dc, ch 2, sc], *skip 2 stitches, in next stitch make [2 dc, ch 2, sc]*, repeat between * to end, sl st to join in top of chain 2, turn (45 sts, 15 ch-2 spaces)
-
Round 3: Sl st into first ch-2 space, ch 2, in same space make [dc, ch 2, sc], *in next ch-2 space make [2 dc, ch 2, sc]*, repeat between * to end, join in top of chain 2, turn (45 sts, 15 ch-2 spaces)
-
Round 4 - 7: Repeat Round 3
-
Round 8: Sl st into first ch-2 space, ch 2, in same space make [dc, ch 1, sc], *in next ch-2 space make [2 dc, ch 1, sc]*, repeat between * to end, join in top of chain 2, turn (45 sts, 15 ch-1 spaces)
-
Round 9: Sl st into first ch-1 space, ch 2, in same space make [dc, sc], *in next ch-1 space make [2 dc, sc]*, repeat between * to end, join in top of chain 2, turn (45)
-
Round 10: Ch 1, in first stitch *make 1 hdc, hdc2tog*, repeat between * to end, join in first hdc - do not turn (30)
-
Round 11: Ch 1, *hdc2tog* 15 times, join in first hdc (15)
-
Leave a lengthy tail. With a yarn needle, weave the tail through the front loop of each stitch and pull gently to close the hole, secure the end and fasten off. On the brim, use the starting tail to seam the ends together. Weave in all ends. Attach a pompom if desired.
Toddler & Small Child
(Approximately 1 to 5 years - please measure for a more accurate fit)
Head Circumference = 17" - 19" • Hat Circumference = 17" • Height hat = 7.5"
-
Ribbing - leave a lengthy starting tail for seaming the ends of the brim together.
-
Row 1: Ch 6, hdc in 2nd chain and in each chain to end, turn (5)
-
Row 2: Ch 1, working in FRONT LOOPS only - hdc in each stitch across, turn (5)
-
Row 3 - 31: Repeat Row 2
-
Hat Body - Turn your work so you are working in the ends of the Rows.
-
Round 1: Ch 1, *make 1 sc in the end of the first row, make 2 sc in the next row* repeat between * to end, make 2 sc into the foundation chain after the last row, bring the ends together and sl st to join in the first sc (48)
-
Round 2: Ch 2 (counts as first stitch throughout), in same stich make [dc, ch 2, sc], *skip 2 stitches, in next stitch make [2 dc, ch 2, sc]*, repeat between * to end, sl st to join in top of chain 2, turn (48 sts, 16 ch-2 spaces)
-
Round 3: Sl st into first ch-2 space, ch 2, in same space make [dc, ch 2, sc], *in next ch-2 space make [2 dc, ch 2, sc]*, repeat between * to end, join in top of chain 2, turn (48 sts, 16 ch-2 spaces)
-
Round 4 - 8: Repeat Round 3
-
Round 9: Sl st into first ch-2 space, ch 2, in same space make [dc, ch 1, sc], *in next ch-2 space make [2 dc, ch 1, sc]*, repeat between * to end, join in top of chain 2, turn (48 sts, 16 ch-1 spaces)
-
Round 10: Sl st into first ch-1 space, ch 2, in same space make [dc, sc], *in next ch-1 space make [2 dc, sc]*, repeat between * to end, join in top of chain 2, turn (48)
-
Round 11: Ch 1, in first stitch *make 1 hdc, hdc2tog*, repeat between * to end, join in first hdc - do not turn (32)
-
Round 12: Ch 1, *hdc2tog* 16 times, join in first hdc (16)
-
Leave a lengthy tail. With a yarn needle, weave the tail through the front loop of each stitch and pull gently to close the hole, secure the end and fasten off. On the brim, use the starting tail to seam the ends together. Weave in all ends. Attach a pompom if desired.
Child
(Approximately 5 to 10 years - please measure for a more accurate fit)
Head Circumference = 18" - 20" • Hat Circumference = 18" • Height hat = 8"
-
Ribbing - leave a lengthy starting tail for seaming the ends of the brim together.
-
Row 1: Ch 6, hdc in 2nd chain and in each chain to end, turn (5)
-
Row 2: Ch 1, working in FRONT LOOPS only - hdc in each stitch across, turn (5)
-
Row 3 - 33: Repeat Row 2
-
Hat Body - Turn your work so you are working in the ends of the Rows.
-
Round 1: Ch 1, *make 1 sc in the end of the first row, make 2 sc in the next row* repeat between * to end, make 2 sc into the foundation chain after the last row, bring the ends together and sl st to join in the first sc (51)
-
Round 2: Ch 2 (counts as first stitch throughout), in same stich make [dc, ch 2, sc], *skip 2 stitches, in next stitch make [2 dc, ch 2, sc]*, repeat between * to end, sl st to join in top of chain 2, turn (51 sts, 17 ch-2 spaces)
-
Round 3: Sl st into first ch-2 space, ch 2, in same space make [dc, ch 2, sc], *in next ch-2 space make [2 dc, ch 2, sc]*, repeat between * to end, join in top of chain 2, turn (51 sts, 17 ch-2 spaces)
-
Round 4 - 9: Repeat Round 3
-
Round 10: Sl st into first ch-2 space, ch 2, in same space make [dc, ch 1, sc], *in next ch-2 space make [2 dc, ch 1, sc]*, repeat between * to end, join in top of chain 2, turn (51 sts, 17 ch-1 spaces)
-
Round 11: Sl st into first ch-1 space, ch 2, in same space make [dc, sc], *in next ch-1 space make [2 dc, sc]*, repeat between * to end, join in top of chain 2, turn (51)
-
Round 12: Ch 1, in first stitch *make 1 hdc, hdc2tog*, repeat between * to end, join in first hdc - do not turn (34)
-
Round 13: Ch 1, *hdc2tog* 17 times, join in first hdc (17)
-
Leave a lengthy tail. With a yarn needle, weave the tail through the front loop of each stitch and pull gently to close the hole, secure the end and fasten off. On the brim, use the starting tail to seam the ends together. Weave in all ends. Attach a pompom if desired.
Teen / Small Adult
Head Circumference = 20" - 22" • Hat Circumference = 19" • Height hat = 8"
-
Ribbing - leave a lengthy starting tail for seaming the ends of the brim together.
-
Row 1: Ch 6, hdc in 2nd chain and in each chain to end, turn (5)
-
Row 2: Ch 1, working in FRONT LOOPS only - hdc in each stitch across, turn (5)
-
Row 3 - 35: Repeat Row 2
-
Hat Body - Turn your work so you are working in the ends of the Rows.
-
Round 1: Ch 1, *make 1 sc in the end of the first row, make 2 sc in the next row* repeat between * to end, make 2 sc into the foundation chain after the last row, bring the ends together and sl st to join in the first sc (54)
-
Round 2: Ch 2 (counts as first stitch throughout), in same stich make [dc, ch 2, sc], *skip 2 stitches, in next stitch make [2 dc, ch 2, sc]*, repeat between * to end, sl st to join in top of chain 2, turn (54 sts, 18 ch-2 spaces)
-
Round 3: Sl st into first ch-2 space, ch 2, in same space make [dc, ch 2, sc], *in next ch-2 space make [2 dc, ch 2, sc]*, repeat between * to end, join in top of chain 2, turn (54 sts, 18 ch-2 spaces)
-
Round 4 - 10: Repeat Round 3
-
Round 11: Sl st into first ch-2 space, ch 2, in same space make [dc, ch 1, sc], *in next ch-2 space make [2 dc, ch 1, sc]*, repeat between * to end, join in top of chain 2, turn (54 sts, 18 ch-1 spaces)
-
Round 12: Sl st into first ch-1 space, ch 2, in same space make [dc, sc], *in next ch-1 space make [2 dc, sc]*, repeat between * to end, join in top of chain 2, turn (54)
-
Round 13: Ch 1, in first stitch *make 1 hdc, hdc2tog*, repeat between * to end, join in first hdc - do not turn (36)
-
Round 14: Ch 1, *hdc2tog* 18 times, join in first hdc (18)
-
Leave a lengthy tail. With a yarn needle, weave the tail through the front loop of each stitch and pull gently to close the hole, secure the end and fasten off. On the brim, use the starting tail to seam the ends together. Weave in all ends. Attach a pompom if desired.
Medium Adult
Head Circumference = 22" - 23" • Hat Circumference = 20.5" • Height hat = 8.5"
-
Ribbing - leave a lengthy starting tail for seaming the ends of the brim together.
-
Row 1: Ch 6, hdc in 2nd chain and in each chain to end, turn (5)
-
Row 2: Ch 1, working in FRONT LOOPS only - hdc in each stitch across, turn (5)
-
Row 3 - 37: Repeat Row 2
-
Hat Body - Turn your work so you are working in the ends of the Rows.
-
Round 1: Ch 1, *make 1 sc in the end of the first row, make 2 sc in the next row* repeat between * to end, make 2 sc into the foundation chain after the last row, bring the ends together and sl st to join in the first sc (57)
-
Round 2: Ch 2 (counts as first stitch throughout), in same stich make [dc, ch 2, sc], *skip 2 stitches, in next stitch make [2 dc, ch 2, sc]*, repeat between * to end, sl st to join in top of chain 2, turn (57 sts, 19 ch-2 spaces)
-
Round 3: Sl st into first ch-2 space, ch 2, in same space make [dc, ch 2, sc], *in next ch-2 space make [2 dc, ch 2, sc]*, repeat between * to end, join in top of chain 2, turn (57 sts, 19 ch-2 spaces)
-
Round 4 - 11: Repeat Round 3
-
Round 12: Sl st into first ch-2 space, ch 2, in same space make [dc, ch 1, sc], *in next ch-2 space make [2 dc, ch 1, sc]*, repeat between * to end, join in top of chain 2, turn (57 sts, 19 ch-1 spaces)
-
Round 13: Sl st into first ch-1 space, ch 2, in same space make [dc, sc], *in next ch-1 space make [2 dc, sc]*, repeat between * to end, join in top of chain 2, turn (57)
-
Round 14: Ch 1, in first stitch *make 1 hdc, hdc2tog*, repeat between * to end, join in first hdc - do not turn (38)
-
Round 15: Ch 1, *hdc2tog* 18 times, join in first hdc (19)
-
Leave a lengthy tail. With a yarn needle, weave the tail through the front loop of each stitch and pull gently to close the hole, secure the end and fasten off. On the brim, use the starting tail to seam the ends together. Weave in all ends. Attach a pompom if desired.
Large Adult
Head Circumference = 23" - 24" • Hat Circumference = 22" • Height hat = 8.5"
-
Ribbing - leave a lengthy starting tail for seaming the ends of the brim together.
-
Row 1: Ch 6, hdc in 2nd chain and in each chain to end, turn (5)
-
Row 2: Ch 1, working in FRONT LOOPS only - hdc in each stitch across, turn (5)
-
Row 3 - 39: Repeat Row 2
-
Hat Body - Turn your work so you are working in the ends of the Rows.
-
Round 1: Ch 1, *make 1 sc in the end of the first row, make 2 sc in the next row* repeat between * to end, make 2 sc into the foundation chain after the last row, bring the ends together and sl st to join in the first sc (60)
-
Round 2: Ch 2 (counts as first stitch throughout), in same stich make [dc, ch 2, sc], *skip 2 stitches, in next stitch make [2 dc, ch 2, sc]*, repeat between * to end, sl st to join in top of chain 2, turn (60 sts, 20 ch-2 spaces)
-
Round 3: Sl st into first ch-2 space, ch 2, in same space make [dc, ch 2, sc], *in next ch-2 space make [2 dc, ch 2, sc]*, repeat between * to end, join in top of chain 2, turn (60 sts, 20 ch-2 spaces)
-
Round 4 - 11: Repeat Round 3
-
Round 12: Sl st into first ch-2 space, ch 2, in same space make [dc, ch 1, sc], *in next ch-2 space make [2 dc, ch 1, sc]*, repeat between * to end, join in top of chain 2, turn (60 sts, 20 ch-1 spaces)
-
Round 13: Sl st into first ch-1 space, ch 2, in same space make [dc, sc], *in next ch-1 space make [2 dc, sc]*, repeat between * to end, join in top of chain 2, turn (60)
-
Round 14: Ch 1, in first stitch *make 1 hdc, hdc2tog*, repeat between * to end, join in first hdc - do not turn (40)
-
Round 15: Ch 1, *hdc2tog* 18 times, join in first hdc (20)
-
Leave a lengthy tail. With a yarn needle, weave the tail through the front loop of each stitch and pull gently to close the hole, secure the end and fasten off. On the brim, use the starting tail to seam the ends together. Weave in all ends. Attach a pompom if desired.

Read NextTimeless Boho Beanie
Your Recently Viewed Projects
Thanks for your comment. Don't forget to share!
Hippie Chick
Jan 04, 2019
The berry delight beanie looks like a pretty simple and basic hat to make. Glad to see that the directions are given in so many different sizes. There is a hat for each member of the family. The color can be made a single color as shown or you can use a variegated yarn or maybe a Caron Cake.
elocin1104 2800379
Nov 28, 2018
I love the design of this berry delight beanie. It certainly looks easy enough to make. I have not seen many hat patterns that are worked from the brim up, but I feel like this may be a good option. If you are making a hat specifically for someone, and not as a gift, you could measure if it is going to fit their head a lot sooner!
JaneEK
Jul 31, 2018
The hat just looks cozy, doesnt it? That Bulky yarn is easy to work with, and I often recommend it to my students, especially my seniors. Its a lot easier to manage than holding two strands of worsted togethera method usually suggested in place of a bulky yarn. The designer gives instructions for everyone from Preemie to Large Adult, so theres no excuse not to outfit the entire family.
Daughter of Light
Aug 16, 2017
How adorable! The beanie and the model! I've always worked beanie patterns that go from the crown to the edge so it'll be interesting to see the difference and which one I like better. It's great having all the sizes written out on one page with measurements too. I love the texture and will definitely go with a solid color yarn to show it off!
pjeannette6 154342 7
Feb 11, 2017
I have made 8 of these in the past two weeks. I have done from a newborn to large adult, for my Mom's caregivers and their children. We have had two newborns in the last two days. I love the pattern and it is so quick and easy. I can do a large adult in a couple of hours if I just go for it.
Cheryl Y
Jan 23, 2017
Oh my how cute is this hat.. I love the look of this cute hat. It's great that the pattern is on this page and it's written for all head sizes taking the guest work out of it. The patterns are will written and easy to follow. I love the color purple and this Berry Delight Beanie fits it well. I'll be making a few of these for sure, some with pom poms and some with out. Thank you so much for sharing this free crochet pattern.
rgcates 1054698
Aug 30, 2016
Where is the pattern???
AFC Editor Julia
Sep 01, 2016
Hi there - there was a server issue that seemed to hide various patterns from our sites. It should be fixed now, so the full pattern is visible on this page. Please let me know if you continue to have any issues! Julia, editor for AllFreeCrochet
Report Inappropriate Comment
Are you sure you would like to report this comment? It will be flagged for our moderators to take action.
Thank you for taking the time to improve the content on our site.