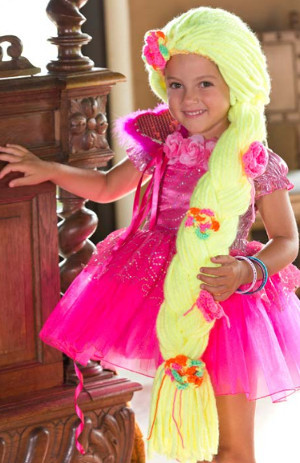
Petite Mermaid Costume

Want to make mermaids part of your world? Make your little girl this gorgeous Petite Mermaid Costume for Halloween or just dress-up playtime. You'll love the creativity behind this free crochet mermaid tail pattern, which wears just like a dress.
She'll be thrilled to become a famous fish-tailed beauty! Little girls love mermaids, probably because they're such free, beautiful creatures. While this intermediate crochet mermaid pattern will take some time and dedication, the smile on her face will be well worth the effort.

Crochet HookH/8 or 5 mm hook, K/10.5 or 6.5 mm hook
Yarn Weight(4) Medium Weight/Worsted Weight and Aran (16-20 stitches to 4 inches)
MATERIALS:
- RED HEART Super Saver: 1 skein each 512 Turqua A, 722 Pretty ‘n Pink B, 1 skein 3620 Glowworm C.
- RED HEART Boutique Sashay: 1 ball 1959 Twist D
- Susan Bates Crochet Hooks: 5 mm [US H-8] (for bra top and skirt), and 6.5 mm [US K-10.5] (for boa)
- 1yd (1m) of netting to match C (for skirt), sewing needle and thread to match netting, one ½” (13mm) headband (shown: Bow-tique- Horizon Group USA), three packages shell and fish charms (Bead Landing Oceanside Charms), one package of Bling Bling Beads (#SUL 51576, Clubhouse Crafts, Advantus Corp.), one package of large and small sequins, one child’s leotard, yarn needle
GAUGE:
16 sts = 4” (10 cm); 16 rows = 4” (10 cm), in single crochet. 4 shells = 5” (12.5 cm); 10 rows = 4” (10 cm), in shell pattern. CHECK YOUR GAUGE. Use any size hook to obtain the gauge.
SIZE:
Directions are for size 4 years. Changes for sizes 6 years and 8 years are in parentheses.
To Fit Chest: 23 (25, 26)” (58.5 (63.5, 66) cm)
Finished Chest: 22 (24, 25)” (56 (61, 63.5) cm)
Note: Bra top will stretch for a snug fit.
Finished Skirt Waist: 22 (25, 28)” (56 (63.5, 71) cm), before tightening with drawstring
Finished Skirt Length: 16 (17, 19)” (40.5 (43, 48.5) cm), not including netting
Netting adds about 8” (20.5 cm) to finished length.
SPECIAL STITCH:
sc2tog= [Insert hook in next stitch, yarn over and pull up a loop] twice, yarn over and draw through all 3 loops on hook.
NOTES:
- For steps on how to crochet with Sashay yarn go to http://www.redheart.com/learn/videos/sashay-secrets for a video instruction. Stretch one end of the Sashay open for several inches and lay it flat, placing the edge with the metallic thread along the bottom. Notice that the Sashay yarn is a mesh of holes. You will work with the top of the mesh and leave the metallic edge loose to form ruffles. One skein, worked with a K-10.5 (6.5 mm) hook, makes a 48” (122 cm) boa.
- Bra top is worked from side to side beginning at center back. Middle band and straps are worked separately and attached to finished bra top.
- Skirt is worked in two pieces beginning at the waistband.
- To change color work last stitch of old color to last yarn over. Yarn over with new color and draw through all loops on hook to complete stitch. Proceed with new color. Fasten off old color.
BRA TOP
With middle size hook and A, ch 13 (15, 15).
Row 1: Sc in 2nd ch from hook and in each remaining ch across, turn—12 (14, 14) sc.
Row 2: Ch 1, sc in first st, *ch 1, skip next st, sc in next st; repeat from * to last st, sc in last st, turn—5 (6, 6) ch-1 spaces and 7 (8, 8) sc.
Rows 3–26 (28, 28): Ch 1, sc in first st, *ch 1, skip next st, sc in next ch-1 space; repeat from * to last st, sc in last st, turn.
Row 27 (29, 29): Ch 1, sc in first st, *ch 1, skip next st, sc in next ch-1 space; repeat from * to last st, 2 sc in last st, turn—5 (6, 6) ch-1 spaces and 8 (9, 9) sc.
Row 28 (30, 30): Ch 1, sc in first 2 sts, *ch 1, skip next st, sc in next ch-1 space; repeat from * to last st, sc in last st, turn.
Row 29 (31, 31): Ch 1, sc in first st, *ch 1, skip next st, sc in next ch-1 space; repeat from * to last 2 sts, ch 1, skip next st, 2 sc in last st, turn—6 (7, 7) ch-1 spaces and 8 (9, 9) sc.
Row 30 (32, 32): Repeat Row 3.
Rows 31 (33, 33) and 32 (34, 34): Repeat
Row 27 (29, 29) and 28 (30, 30)—6 (7, 7) ch- spaces and 9 (10, 10) sc.
Row 33 (35, 35): Ch 1, sc in first st, *ch 1, skip next st, sc in next ch-1 space; repeat from * to last 2 sts, ch 1, skip next st, sc in last st, turn—7 (8, 8) ch-spaces and 8 (9, 9) sc.
Row 34 (36, 36): Ch 1, sc in first st, sc in next ch-1 space, *ch 1, skip next st, sc in next ch-1 space; repeat from * to last st, sc in last st, turn—6 (7, 7) ch-spaces and 9 (10, 10) sc.
Rows 35 (37, 37)–36 (40, 42): Repeat last 2 rows 1 (2, 3) more times.
Row 37 (41, 43): Ch 1, sc in first st, *ch 1, skip next st, sc in next ch-1 space; repeat from * to last 2 sts, sc2tog, turn—6 (7, 7) ch- spaces and 8 (9, 9) sc.
Row 38 (42, 44): Repeat Row 3.
Row 39 (43, 45): Ch 1, sc in first st, *ch 1, skip next st, sc in next ch-1 space; repeat from * to last 3 sts (2 sc and a ch-1 space), ch 1, skip next st, sc2tog (working into last ch-1 space and last sc), turn—6 (7, 7) ch-spaces and 7 (8, 8) sc.
Row 40 (44, 46): Repeat Row 34 (36, 36)—5 (6, 6) ch-spaces and 8 (9, 9) sc.
Row 41 (45, 47): Ch 1, sc2tog, sc in next ch-1 space, *ch 1, skip next st, sc in next ch-1 space; repeat from * to last 2 sts, sc2tog, turn—4 (5, 5) ch-1 spaces and 7 (8, 8) sc.
Rows 42 (46, 48) and 43 (47, 49): Repeat Rows 33 (35, 35) and 34 (36, 36)—4 (5, 5) ch-1 spaces and 7 (8, 8) sc.
Row 44 (48, 50): Repeat Row 33 (35, 35)—5 (6, 6) ch-1 spaces and 6 (7, 7) sc.
Row 45 (49, 51): Ch 1, 2 sc in first st, sc in next ch-1 space, *ch 1, skip next st, sc in next ch-1 space; repeat from * to last st, 2 sc in last st, turn—4 (5, 5) ch-1 spaces and 9 (10, 10) sc.
Row 46 (50, 52): Ch 1, sc in first 2 sts, *ch 1, skip next st, sc in next ch-1 space; repeat from * to last 3 sts, ch 1, skip next st, sc in last 2 sts, turn—5 (6, 6) ch-1 spaces and 8 (9, 9) sc.
Row 47 (51, 53): Ch 1, sc in first st, *ch 1, skip next st, sc in next ch-1 space; repeat from * to last 2 sts, ch 1, skip next st, 2 sc in last st, turn—6 (7, 7) ch-1 spaces and 8 (9,9) sc.
Rows 48 (52, 54)–57 (63, 67): Repeat Rows 30 (32, 32)–39 (43, 45)—6 (7, 7) ch-1 spaces and 7 (8, 8) sc at end of Row 57 (63, 67).
Row 58 (64, 68): Repeat Row 34 (36, 36)—5 (6, 6) ch-1 spaces and 8 (9, 9) sc.
Row 59 (65, 69): Repeat Row 37 (41, 43)—5 (6, 6) ch-1 spaces and 7 (8, 8) sc.
Row 60 (66, 70)–85 (93, 97): Repeat Row 3, 26 (28, 28) times. Fasten off. Sew short ends together for back seam.
MIDDLE BAND FOR BRA
With middle size hook and A , ch 17 (19, 19).
Row 1: Sc in 2nd ch from hook and in each remaining ch across—16 (18, 18) sc. Fasten off. Wrap band around middle of front of bra and sew ends together on inside of bra.
SHOULDER STRAPS (2)
Place the bra on the child and measure from the top of the bra, over the shoulder, to the back of the bra. With middle size hook and A, make a chain about 1” (2.5 cm) shorter than the measured
length (yarn will stretch after crocheting).
Row 1: Dc in 3rd ch from hook and in each remaining ch across. Fasten off. Sew straps to bra.
SKIRT PIECE (2)
Note: To lengthen or shorten skirt, repeat Rows 6 and 7 more or fewer times, ending with a Row 6, before working the Shape Lower Edge section.
Waistband
With middle size hook and B, ch 44 (50, 56).
Row 1 (right side): Sc in 2nd ch from hook and in each remaining ch across, turn—43 (49, 55) sc.
Row 2: Ch 2 (does not count as a st here and throughout), dc in each st across, turn.
Row 3: Ch 1, sc in each st across, turn.
Row 4: Ch 2, dc in each st across; change to C, turn.
Body of Skirt
Row 5: Ch 1, sc in first st, *skip next 2 sts, 5dc in next st (shell made), skip next 2 sts, sc in next st; repeat from * across, turn—7 (8, 9) shells.
Row 6: Ch 3 (counts as first dc here and throughout), 2 dc in first st, skip next 2 dc, sc in next dc (center dc of shell), *skip next 2 dc, 5 dc in next sc, skip next 2 dc, sc in next dc; repeat from * to last 3 sts, skip next 2 dc, 3 dc in last sc, turn—6 (7, 8) shells and one half- shell at each end of row.
Row 7: Ch 1, sc in first st, *skip next 2 dc, 5 dc in next sc, skip next 2 dc, sc in next dc; repeat from * across, turn.
Rows 8–31 (33, 37): Repeat last 2 rows 12 (13, 15) more times.
Row 32 (34, 38): Repeat Row 6. Fasten off.
Shape Lower Edge
Row 33 (35, 39) (right side): With right side facing, skip the first 6 sts of previous row, join C with sc in next dc (center dc of first full shell), *skip next 2 dc, 5 dc in next sc, skip next 2 dc, sc in next dc; repeat from * working last sc in center dc of last shell, turn; leave remaining sts unworked—5 (6, 7) shells.
Row 34 (36, 40): Ch 3, dc in first st, skip next 2 dc, sc in next dc, *skip next 2 dc, 5 dc in next sc, skip next 2 dc, sc in next dc; repeat from * to last 3 sts,, skip next 2 dc, 2 dc in last sc, turn—4 (5, 6) shells and 2-dc at each end of row.
Row 35 (37, 41): Ch 3, dc in first st, skip next 4 sts, sc in next dc, *skip next 2 dc, 5 dc in next sc, skip next 2 dc, sc in next dc; repeat from * to last 5 sts, skip next 4 sts, 2 dc in last st, turn—3 (4, 5) shells and 2-dc at each end of row.
Row 36 (38, 42)–37 (40, 45): Repeat last row 2 (3, 4) more times—1 shell and 2-dc at each end of row.
Waistband Shell Trim
With wrong side of waistband facing and working across opposite side of foundation ch (at bottom edge of Row 1), join B with sc in any ch, *skip next 2 ch, 5 dc in next ch (shell made), skip next 2 ch, sc in next ch; repeat from * across, turn—7 (8, 9) shells.
Seam Skirt Pieces
Hold skirt pieces with right sides together. Sewing from wrong side, sew side edges of pieces together from Row 1 through Row 32 (34, 38). Do not sew lower edges together.
Drawstring
With B, *ch 2, sc in 2nd ch from hook; repeat from * until piece measures about 14” longer than waist size. Fasten off. Note: ½” (13 mm) elastic can be used instead of drawstring.
Finish Waistband
Place drawstring around top of right side of skirt with ends at center front. Fold waistband down over the drawstring and thread ends of drawstring through space between center front dc stitches. Sew Row 4 of waistband to top of skirt where waistband and skirt meet, keeping the shell trim free. Pull on ends of drawstring and tie into a bow.
Attach Netting
Cut three 9 x 52” (23 x 132 cm) strips of netting (or desired length and width). Place the strips on top of each other and sew a line of basting stitches about ½” (13 mm) below and parallel to one long edge (top edge). Pull gently on the ends of the basting thread to gather the top of the netting until it fits around the lower edge of the mermaid skirt. Pin the top of the netting just under the lower edge of the skirt and sew in place, sewing from the wrong side. If needed, trim netting to desired length.
BOA
Note: See Notes at beginning of pattern for how to work with C. With largest hook and C.
Row 1: Sc in 2nd ch (opening in mesh) from hook, [skip next opening, sc in next opening] 5 times, turn—6 sts.
Row 2: Ch 2, sc in each st across, turn. Repeat last row until boa is desired length. Fasten off.
FINISHING
Embellishments Note:Select and arrange beads and charms as desired. Sew beads and charms to front of top edge of bra between straps. Sew a bead to the tip of each shell of the waist shell trim. Sew beads evenly spaced around lower edge of crocheted skirt. Sew large sequins evenly spaced over the netted skirt.Weave in ends. Wear the finished mermaid costume over a leotard. If desired, the bra top can be basted to the shoulders and chest of the leotard.
ABBREVIATIONS: A, B,C = Color A, Color B, Color C etc; ch= chain; dc= double crochet; sc= single crochet; st(s)= stitch (es); ( ) = work directions in parentheses into same st; [ ] = work directions in brackets the number of times specified; *= repeat whatever follows the * as indicated.
Read Next17 Free Crochet Pumpkin Patterns
Your Recently Viewed Projects

Thanks for your comment. Don't forget to share!
Morehouse17
Apr 30, 2018
Play time can be so much more fun with an item like this. Red Heart Yarn will often have some great projects but some of the time they lack the pictures I crave. I was able to see from the download format what I really wanted to see and if your little one is wanting to be a mermaid for this year's Halloween, this is the costume to make. You will be surprised at the price to complete. Based on what you would spend on a store bought one, this is a bargain.
Delphine Bryant
Apr 27, 2018
What a cute mermaid costume. With the added tulle or netting at the bottom, your little princess can still use her land legs and be the most adorable mermaid in the "ocean".
Report Inappropriate Comment
Are you sure you would like to report this comment? It will be flagged for our moderators to take action.
Thank you for taking the time to improve the content on our site.