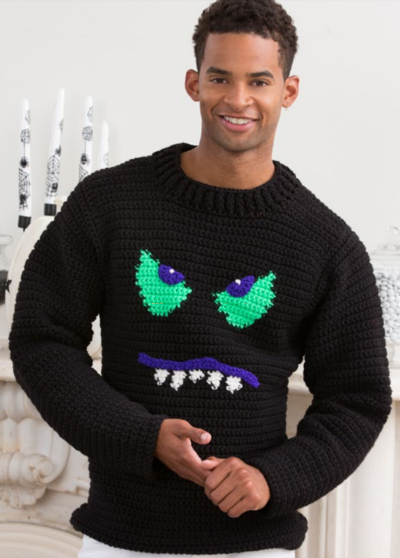
Monster Face Crochet Sweater

You'll be the life of the Halloween party with this Monster Face Crochet Sweater. Instead of being the scary one, you'll be the festive party-goer this year. When you learn how to crochet a sweater, you are never hindered by the store again. Especially when it comes to holiday crochet sweaters. This is a great Halloween party top for anyone.
I've seen some people pin a face on their shirt before with some pins and extra fabric, but with this fun crochet sweater pattern, you'll save yourself from being tacky. It may not be a real costume, but sometimes this is all you need to show your Halloween spirit.

Crochet HookJ/10 or 6 mm hook
Yarn Weight(4) Medium Weight/Worsted Weight and Aran (16-20 stitches to 4 inches)
Crochet Gauge11 sts = 4 (10 cm); 14 rows = 4 (10 cm) in single crochet (sc).
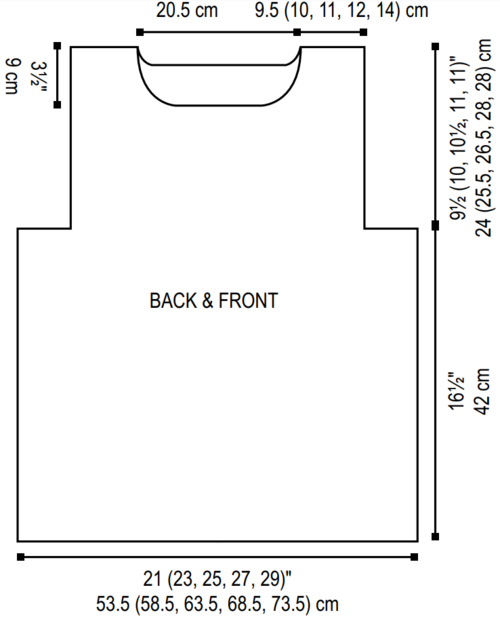
Finished SizeTo Fit Chest: 36 (40, 44, 46, 52) (91.5 (101.5, 112, 117, 132) cm). Finished Chest: 42 (46, 50, 54, 58) (106.5 (117, 127, 137, 147.5) cm). Finished Length: 26 (26.5, 27, 27.5, 27.5) (66 (67.5, 68.5, 70, 70) cm).
Materials List
- RED HEART Super Saver: 4 (5, 5, 5, 6) skeins 312 Black A, and 1 skein each of 316 Soft White B, 3620 Glowworm C, and 356 Amethyst D
- Susan Bates Crochet hook: 6mm [US J-10]
- Yarn needle
Monster Face Crochet Sweater:
Directions are for size Small. Changes for sizes Medium, Large, X-Large, and XX-Large are in parentheses.
Special Stitches:
- Bpdc (back post double crochet) = Yarn over, insert hook from back side of work to front and to back again around the post of indicated stitch; yarn over and pull up a loop (3 loops on hook), [yarn over and draw through 2 loops on hook] twice.
- Fpdc (Front post double crochet) = Yarn over, insert hook from front side of work to back and to front again around post of indicated stitch; yarn over and pull up a loop (3 loops on hook), [yarn over and draw through 2 loops on hook] twice.
- sc2tog (single crochet 2 stitches together) = [Insert hook in next stitch, yarn over and pull up a loop] twice, yarn over and draw through all 3 loops on hook.
Notes:
- Sweater is made from four pieces: Back, front, and two sleeves.
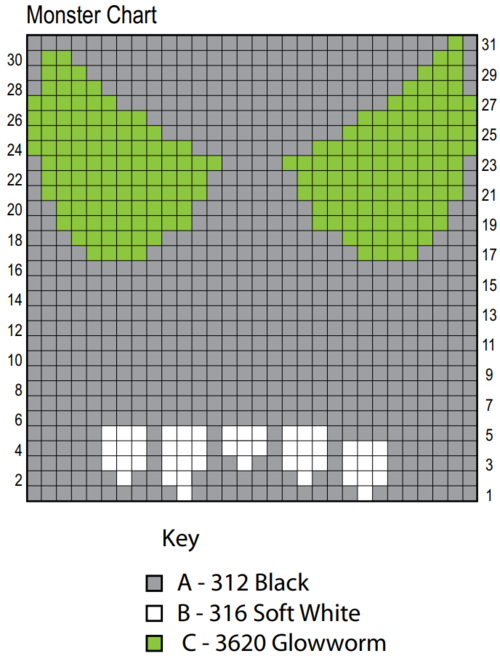
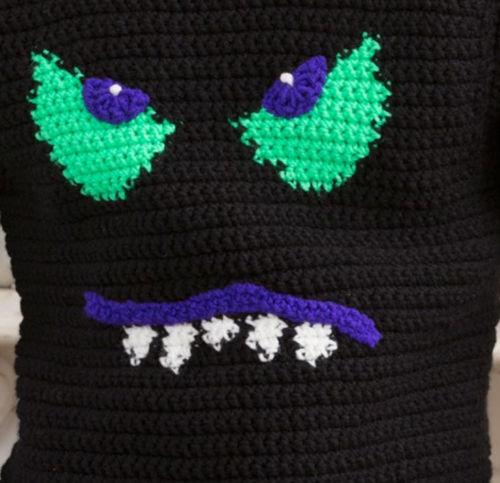
- Monster eyes and teeth are worked on front by changing colors following Monster Chart. Each square of chart represents one single crochet stitch worked in the indicated color. Read right side rows of chart from right to left and wrong side rows from left to right.
- To change color, work last stitch of old color to last yarn over. Yarn over with new color and draw through all loops on hook to complete stitch. Proceed with new color.
- Use separate small balls of yarn for each section of color. Do not carry colors not in use across wrong side of work nor under stitches.
- Mouth and irises are worked separately and sewn to face.
- CLICK ON ANY IMAGE TO ENLARGE.
- To save an image, right-click and select "Save image as..."
Monster Face Crochet Sweater Pattern:
BACK
With A, ch 59 (65, 69, 75, 81).
Foundation Row (right side): Sc in 2nd ch from hook and in each ch across, turn—58 (64, 68, 74, 80) sc.
Row 1: Ch 1, sc in each st across, turn. Repeat last row until piece measures about 16.5 (42 cm) from beginning; end with a wrong side row.
Shape Armholes
Row 1 (right side): Slip st in first 8 (10, 11, 13, 14) sts, ch 1, sc in each st across to last 8 (10, 11, 13, 14) sts; leave remaining sts unworked, turn—2 (44, 46, 48, 52) sc.
Row 2: Ch 1, sc in each st across, turn. Repeat last row until armholes measure about 8.5 (9, 9.5, 10, 10) (21.5 (23, 24, 25.5, 25.5) cm); end with a wrong side row.
Shape Neck and First Shoulder
Row 1 (right side): Ch 1, sc in next 11 (12, 13, 14, 16) sts for first shoulder; leave remaining sts unworked for neck and second shoulder, turn—11 (12, 13, 14, 16) sts.
Row 2: Ch 1, sc2tog, sc in each st across, turn—10 (11, 12, 13, 15) sts.
Row 3: Ch 1, sc in each st across, turn. Repeat last row until armhole measures about 9 (10, 10.5, 11, 11) (24 (25.5, 26.5, 28, 28) cm). Fasten off.
Shape Neck and Second Shoulder
Row 1 (right side): With right side facing, skip next 20 unworked sts following first shoulder, join yarn with sc in next st, sc in each st across for second shoulder, turn—11 (12, 13, 14, 16) sts.
Row 2: Ch 1, sc in each st to last 2 sts, sc2tog, turn—10 (11, 12, 13, 15) sts.
Row 3: Ch 1, sc in each st across, turn. Repeat last row until armhole measures about 9.5 (10, 10.5, 11, 11) (24 (25.5, 26.5, 28, 28) cm). Fasten off.
FRONT
Work same as back until piece measures about 11.25 (12, 12.5, 13, 13) (28.5 (30.5, 32, 33, 33) cm) from beginning; end with a wrong side row58 (64, 68, 74, 80) sc.
Begin Monster Chart
Row 1 (right side): Ch 1, sc in first 14 (17, 19, 22, 25) sts, work Row 1 of Monster Chart over next 30 sts, sc in last 14 (17, 19, 22, 25) sts, turn.
Rows 2–18 (16, 14, 12, 12): Ch 1, sc in first 14 (17, 19, 22, 25) sts, work next row of Monster Chart over next 30 sts, sc in last 14 (17, 19, 22, 25) sts, turn.
Shape Armholes
Row 1 (right side): Slip st in first 8 (10, 11, 13, 14) sts, ch 1, sc in next 6 (7, 8, 9, 11) sts, work next row of Monster Chart over next 30 sts, sc in next 6 (7, 8, 9, 11) sts; leave remaining sts unworked, turn—42 (44, 46, 48, 52) sc.
Row 2: Ch 1, sc in first 6 (7, 8, 9, 11) sts, work next row of Monster Chart over next 30 sts, sc in last 6 (7, 8, 9, 11) sts, turn. Repeat last row until all rows of Monster Chart have been completed. Continue with A only.
Next Row: Ch 1, sc in each st across, turn. Repeat last row until armholes measure about 6 (6, 7, 7, 7) (15 (16.5, 18, 19, 19) cm); end with a wrong side row.
Shape Neck and First Shoulder
Row 1 (right side): Ch 1, sc in next 13 (14, 15, 16, 18) sts for first shoulder; leave remaining sts unworked for neck and second shoulder, turn—13 (14, 15, 16, 18) sts.
Row 2: Ch 1, sc2tog, sc in each st across, turn—12 (13, 14, 15, 17) sts.
Row 3: Ch 1, sc in each st to last 2 sts, sc2tog, turn—11 (12, 13, 14, 16) sts.
Row 4: Repeat Row 2–10 (11, 12, 13, 15) sts.
Row 5: Ch 1, sc in each st across, turn. Repeat last row until armhole measures about 9 (10, 10, 11, 11) (24 (25.5, 26.5, 28, 28) cm). Fasten off.
Shape Neck and Second Shoulder
Row 1 (right side): With right side facing, skip next 16 unworked sts following first shoulder, join yarn with sc in next st, sc in each st across for second shoulder, turn—13 (14, 15, 16, 18) sts.
Row 2: Ch 1, sc in each st to last 2 sts, sc2tog, turn—12 (13, 14, 15, 17) sts.
Row 3: Ch 1, sc2tog, sc in each st across, turn—11 (12, 13, 14, 16) sts.
Row 4: Repeat Row 2–10 (11, 12, 13, 15) sts.
Row 5: Ch 1, sc in each st across, turn. Repeat last row until armhole measures about 9.5 (10, 10.5, 11, 11) (24 (25.5, 26.5, 28, 28) cm). Fasten off.
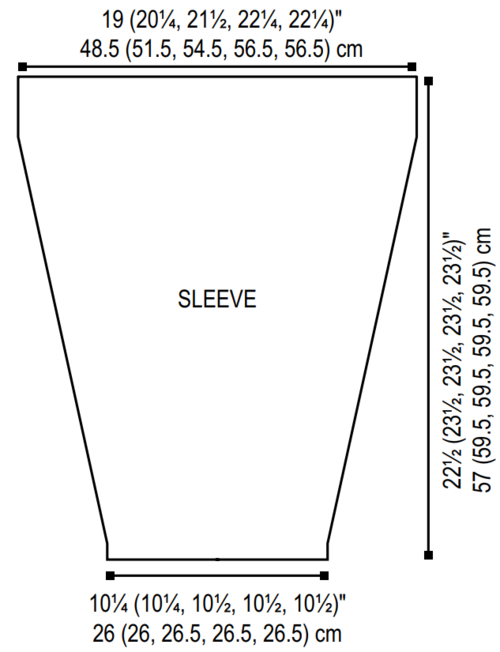
SLEEVES (make 2)
Ch 29 (29, 30, 30, 30).
Foundation Row (right side): Sc in 2nd ch from hook and in each ch across, turn—28 (28, 29, 29, 29) sc.
Row 1: Ch 1, sc in each st across, turn.
Row 2 (increase row): Ch 1, 2 sc in first st, sc in each st across to last st, 2 sc in last st, turn—30 (30, 31, 31, 31) sc.
Next 4 (3, 3, 3, 3) Rows: Ch 1, sc in each st across, turn.
Next Row (increase row): Repeat Row 2–32 (32, 33, 33, 33) sc. Repeat last 5 (4, 4, 4, 4) rows 6 (4, 11, 10, 10) more times—44 (40, 55, 53, 53) sc.
Next 5 (4, 4, 2, 2) Rows: Ch 1, sc in each st across, turn.
Next Row (increase row): Repeat Row 2–46 (42, 57, 55, 55) sc. Repeat last 6 (5, 5, 3, 3) rows 3 (7, 1, 3, 3) more times—52 (56, 59, 61, 61) sc.
Next Row: Ch 1, sc in each st across, turn. Repeat last row until piece measures about 22.5 (23.5, 23.5, 23.5, 23.5) (57 (59.5, 59.5, 59.5, 59.5) cm) from beginning. Fasten off.
Face Pattern:
MOUTH
With D, ch 29.
Row 1: Working in back bumps, sc in 2nd ch from hook and in each ch across28 sc. Fasten off, leaving a long tail for sewing mouth to face.
IRISES (make 2)
With D, ch 4; join with slip st in first ch to form a ring.
Round 1: Ch 3, work 6 dc in ring; join with slip st in top of beginning ch. Fasten off, leaving a long tail for sewing iris to eye.
FINISHING
Using photograph (below) as a guide, sew one iris to each eye. With B, embroider a French Knot in the center of each iris for pupils. Position mouth above teeth and sew in place.
Sew shoulder seams. Sew side and sleeve seams.
Neckband
Round 1 (right side): With right side facing, join A with slip st in neck edge at shoulder seam to begin working across back neck edge, ch 3 (counts as first dc), work 71 more dc evenly spaced around neck edge; join with slip st in top of beginning ch—72 dc.
Round 2: Ch 2 (does not count as a st), FPdc around beginning ch of previous round, BPdc around next st, *FPdc around next st, BPdc around next st; repeat from * around; join with slip st in top of first post st.
Round 3: Ch 2, FPdc around same st as joining, BPdc around next st, *FPdc around next st, BPdc around next st; repeat from * around; join with slip st in top of first post st. Repeat Round 3 until neckband measures about 1.5 (4 cm).
Last Round: Slip st in each st around. Fasten off. Weave in any remaining ends.

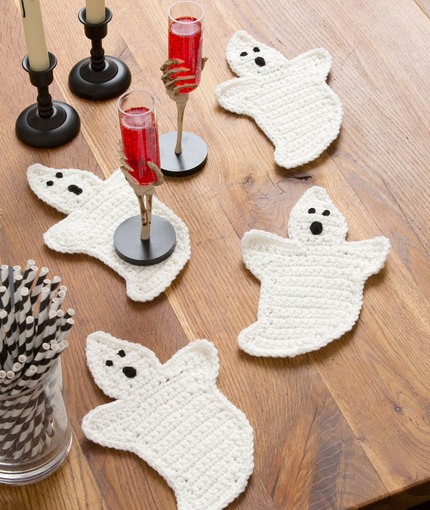
Read NextSuper Ghoster Coasters
Your Recently Viewed Projects
Thanks for your comment. Don't forget to share!
KLC
Sep 30, 2019
The charts have been added to this page. Thank you! - Krista, Editor, AllFreeCrochet
lcarr
Sep 19, 2017
I think this would be a fun sweater to make and to wear, especially if it was made using a fur type yarn. It would be like wearing a monster. If you go to the Red Heart website and search for Monster Face Sweater, you will find the complete pattern, with chart and schematics.
ashevillepet 01507 73
Aug 15, 2015
Where can I find the chart needed for this pattern? I really would like to make this for my grandson.
stjohnmarilyn 6704 568
Jul 11, 2015
nice pattern, but I could not find any chart as indicated is needed to complete the pattern, Where would I find this? Giving a lower for this reason only.
Report Inappropriate Comment
Are you sure you would like to report this comment? It will be flagged for our moderators to take action.
Thank you for taking the time to improve the content on our site.