Glam Black Cat Hat
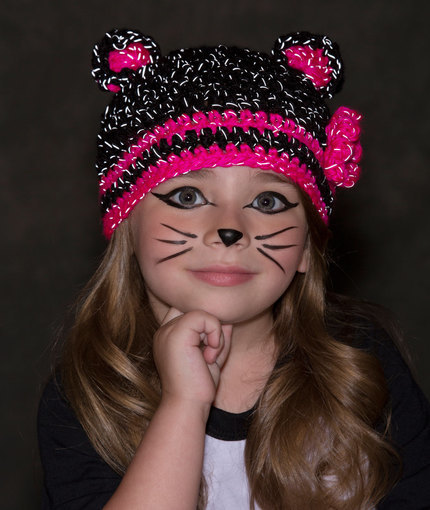
One of the most popular Halloween costumes for girls is being a cat. Help her be one this year by working up the Glam Black Cat Hat. Not only is it the perfect accessory to a homemade Halloween costume, but it can also be worn later in the year as it stays rather chilly outside. In fact, the best part about this Halloween crochet pattern is that it uses reflective yarn. You can have no worries sending your kids door to door knowing that people will still see them in their costume while it's dark outside.

Crochet HookJ/10 or 6 mm hook
Yarn Weight(5) Bulky/Chunky (12-15 stitches for 4 inches)
Crochet Gauge12 sts = 4 (10 cm); 6 rows = 4 (10 cm) in double crochet.
Finished SizeHat measures 16 (18, 20) [42 (47, 52) cm] circumference at brim.
Materials List
- RED HEART Reflective: 1 ball each 8012 Black A and 8704 Neon Pink B
-
Susan Bates Crochet Hook: 6mm [US J-10]
- Yarn Needle
- Stitch Markers
Notes
Directions are for size Small. Changes for sizes Medium and Large are in parentheses. Special Technique Adjustable-ring method = Wrap yarn in a ring, ensuring that the tail falls behind the working yarn. Grip ring and tail firmly between middle finger and thumb. Insert hook through center of ring, yarn over (with working yarn) and draw up a loop. Work stitches of first round in the ring, working over both strands (the tail and the ring). After the first round of stitches is worked, pull gently, but firmly, on tail to tighten ring. Notes 1. Hat is worked in joined rounds with right side facing. Cats ears and flower are made separately and sewn to hat. 2. Ch 1 at beginning of rounds does not count as a stitch. 3. To change color, work last stitch of old color to last yarn over. Yarn over with new color and draw through all loops on hook to complete stitch. Proceed with new color. Cut old color.
Hat
With A, make an adjustable ring. Round 1: Ch 1, 12 dc in ring; join with slip st in first dc12 dc. Pull gently, but firmly, on tail to tighten ring. Round 2: Ch 1, 2 dc in each st around; join with slip st in first dc24 dc. Round 3: Ch 1, 2 dc in first st, dc in next st, *2 dc in next, dc in next st; repeat from * around; join with slip st in first dc36 dc. Round 4: Ch 1, 2 dc in first st, dc in next 2 st, *2 dc in next, dc in next 2 st; repeat from * around; join with slip st in first dc 48 dc. Round 5: Ch 1, 2 dc in first st, dc in next 23 (5, 3) sts, *2 dc in next st, dc in next 23 (5, 3) sts; repeat from * 0 (6, 10) times; join with slip st in first dc 50 (56, 60) dc. Size Large only Round 6: Ch 1, 2 dc in first st, dc in next 29 sts, 2 dc in next st, dc in next 29 sts; join with slip st in first dc62 dc. All sizes Rounds 6 (6, 7)7 (8, 9): Ch 1, dc in each st around; change to B at end of last round; join with slip st in first dc. Rounds 8 (9, 10) and 9 (10, 11): Ch 1, sc in each st around; change to A at end of last round; join with slip st in first sc. Round 10 (11, 12): Ch 2 (counts as first dc), dc in each st around; change to B; join with slip st in top of beginning ch. Rounds 11 (12, 13) and 12 (13, 14): Ch 1, sc in each st around; join with slip st in first sc. Fasten off.
Ear (Make 4)
With B and leaving a long tail, make an adjustable ring. Row 1 (right side): Ch 3 (counts as first dc), 4 dc in ring, ch 1, 4 dc in ring, ch 3 (counts as last dc); join with slip st in ring10 dc and 1 ch-1 space. Fasten off, leaving a long tail for sewing. Pull gently, but firmly, on beginning tail to tighten ring. Edging (work twice) Hold wrong side of one ear to right side of another ear. Row 1: With right side of top ear facing and working through both thicknesses, join A with slip st in top of beginning ch, ch 2, hdc in next 4 sts, slip st in ch-1 space, ch 3, slip st in 3rd chain from hook, hdc in next 4 sts, ch 2; join with slip st in top of ending ch. Fasten off, leaving a long tail for sewing. Flower With B, make an adjustable ring. Round 1 (right side): Ch 1, 8 hdc in ring; join with slip st in first hdc8 hdc. Pull gently, but firmly, on tail to tighten ring. Round 2: Ch 1, sc in first st, [ch 3, sc in next st] 7 times, ch 3; join with slip st in first sc8 sc and 8 ch-3 spaces. Round 3: (Slip st, ch 1, hdc, ch 1, slip st petal made) in each ch-3 space; join with slip st in first slip st8 petals.
Finishing
For each ear, weave A tails between pieces. Thread all B tails through center bottom of ear. Lay hat flat with seam at center back and place stitch markers on each side of Round 3. Thread B tails through stitches at markers and tie securely on wrong side of hat. Sew flower in place where desired. Weave in ends.
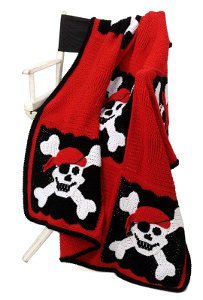
Read NextCoolest Pirate Afghan Ever
Your Recently Viewed Projects
Thanks for your comment. Don't forget to share!
JaneEK
Sep 30, 2017
I normally stick with conventional yarns, but I have a special young friend in mind for this hat, and shes well worth splurging on specialty yarn. Her church youth group is having a costume party and they dont want scary or gory costumes. Alex has lots of kitties at her house, so I know shell be thrilled with this idea. Ive already run it past her mom and she agrees, too.
Report Inappropriate Comment
Are you sure you would like to report this comment? It will be flagged for our moderators to take action.
Thank you for taking the time to improve the content on our site.