Day of the Dead Crochet Jar Cozies
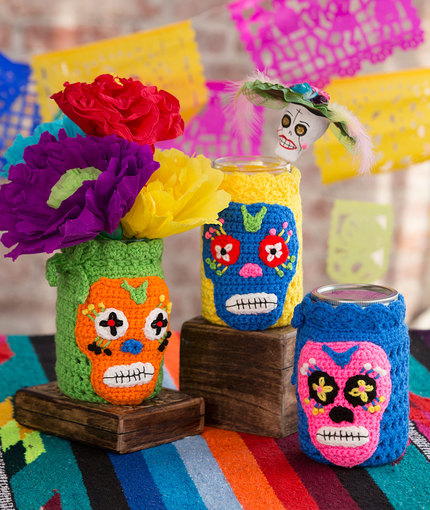
These Day of the Dead Crochet Jar Cozies are the perfect way to dress up a plain Mason jar. The festive mug cozies add a fun vibe to a Day of the Dead gathering or any other type of party. Use them to hold flowers, treats, utensils, pencils, or anything else you can think of. The vibrant colors really make this crochet pattern stand out from the crowd and the skull design makes them a perfect Halloween decoration. Your guests will marvel at your handiwork when they see this easy crochet pattern. Make a set and display your cozies as a trio or give them to a friend hosting a Day of the Dead party.

Crochet HookG/6 or 4 mm hook
Yarn Weight(4) Medium Weight/Worsted Weight and Aran (16-20 stitches to 4 inches)
Crochet GaugeGAUGE: 8 sc = 2 (2 cm); Rows 16 of cover = 2 (5 cm). CHECK YOUR GAUGE. Use any size
hook to obtain the gauge.
Materials:
- RED HEART® Super Saver®: 1 skein each
- 672 Spring Green A
- 886 Blue B
- 324 Bright Yellow C
- 254 Pumpkin D
- 311 White E
- 312 Black F
- 390 Hot Red G
- 722 Pretty in Pink H
- Susan Bates® Crochet Hook: 4.25mm [US G-6].
- Yarn needle
- 3 1-quart Mason jars
- Black embroidery floss
Cozy measures 13” circumference x 7” tall (33 x 18 cm) and fits 1-quart Mason jar.
Special Stitch
sc2tog = [Insert hook in next stitch, yarn over and pull up a loop] twice, yarn over and draw through all 3 loops on hook.
Notes
1. Each cozy is made from cover, skull, and facial pieces.
2. Cover is worked back and forth in rows that are seamed together after skull is assembled and sewn on.
Cozy
Cover (make 3 – 1 each with A, B, and C)
Ch 30.
Row 1: (right side): Sc in 2nd ch from hook and in each ch across, turn—29 sc.
Row 2: Ch 4 (counts as dc, ch 1 here and throughout) skip next sc, (dc, ch 1, dc) in next sc, *ch 1, skip next sc, (dc, ch 1, dc) in next sc; repeat from * across, to last 2 sc, ch 1, skip next sc, dc in last sc, turn—28 dc and 27 ch-1 spaces.
Row 3: Ch 1, sc in each dc and ch-1 space across working last sc in 3rd ch of beginning ch, turn—55 sc.
Row 4: Ch 4, skip next sc, dc in next sc, *ch 1, skip next sc, dc in next sc; repeat from *across, turn¬—28 dc and 27 ch-1 spaces.
Row 5: Repeat Row 3.
Rows 6–17: Repeat last 2 rows 6 times.
Row 18: Ch 1, *sc in next 9 sc, sc2tog; repeat from * across, turn—50 sc.
Row 19: Ch 1, *sc in next 8 sc, sc2tog; repeat from * across, turn—45 sc.
Row 20: Repeat Row 4—23 dc and 22 ch-1 spaces.
Row 21: Ch 1, sc in first dc, *skip next ch-1 space, 4 dc in next dc, skip next ch-1 space, sc in next dc; repeat from * across—12 sc and eleven 4-dc groups. Fasten off, leaving a long tail for sewing.
Skull (make 3 – 1 each with B, D, and H)
Ch 4.
Row 1 (wrong side): Sc in 2nd ch from hook and in each ch across, turn—3 sc.
Row 2: Ch 1, 2 sc in first sc, sc in next sc, 2 sc in last sc, turn—5 sc.
Row 3: Ch 1, sc in first sc, *2 sc in next sc, sc in next sc; repeat from * once, turn—7 sc.
Row 4: Ch 1, 2 sc in first sc, sc in next 5 sc, 2 sc in last sc, turn—9 sc.
Row 5: Ch 1, sc in first sc, 2 sc in next sc, sc in each sc across to last 2 sc, 2 sc in next sc, sc in last sc, turn—11 sc.
Rows 6–11: Ch 1, sc in each sc across, turn.
Row 12: Ch 1, 3 sc in first sc, sc in next 9 sc, 3 sc in last sc, turn—15 sc.
Row 13: Ch 1, 2 sc in next sc, sc in each sc across to last 2 sc, 2 sc in last sc, turn—17 sc.
Rows 14–21: Ch 1, sc in each sc across, turn.
Rows 22 and 23: Repeat Row 13—13 sc.
Round 24: Ch 1, 2 sc in next sc, sc in each sc across to last 2 sc, 2 sc in last sc; working in ends of rows and in opposite side of foundation ch, sc evenly spaced around piece, working additional sc in end of any row as needed for piece to lay flat. Fasten off, leaving a long tail for sewing.
Headpiece (make 3 – 2 with A and 1 with B)
Row 1: Ch 8, hdc in 3rd ch from hook, dc in next ch, ch 3. Fasten off, leaving a long tail for sewing.
Eye (make 6 – 2 each with E, F, and G)
Ch 2.
Round 1 (right side): 6 sc in 2nd ch from hook—6 sc. Do not join.
Round 2: 2 sc in each sc around; join with slip st in first sc—12 sc. Fasten off, leaving a long tail for sewing.
Nose (make 3 – 1 each with B, F, and H)
Row 1: Ch 5, sc in 2nd ch from hook and in each ch across. Fasten off, leaving a long tail for sewing.
Mouth (make 3 with E)
Round 1: Ch 8, sc in 2nd ch from hook and in next 5 ch, 3 sc in last ch; working in opposite side of foundation ch, skip first ch, sc in next 5 ch, 2 sc in last ch; join with slip st in first sc. Fasten off, leaving a long tail for sewing.
Tie (make 3 – 1 each with A, B, and C)
Ch 90.
Row 1: Sc in 2nd ch from hook and in each ch across. Fasten off.

Find even more great cozy ideas by checking out Keepin' It Cozy: 12 Coffee Cozies for Winter
Assembly
Use photograph as a guide for placement of pieces and embroidery stitching.
Assemble 3 skulls in the following color sequences:
With A-colored cover: Skull with D, headpiece with A, eyes and mouth with E, nose with B
With B-colored cover: Skull with H, headpiece with B, eyes and nose with F, mouth with E
With C-colored cover: Skull with B, headpiece with A, eyes with G, nose with H, mouth with E
Sew headpiece to top of skull.
Embroider 4 lazy daisy stitches in center of each eye as follows:
F-colored sts on E-colored eye, C-colored sts on F-colored eye, E-colored sts on G-colored eye.
Embroider a French knot in center of each eye as follows: G-colored knot on E-colored eye, H-colored knot on F-colored eye, F-colored knot on G-colored eye. Sew eyes to skulls.
Weave tail of nose through lower edge and gather slightly to form a half-circle and sew to skull. With 6 strands of black floss, back stitch horizontally across center of mouth, then work small straight stitches vertically to form teeth. Sew mouth on skull.
Embroider 6 small straight stitches and 6 French knots around each eye as follows: A-colored sts and C- and F-colored knots on D-colored skull, B-colored sts C- and E-colored knots on H-colored skull, C-colored sts and A- and H-colored knots on B-colored skull.
Center skull on right side of cover and sew in place. With ending tail, sew ends of rows of cover together. Place cover on Mason jar.
Finishing
Weave in ends. Beginning at side of cover, weave tie through Row 20 and tie in a bow.
Abbreviations
- A, B, C = Color A, Color B, Color C, etc.;
- ch = chain(s)
- dc = double crochet
- hdc = half double crochet
- sc = single crochet
- st(s) = stitch(es)
- ( ) = work directions in parentheses into same st
- [ ] = work directions in brackets the number of times specified
- *= repeat whatever follows the * as indicated
Your Recently Viewed Projects
Thanks for your comment. Don't forget to share!
Delphine Bryant
Oct 03, 2018
There are so many holidays to recognize through the year and I attempt to put something on my desk at work just to recognize everyone and there traditions. A cozy has been my way of doing just that. Now I can have one for the Day of the Dead celebration as well.
Morehouse17
Sep 30, 2018
These are cute. They are very colorful and would make a great addition to any Day of the Dead celebration. The skulls could be created and used elsewhere for decoration. If I hurry I may be able to complete at lease one of these in time to decorate.
princess6860504
Feb 27, 2017
I love these kinds of home decor crochet projects because they are so unexpected. These are really not just for Halloween in my book of rules. An idea I have, if you don't favor the classic Day of the Dead colorful theme- I bet you could do them in a tonal way. Choose black, white and gray. Chose red, black and gray. It will turn them into a slightly more modern take on the Day of the Dead decor. I wonder how long a pair of these take to make? Only one way to find out...
Cheryl Y
Oct 01, 2016
I love these Day of the Dead Crochet Jar Cozies! They are so cute and easy to make! The crochet pattern is easy to read and follow. My Grand son will love these cozies and I will be making them for him. I love the colors too, I wish there was a glow in the dark yarn to make these pattern out of.. That would be great! But I'll just do them with the yarns called for. Thank you so much for these free crochet patterns.
Report Inappropriate Comment
Are you sure you would like to report this comment? It will be flagged for our moderators to take action.
Thank you for taking the time to improve the content on our site.