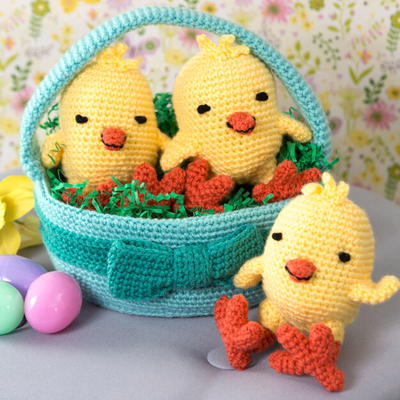
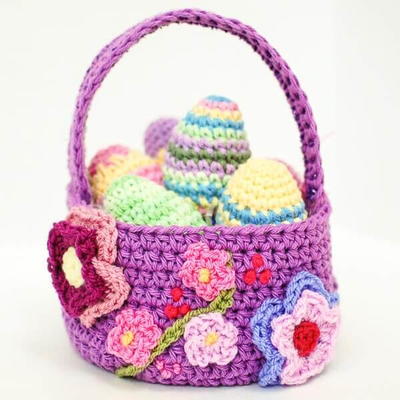
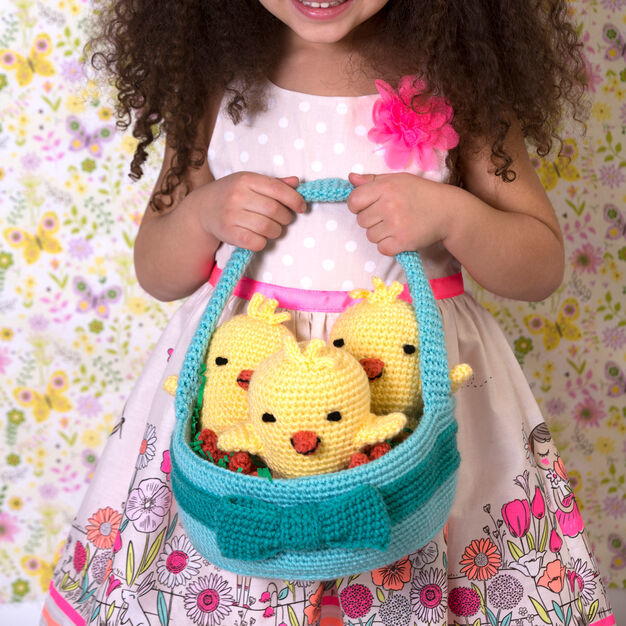
Just Hatched Easter Basket

Crochet your way to the most memorable Easter ever with the Just Hatched Easter Basket. This adorable pattern has instructions for sweet little amigurumi chicks and a beautiful Easter basket with a bow. You can work up just the basket, a single chick, or go crochet crazy and make three cute little chicks to peek out of your basket. Any little chickadee in your life would be delighted to use this darling crochet Easter basket, and to have the adorable little chicks in their basket. This colorful home decor crochet project also makes a playful decoration to display through spring.

Crochet Hook4.5 mm hook
Yarn Weight(4) Medium Weight/Worsted Weight and Aran (16-20 stitches to 4 inches)
Crochet Gauge17½ sts = 4” (10 cm); 16 rows = 4” (10 cm) in single crochet. Rounds 1–6 = 2½” (6.5 cm) around. CHECK YOUR GAUGE. Use any size hook to obtain the gauge.
Finished SizeEach chick measures about 5½” (14 cm) tall, not including tuft on top of head. Basket measures about 7½” (19 cm) around and 3½” (9 cm) tall, not including handle.
Materials List
-
RED HEART® Super Saver®: 1 skein each of
- 235 Lemon A
- 726 Coral B
- 505 Aruba Sea C
- 3862 Jade D
- Small amount of 312 Black E
- 4.5 mm [US 7] crochet hook
- Stitch markers
- Stuffing
- Sewing pins
- Yarn needle
Instructions
Special Stitch
sc2tog = [Draw up a loop in next st] twice, yarn over and draw through all 3 loops on hook.
Special Technique
Adjustable-ring = Wrap yarn into a ring, ensuring that the tail falls behind the working yarn. Grip ring and tail between middle finger and thumb. Insert hook through center of ring, yarn over (with working yarn) and draw up a loop. Work stitches of first round in the ring. After the first round of stitches is worked, pull gently on tail to tighten ring.
Abbreviations
- A, B, C, D, and E = Color A, Color B, Color C, Color D, and Color E
- ch = chain
- dc = double crochet
- hdc = half double crochet
- sc = single crochet
- st(s) = stitch (es)
- () = work directions in parentheses into same st
- [] = work directions in brackets the number of times specified
- * = repeat whatever follows the * as indicated.
Notes
- Gauge is not critical for this project. Work tightly so the pieces are firm and the stuffing does not show between stitches.
- To change color, work last stitch of old color to last yarn over. Yarn over with new color and draw through all loops on hook to complete stitch. Proceed with new color. Fasten off old color.
Chick (Make 3)
Head/Body
Beginning at top of head, with A, make an adjustable ring.
-
Round 1 (right side): Ch 1, 6 sc in ring—6 sc. Do not join, work in continuous rounds (spiral). Pull gently on tail to tighten ring.
Place a marker for beginning of round. Move marker up as each round is completed. -
Round 2: Work 2 sc in each sc around—12 sc.
-
Round 3: [2 sc in next sc, sc in next sc] 6 times—18 sc.
-
Round 4: [Sc in next sc, 2 sc in next sc, sc in next sc] 6 times—24 sc.
-
Round 5: [Sc in next 3 sc, 2 sc in next sc] 6 times—30 sc.
-
Round 6: [Sc in next 2 sc, 2 sc in next sc, sc in next 2 sc] 6 times—36 sc
-
Round 7: [Sc in next 11 sc, 2 sc in next sc] 3 times—39 sc
-
Round 8: [Sc in next 6 sc, 2 sc in next sc, sc in next 6 sc] 3 times—42 sc.
-
Rounds 9–18: Sc in each sc around.
-
Round 19: Sc in next 14 sc, ch 14, skip next 14 sc (for tail opening), sc in last 14 sc—28 sc and 1 ch-14 space.
-
Round 20: Sc in each sc and ch around—42 sc.
-
Round 21: [Sc in next 5 sc, sc2tog] 6
times—36 sc. -
Round 22: [Sc in next 2 sc, sc2tog, sc in next 2 sc] 6 times—30 sc.
-
Round 23: [Sc2tog, sc in next 3 sc] 6 times—24 sc.
-
Round 24: [Sc in next sc, sc2tog, sc in next sc] 6 times—18 sc.
-
Round 25: [Sc in next sc, sc2tog] 6
times—12 sc. -
Round 26: [Sc2tog] 6 times—6 sc.
Fasten off, leaving a long tail. With yarn needle, thread tail through the front loop of each of the remaining 6 stitches and pull tight to close hole in bottom of Chick.
Tail
-
Round 1: With right side facing, draw up a loop of A in first skipped sc of tail opening, ch 1, sc in same sc, sc in next 13 skipped sc; rotate piece to work across opposite side of tail opening ch, sc in each of the 14 ch; do not join, work in continuous rounds (spiral)—28 sc.
-
Round 2: *[Sc2tog] twice, sc in next 6 sc, [sc2tog] twice; repeat from * once more—20 sc.
Do not fasten off. Stuff Chick firmly and continue to add stuffing to Chick as you work. Stuff the body and head quite firmly, but stuff the tail only lightly so that it keeps a flat-ish shape. -
Round 3: [Sc2tog, sc in next 6 sc, sc2tog] twice—16 sc.
-
Round 4: [Sc2tog, sc in next 4 sc, sc2tog] twice—12 sc.
-
Round 5: [Sc2tog, sc in next 2 sc, sc2tog] twice—8 sc.
-
Round 6: Sc in each sc around.
Fasten off, leaving a long tail. With yarn needle, thread tail through the front loop of each of the remaining 8 stitches and pull tight to close hole in tail of Chick.
Wings (Make 2 for each Chick)
With A, make an adjustable ring.
-
Round 1 (right side): Ch 1, work 6 sc in ring—6 sc. Do not join, work in continuous rounds (spiral). Pull gently on tail to tighten ring. Place a marker for beginning of round. Move marker up as each round is completed.
-
Round 2: [2 sc in next sc, sc in next 2 sc] twice—8 sc.
-
Round 3: [2 sc in next sc, sc in next 3 sc] twice—10 sc.
-
Round 4: [2 sc in next sc, sc in next 4 sc] twice—12 sc.
-
Round 5: [2 sc in next sc, sc in next 5 sc] twice—14 sc.
-
Round 6: [2 sc in next sc, sc in next 6 sc] twice—16 sc.
Slip st in next st. Fasten off, leaving a long tail for sewing wing to body.
Legs (make 2 for each Chick)
Beginning at top of leg, with A, leaving a long beginning tail for sewing, ch 12; taking care not to twist ch, join with slip st in first ch to form a ring.
-
Round 1 (right side): Ch 1, beginning in same ch as join, sc in each ch around; join with slip st in first sc—12 sc.
-
Round 2: Ch 1, beginning in same sc as join, [sc2tog] 6 times; join with slip st in first sc—6 sc.
-
Round 3: Slip st in each sc around.
Notes: Keep the slip stitches a bit loose. This will make it easier to work the next round. On the following round work behind the round of slip stitches into the single crochet stitches of Round 2. The slip stitches in this round are only made as decoration. They will never be worked into.
Fasten off. -
Round 4: With right side facing and working behind the slip sts of Round 3, draw up a loop of B in any sc of Round 2, ch 1, beginning in same sc, sc in each sc around; join with slip st in first sc—6 sc.
-
Rounds 5–7: Ch 1, beginning in same sc as join, sc in each sc around; join with slip st in first sc.
Fasten off, leaving a long tail for sewing leg to foot.
Feet (make 2 for each Chick)
Beginning at heel, with B, make an adjustable ring.
-
Round 1 (right side): Ch 1, work 6 sc in ring—6 sc. Do not join, work in continuous rounds (spiral). Pull gently on tail to tighten ring. Place a marker for beginning of round. Move marker up as each round is completed.
-
Rounds 2–5: Sc in each sc around.
-
Round 6: Work 2 sc in each sc around—12 sc.
-
Round 7: [2 sc in next sc, sc in next sc] 6 times—18 sc.
-
First toe
Round 8 (first toe): Sc in next 6 sc, skip last 12 sc—6 sc. Note: The first stitch of the next round is worked into the first stitch of this round (to skip the last 12 sc of this round). This begins the first toe. Later, stitches will be worked into the skipped 12 sc to begin the other two toes.
Rounds 9 and 10: Sc in each sc around—6 sc.
Slip st in next sc. Fasten off, leaving a long tail -
Middle toe
Round 8: With right side facing, draw up a loop of B in first skipped sc of Round 7 following first toe, ch 1, beginning in same sc, sc in next 3 sc, skip next 6 sc, sc in last 3 skipped sc of Round 7—6 sc. Note: Leave the beginning yarn tail hanging on the outside of the piece. The beginning tail will be used later to sew the small hole between toes closed.
Rounds 9–11: Sc in each sc around.
Slip st in next sc. Fasten off, leaving a long tail. -
Third toe
Round 8: With right side facing, draw up a loop of B in first skipped sc of Round 7 following middle toe, ch 1, beginning in same sc, sc in each of the remaining 6 skipped sts—6 sc. Note: Leave the beginning yarn tail hanging on the outside of the piece. The beginning tail will be used later to sew the small hole between toes closed.
Rounds 9 and 10: Sc in each sc around. Slip st in next sc. Fasten off, leaving a long tail.
Using the back end of your crochet hook, or the eraser end of a pencil, push small amounts of stuffing down into the feet until they are fairly stiff. Although this doesn’t really change the appearance of the feet, it will make them sturdier and help keep the chick balanced on his feet.
With yarn needle, thread ending yarn tail from each toe through the front loop of each of the remaining 6 stitches and pull tight to close hole in toe. With yarn needle and beginning yarn tails, sew the small gaps between toes closed. Weave in ends.
Beak (Make 1 for each Chick)
With B, leaving a long beginning tail for sewing, ch 9.
-
Row 1: Dc in 3rd ch from hook (beginning ch does not count as a st), hdc in next ch, slip st in next 3 ch, hdc in next ch, dc in last ch.
Fasten off, leaving a long tail for sewing.
Fold the strip in half so that the middle slip stitch is at the fold. The middle slip stitch will be the tip of the beak. With yarn needle and one of the yarn tails whip stitch the side edges of the folded beak together so that it stays in this folded position. Set aside.
The other yarn tail will be used later to sew beak to head.
Tuft (Make 1 for each Chick)
With A, leaving a long beginning tail for sewing, ch 4.
-
Row 1: Slip st in 2nd ch from hook and in next 2 ch, ch 5, slip st in 2nd ch from hook and in next 3 ch; ch 6, slip st in 2nd ch from hook and in next 4 ch.
Fasten off, leaving a long tail for sewing tuft to top of head.
Finishing Chick
With B, sew the top of one foot to the bottom of each leg. The front of the leg should be lined up just behind Round 6 of the foot (this is where the first round of increases were made). Make sure that about 3 rounds of the heel of the foot stick out past the back of the leg.
Stuff the legs very firmly. Pin legs to the underside of body. They should be lined up with the center of the Chick’s underside, but placed outward (toward the sides) so that there is about ½–¾” (13–19mm) of space between the legs. With yarn needle and yarn tails, whipstitch around edge of legs to sew them to the underside of the Chick’s body. Pin Beak to center front of Chick and, with yarn needle and yarn tail, sew in place. Pin wings to sides of body (Note: Wings should not be stuffed; they should be flat). With yarn needle and yarn tails, sew wings to sides of body. With yarn needle and yarn tail, sew tuft to top of head, about ½” (13mm) forward from center.
With yarn needle and E, make a large French knot for each eye, and add some horizontal stitches along the sides of the beak to visually separate the top beak from the bottom beak.
Weave in all ends.
Basket
Beginning at bottom, with C, make an adjustable ring.
-
Round 1 (inside basket): Ch 1, work 6 sc in ring—6 sc. Do not join, work in continuous rounds (spiral). Pull gently on tail to tighten ring. Place a marker for beginning of round. Move marker up as each round is completed.
-
Round 2: Work 2 sc in each sc around—12 sc.
-
Round 3: [2 sc in next st, sc in next st] 6 times—18 sc.
-
Round 4: [Sc in next sc, 2 sc in next sc, sc in next sc] 6 times—24 sc.
-
Round 5: [Sc in next 3 sc, 2 sc in next sc] 6 times—30 sc.
-
Round 6: [Sc in next 2 sc, 2 sc in next sc, sc in next 2 sc] 6 times—36 sc.
-
Round 7: [Sc in next 5 sc, 2 sc in next sc] 6 times—42 sc.
-
Round 8: [Sc in next 2 sc, 2 sc in next sc, sc in next 4 sc] 6 times—48 sc.
-
Round 9: [Sc in next sc, 2 sc in next sc, sc in next 6 sc] 6 times—54 sc.
-
Round 10: [Sc in next 6 sc, 2 sc in next sc, sc in next 2 sc] 6 times—60 sc.
-
Round 11: [Sc in next 3 sc, 2 sc in next sc, sc in next 6 sc] 6 times—66 sc.
-
Round 12: [Sc in next 10 sc, 2 sc in next sc] 6 times—72 sc.
-
Round 13: [Sc in next 6 sc, 2 sc in next sc, sc in next 5 sc] 6 times—78 sc.
-
Round 14: [Sc in next 2 sc, 2 sc in next sc, sc in next 10 sc] 6 times—84 sc.
-
Round 15: [Sc in next 10 sc, 2 sc in next sc, sc in next 3 sc] 6 times—90 sc.
-
Round 16: [Sc in next 7 sc, 2 sc in next sc, sc in next 7 sc] 6 times—96 sc.
-
Round 17: [Sc in next sc, 2 sc in next sc, sc in next 14 sc] 6 times—102 sc.
-
Round 18: [Sc in next 16 sc, 2 sc in next sc] 6 times—108 sc.
-
Round 19: Working in front loops only, sc in each sc around.
-
Rounds 20–35: Sc in each sc around.
-
Round 36: [2 sc in next sc, sc in next 17 sc] 6 times—114 sc.
-
Round 37: Working in back loops only, sc in next 26 sc, ch 5, skip next 5 sc (for handle opening), sc in next 52 sc, ch 5, skip next 5 sc (for 2nd handle opening), sc in next 26 sc—104 sc and 2 ch-5 spaces.
-
Round 38: Sc in each sc and ch around—114 sc.
-
Rounds 39 and 40: Sc in each sc around; change to D in last st of Round 40.
-
Round 41: With D, slip st in each st around. Notes: Keep the slip stitches a bit loose. This will make it easier to work the next round.
On the following round work behind the round of slip stitches into the single crochet stitches of Round 40. The slip stitches in this round are only made as decoration. They will never be worked into. -
Round 42: Working behind the slip sts of Round 41, sc in each sc around.
-
Rounds 43–45: Sc in each sc around.
-
Round 46: Slip st in each st around; change to C in last st.
-
Round 47: With C and working behind the slip sts of Round 46, sc in each sc around.
-
Rounds 48–53: Sc in each sc around.
-
Round 54: [Sc2tog, sc in next 17 sc] 6 times—108 sc.
Hold Basket so that wrong side of the single crochet stitches show on the outside of the Basket. Fold top of Basket to outside, along Round 37 (this was the round where you worked into the back loop only) so that the right side of the single crochet stitches show on the outside of the Basket. Position Round 54 directly in front of Round 19 (where you worked into the front loop only). -
Round 55: Crochet the two layers together as follows: *insert hook through back loop of next st of Round 54 and then through the unused loop of corresponding st in Round 18 directly, yarn over and draw the loop through all loops on hook (slip st made); repeat from * all the way around basket—108 sts.
Fasten off.
Handle
With C, leaving a long beginning tail for sewing, ch 10; taking care not to twist ch, join with slip st in first ch to form a ring.
-
Round 1: Ch 1, sc in same ch as join and in each ch around—10 sc. Do not join, work in continuous rounds (spiral). Place a marker for beginning of round. Move marker up as each round is completed.
-
Round 2: Sc in each sc around.
Repeat Round 2 until piece measures about 14” (35.5 cm) long.
Fasten off, leaving a long tail for sewing.
Bow
With D, ch 40; taking care not to twist ch, join with slip st in first ch to form a ring.
-
Round 1: Ch 1, sc in same ch as join and in each ch around—40 sc. Do not join, work in continuous rounds (spiral). Place a marker for beginning of round. Move marker up as each round is completed.
-
Round 2: Sc in front loops only of the next 2 sc, place a marker in the unused back loop of the first sc of this round, sc in both loops of the next 16 sc, sc in front loops only of the next 4 sc, sc in both loops of the next 16 sc, sc in front loops only of the next 2 sc.
-
Rounds 3–5: Sc in each sc around.
Remove beginning of round marker. Sc in next sc to establish a new beginning of round and replace the marker. The first stitch of Round 6 is now the first stitch of the rounds. -
Round 6: Beginning with the next st of Round 5 and the marked unused back loop of Round 1, *insert hook through next st and then from top to bottom through the next unused back loop of Round 1, yarn over and draw loop back through the unused loop and the stitch (2 loops remain on hook), yarn over and draw through both loops on hoop (first connecting sc made); repeat from * once more, sc in next 16 sts of Round 5, work connecting sc in next 4 sc and the corresponding unworked back loops of Round 1, sc in next 16 sc, work connecting sc in next 2 sc and the corresponding unworked back loops of
Round 1. -
Round 7: Sc in each sc around.
Fasten off, leaving a long tail for sewing. With yarn needle and yarn tails, sew the front and back (narrow sections) of the center of bow together. Weave in ends.
Bow Center
With D, leaving a long beginning tail for sewing, ch 11.
-
Row 1: Sc in 2nd ch from hook and in each ch across, turn—10 sc.
-
Rows 2–5: Ch 1, sc in each sc across.
Fasten off. Wrap the bow center around the center of the bow. With yarn needle and yarn tails, sew the ends of the bow center together. Sew a few stitches through all thicknesses of bow and bow center to secure bow center in place around bow.
Finishing Basket
With yarn needle and yarn tails, sew one end of handle to each of the openings on the sides of Basket.
With yarn needle and yarn tails, sew bow to front of Basket, covering up the jog where the yarn color was changed. Weave in ends.
Up Next:
30+ Free Easter Crochet Patterns
Read NextCrochet Easter Basket