This project was submitted by one of our readers, just like you.
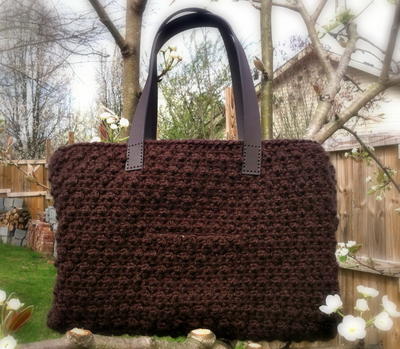
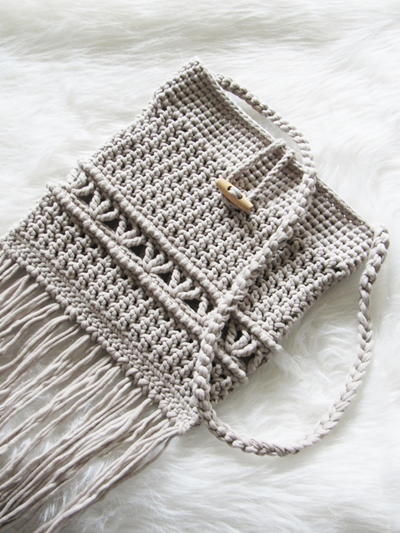
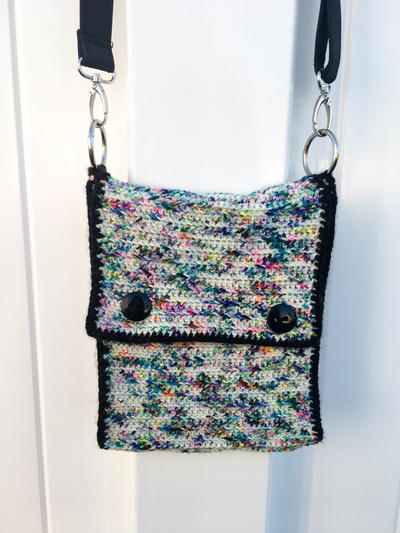
Wayside Knapsack

Wayside Knapsack
"Sturdy, Insta-worthy, Beautiful, Functional! This knapsack is doable to crochet in a day! Perfect for children and adults alike. Great as a gift too! Whom do you want to make a knapsack for today? If you are stuck on this pattern, there is a clear, step-by-step video tutorial on how to crochet this knapsack on my Youtube Channel, Cobalt Crochet Tutorials. Happy Crocheting! Please tag me @cobalt_crochet_ and use #waysideknapsack . I'd LOVE to see your finished, handmade, beautiful creation!!"
NotesI hope you love your Wayside Knapsack! Check out the other purses in this same collection -- The Seaside Satchel and the Hillside Handbag -- by going to my Youtube Channel, Cobalt Crochet Tutorials.
I would really love to see your finished knapsack. Please post on Instagram, tagging me @cobalt_crochet_ as the designer and using #waysideknapsack .

Crochet HookH/8 or 5 mm hook
Yarn Weight(4) Medium Weight/Worsted Weight and Aran (16-20 stitches to 4 inches)
Crochet Gauge12 Dc x 7 rows = 4” x 4”. Gauge does not count beg Ch 2.
Finished SizeBag measures 8 1/2" wide by 12" tall (not including strap or cord)
Materials List
- 5.00 mm crochet hook, or size needed to obtain the gauge
- About 300 yds of worsted weight, category 4 yarn. I recommend a durable, more economic yarn. This will work WAY better than silky yarns.
Notes
BEFORE you make the main bag part, you’ll make the shoulder pad that slides over the strap.
Abbreviations:
- Ch = chain
- Hdc = half double crochet
- Sc = single crochet
- Sl st = slip stitch
- Dc = double crochet
- Mb = mini bean stitch
- Ea = each
- Sp = space
- St = stitch
Special Stitches:
Mini Bean Stitch (Mb)—insert hook into stitch, yarn over, pull up a loop, yo, insert hook into same stitch, yo, pull up a loop, (4 loops on hook), then yarn over and pull through all 4 loops on hook. Chain 1.
US standard crochet terms used.
Beginning chains do NOT count as a stitch. When working rows/rounds, do not work your first stitch in the same space as the beginning chains.
Shoulder Pad (2 pieces stitched together)
First piece:
- Slip knot, ch 8.
- Row 1: 1 Hdc in 2nd ch from hook, 1 Hdc in ea ch across. Ch 1, Turn. (7 Hdc)
- Row 2: 1 Hdc in ea Hdc across. Chain 1, turn. (7 Hdc)
- Rep Row 2 until the shoulder pad is about 10 inches. DO NOT FASTEN OFF or turn in the last row worked.
Border:
- Round 1: Work down the left side of the rectangle. *Sc evenly across the side, with 3 Sc in the corner*, repeat from *-* around. Sl st to first Sc of the round. Fasten off.
Second piece:
- Slip knot, ch 6.
- Row 1: 1 Hdc in 2nd ch from hook, 1 Hdc in ea ch across. Ch 1, turn. (5 Hdc)
- Row 2: Ch 1, 1 Hdc in ea Hdc across. Ch 1, turn. (5 Hdc)
- Repeat row 2 until the piece measures 10 inches (or the same length as the first rectangle). Fasten off leaving a very long tail (25 inches) for seaming.
- Center the second piece on top of the first and seam up the long sides. Leave the short sides of the smaller rectangle UNATTACHED to the main piece. Stitch just under the sc edge of the larger piece.
Weave in ends.
Knapsack Pattern
-
Knapsack Pattern:
Make a slip knot and Ch 11. -
Row 1: Hdc in 2nd ch and in each chain across. Ch 1, turn. (10 Hdcs)
-
Row 2: 1 Hdc in ea hdc across. Ch 1, turn. (10 Hdcs)
-
Repeat Row 2 until the rectangle measures 5 inches. Do not turn your work on the last row worked.
-
Round 1: *Sc evenly across the side of the rectangle. 3 Sc at the corner*, repeat from *-* around. Sl st to the first Sc to join. Ch 1, do not turn.
The body of the bag is now being built and crocheted in the round. Do not turn work until noted. -
Round 2: 1 Hdc in each Sc from the previous round. (Do not increase at the corners). Sl st to first Hdc to join. Ch 2, do not turn.
-
Round 3: 1 Dc in ea Hdc around. Sl st to first Dc to join. Ch 2.
-
Round 4: 1 Dc in ea Dc around. Sl st to first Dc to join. Ch 2.
-
Repeat Round 4 until the height of the rows of Dc (when measuring do not include the Hdc base, etc.) is about 9 inches. Do not Ch 2 at the end of your last round. Lay bag flat, as shown in the video tutorial (see the link to this pattern on this page).
-
After you’ve worked the last round of Dcs, your working loop of yarn should be near the edge of the bag when it is laid flat as shown. Slip stitch in either direction until your working loop of yarn is slightly BEHIND that same edge/side of the bag. You’ll only need a few sl sts. You are staying on the same edge of the bag. Place a stitch marker at the equivalent spot just slightly behind the other edge/side of the bag. Then start working the flap.
-
Flap:
Row 1: Ch 2, 1 Dc in each stitch across until stitch marker (1 Dc in each/any sl sts). It is important to have an ODD amount of Dcs (not counting the Ch 2 at the beginning of the row). Ch 1, turn. -
Row 2: Mb in first Dc, *sk 1 Dc, Mb in next*, rep from * - * across. Turn. (There needs to be a Mb in the last stitch.)
-
Repeat Row 2 until desired flap length (about 5 inches).
-
The WS (underside) of the flap should NOT be facing you while you work the last flap row. If you need to add another row or take one away to make this happen, do so. Do not turn your work after the last row is completed.
-
Work down the side of the flap in even SCs. Sl st to the top round of Dcs. Don’t fasten off until otherwise noted. Make a Romanian Cord (see my tutorial for a Romanian cord on my Youtube Channel, Cobalt Crochet Tutorials) for the length that you want your crossbody strap (mine was 44 inches). Once you have your desired length of cord, THEN fasten off leaving a tail and slide the cord through the shoulder pad. Next, attach the cord to the other bottom corner of where the flap meets the rounds of Dcs. I attached the cord simply by tying the yarn end to the correct location.
-
Sl st new yarn to the same spot where you just attached the cord, then Sc evenly up the side of the flap. 3 Sc in corner, and 1 sc in ea Mb and in ea ch sp across the top of the flap. 3 sc in corner, sl st to first sc.
Fasten off.
Weave in all ends. -
First piece:
Slip knot, ch 8. -
Row 1: 1 Hdc in 2nd ch from hook, 1 Hdc in ea ch across. Ch 1, Turn. (7 Hdc)
-
Row 2: 1 Hdc in ea Hdc across. Chain 1, turn. (7 Hdc)
-
Rep Row 2 until the shoulder pad is about 10 inches. DO NOT FASTEN OFF or turn in the last row worked.
-
Border:
Round 1: Work down the left side of the rectangle. *Sc evenly across the side, with 3 Sc in the corner*, repeat from *-* around. Sl st to first Sc of the round. Fasten off. -
Second piece:
Slip knot, ch 6. -
Row 1: 1 Hdc in 2nd ch from hook, 1 Hdc in ea ch across. Ch 1, turn. (5 Hdc)
-
Row 2: Ch 1, 1 Hdc in ea Hdc across. Ch 1, turn. (5 Hdc)
-
Repeat row 2 until the piece measures 10 inches (or the same length as the first rectangle). Fasten off leaving a very long tail (25 inches) for seaming.
-
Center the second piece on top of the first and seam up the long sides. Leave the short sides of the smaller rectangle UNATTACHED to the main piece. Stitch just under the sc edge of the larger piece.
Weave in ends. -
Copyright Cobalt Crochet
Instagram: cobalt_crochet_
Youtube: Cobalt Crochet Tutorials

Read NextWildflower Shoulder Crochet Bag